Do you have a question about the BREDABEDS URBAN MURPHY and is the answer not in the manual?
Recommends two people for assembly due to heavy parts.
Advises allocating enough time for assembly, estimating 4-7 hours.
Suggests scanning QR code for assembly videos to supplement booklet.
Addresses missing/damaged parts, extra hardware, and illustration discrepancies.
Recommends suitable mattress types and weight/thickness limits.
Addresses doors hitting kick, top shelf, and legs slipping out.
Covers uneven face panels and beds not staying closed/open.
Addresses no wood studs, baseboard issues, stud limitations, and hutch hinge adjustments.
Insert male/female screws from Hardware Card #20.
Insert cam screws from hardware package #1 into marked holes.
Insert cam screws into specific holes on Bed Left Side and Right Hutch Left Side.
Attach mechanism to side panels using bolts and nylock nuts from Hardware Card #2.
Insert cam screws and cam fittings into various panels. Includes a safety checklist.
Attach Hutch Top Nailer onto Hutch Top Shelf and tighten cams.
Assemble Hutch Left Side, Top Assembly, Mid Shelf, Bottom Shelf, and Toe Kick.
Attach Bed Cabinet Top Nailer to Bed Cabinet Top and tighten cams.
Position Bed Cabinet Left Side and attach Top Assembly and Bed Cabinet Toe Kick.
Slide hutch into place and tighten all cam fittings.
Attach Headboard and Bed Cabinet Bottom Nailer and tighten cams.
Stand the Bed Cabinet upright against the wall and perform a safety checklist.
Level the Bed Cabinet by placing shims under the sides. Plumb the bed by checking vertical alignment.
Use a stud finder to locate and mark stud centers along the Bed Cabinet Top Nailer.
Pre-drill stud centers on the Bed Cabinet Top Nailer and countersink holes.
Insert long screws through the Top Nailer into stud centers, securing it firmly to the wall.
Attach the Top Nailer Cover over the Top Nailer, securing it with screws. Includes safety checklist.
Lay doors face down, pre-drill handle holes away from cabinet, mark screw-free zones.
Attach metal frame pieces to bed doors, including corner brackets, leg stops, and panel savers.
Position frame centered on doors, attach with screws, ensuring 1/2" gap at mechanism end.
Position steel support stiffeners according to dimensions and attach with screws.
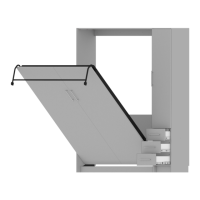
Insert springs into mechanism slots according to bed size and hole numbers.
Slide steel tube over mechanism arm to engage arm lock. Includes safety checklist.
Insert round Allen head bolts and Nylock nuts for positioning guide.
Insert Hex head bolts and Nylock nuts into Hole #3 for initial attachment.
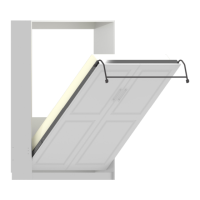
Stand Bed Face Panel, align bolts in mechanism arms, and secure with bolts and nuts.
Attach handles to the Bed Face Panel using provided screws.
Install the mattress in the frame on top of support stiffeners.
Install legs using large washers and Nylock nuts, ensuring slight friction.
Install leg connector rod between legs and secure with bolts and washers.
Optional: Attach mattress strap for securing mattress if needed.
Align the bed by shifting the bottom left or right to ensure equal clearance.
Check bed tension with mattress in place; adjust springs or use alternative methods.
Lubricate pivot points with spray if beds squeak, then align and secure mechanism cover.
Detach drawer slides into two parts, locating the plastic release lever.
Attach outer drawer slides to the Hutch Left/Right Sides at specified locations.
Insert cam screws and cam fittings into drawer front pieces.
Assemble drawer box by attaching sides, bottom, and back to the drawer front.
Attach inner drawer slides to the bottom of the drawer box and install night shelf.
Attach hinge plates to the Hutch Right Side panel at specified distances.
Attach hutch doors to hinge plates and secure with screws, then attach door handles.
Position adjustable shelves using shelf pins from hardware package #11.
Rotate Bed Face Panel outward to re-engage mechanism Arm Locks.
Remove bolts from Hole #2 and loosen bolts from Hole #3 to detach.
Remove Top Nailer and Bottom Nailer screws, then loosen cam locks to dismantle.
| Brand | BREDABEDS |
|---|---|
| Model | URBAN MURPHY |
| Category | Indoor Furnishing |
| Language | English |