Do you have a question about the BREDABEDS MURPHY BED and is the answer not in the manual?
Recommendations for lifting heavy objects and using assistance during assembly.
Guidance on allocating adequate time for assembly to avoid distraction.
Information on accessing video guides for assembly via QR code or URL.
Addresses issues where the bed doors interfere with the toe kick during opening.
Explains why the bed face panel might fall into the cabinet and hit the wall.
Details common causes and solutions for the bed legs slipping from their disks.
Lists and illustrates the various panel components of the bed cabinet.
Lists all necessary tools for assembly.
Explains the function and proper use of cam fittings in assembly.
Guidelines for clearing space and organizing parts for assembly.
Inserting cam screws into bed cabinet side panels.
Inserting cam fittings and screws into top, nailer, and toe kick panels.
Critically aligning and attaching the bed cabinet top nailer.
Positioning the bed cabinet right side and toe kick panels.
Sliding and securing the bed cabinet left side panel.
Securing the headboard and bottom nailer to the cabinet.
Standing the assembled bed cabinet upright against the wall.
Verifying critical steps and ensuring proper cam fitting installation.
Hooking springs onto the stationary and movable mechanism parts.
Securing the mechanism assembly to the inside face of the side panel.
Ensuring the bed cabinet is level and plumb before wall attachment.
Using a stud finder to mark the exact center of wall studs.
Pre-drilling holes in the top nailer at stud centers.
Firmly attaching the bed cabinet top nailer to the wall studs.
Laying out doors and marking screw-free zones.
Attaching leg end and mechanism end corner brackets.
Critical alignment of the frame onto the bed face panel doors.
Positioning and attaching middle and end support stiffeners.
Verifying secure wall attachment, screws, springs, and leg stops.
Sliding PVC tube over arm to engage the arm lock.
Inserting bolts for positioning guide on the mechanism end.
Inserting and finger-tightening bolts for the mechanism end.
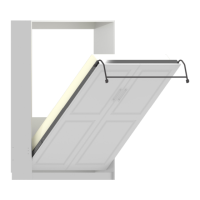
Attaching face panel to mechanism arms using bolts and nuts.
Confirming bolt security and releasing mechanism arm locks.
Attaching handles to the pre-drilled holes on the bed face panel.
Installing leg assemblies using washers and nuts.
Connecting the legs with the leg connector rod.
Placing the mattress and preparing for spring tension adjustment.
Attaching optional Velcro straps for securing mattress and bedding.
Final leveling and attaching the bed cabinet bottom nailer.
Adjusting spring tension with the mattress in place for proper operation.
Lubricating pivot points to prevent squeaking during operation.
Removing labels, cleaning parts, and storing instructions.
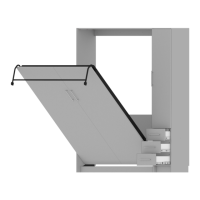
Rotating the face panel to re-engage the mechanism arm locks.
Removing bolts from the mechanism arms to detach the face panel.
Removing cabinet nailers, loosening cam locks, and taking apart panels.
| Brand | BREDABEDS |
|---|---|
| Model | MURPHY BED |
| Category | Indoor Furnishing |
| Language | English |