31
Chapter 7: Final adjustment for the Bed Cabinet and springs.
Chapter 7: Final adjustment for the
Bed Cabinet and springs.
REQUIRED TOOLS
• Cordless Drill with #2 Phillips
• 1/8” Drill Bit
• Countersink (Or 3/8” Drill Bit)
• Stud Finder or Tape Measure
Check that the Bed Cabinet is level and square so the Bed
Face Panel has equal clearance of the Bed Cabinet, top to
bottom on the left and right sides. If the Bed Cabinet is
leaning to one side, nudge it at the oor level. E.g., if there is
a wider gap along the top-left and bottom-right sides, move
the bottom of the Bed Cabinet to the left to equalize the side
reveals. If there is a wider gap along the bottom-left and top-right sides, move the
bottom to the right.
Once the bed is level and square, you can now attach the “Bed Cabinet Bottom
Nailer” in the same fashion as the top was previously attached. Two screws is
sucient, one on the far left and right stud locations.
STEP 1
TIP: If the bottom of the cabinet can’t be moved side-to-side (e.g. the bed is on
carpet), you can rst try sliding the bed on the provided wood shims. If that doesn’t
work you can adjust the top by rst removing the Bed Face Panel and then remove
the Bed Cabinet Top Nailer from the wall. Prior to doing this, measure how far and in
what direction the bed cabinet needs to shift in order to achieve alignment.
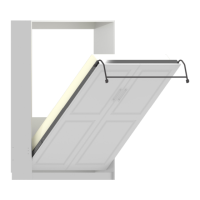
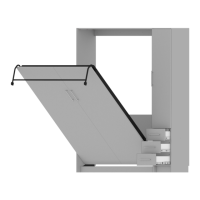
TO REMOVE BED FACE PANEL: Rotate the Bed Face Panel outward in order to
re-engage the mechanism arm locks. Once engaged, remove the bolts
in Hole #2 and loosen bolts in Hole #3. Lift the Bed Face Panel o the
mechanism arms. This is the reverse of the procedure done in Chapter 5.
Review Chapter 8, Steps 1 & 2 for a more detailed explanation of this procedure.
If you have any question, contact us (phone: 1-855-466-4781, email: service@bredabeds.com
or live chat: https://bredabeds.com) before doing anything.
NEVER REMOVE THE SCREWS IN “BED CABINET TOP NAILER”
FROM THE WALL WITHOUT FIRST REMOVING THE BED FACE PANEL.
THE BED CABINET WILL COLLAPSE OTHERWISE.
REQUIRED HARDWARE
• Hardware Card #2
• Hardware Package #8