5 5
6 6
7 7
8 8
Thumbturn Assembly
Thumbturn
(S3)
Conjunto de la mariposa de cierre
Mariposa de cierre
b
a
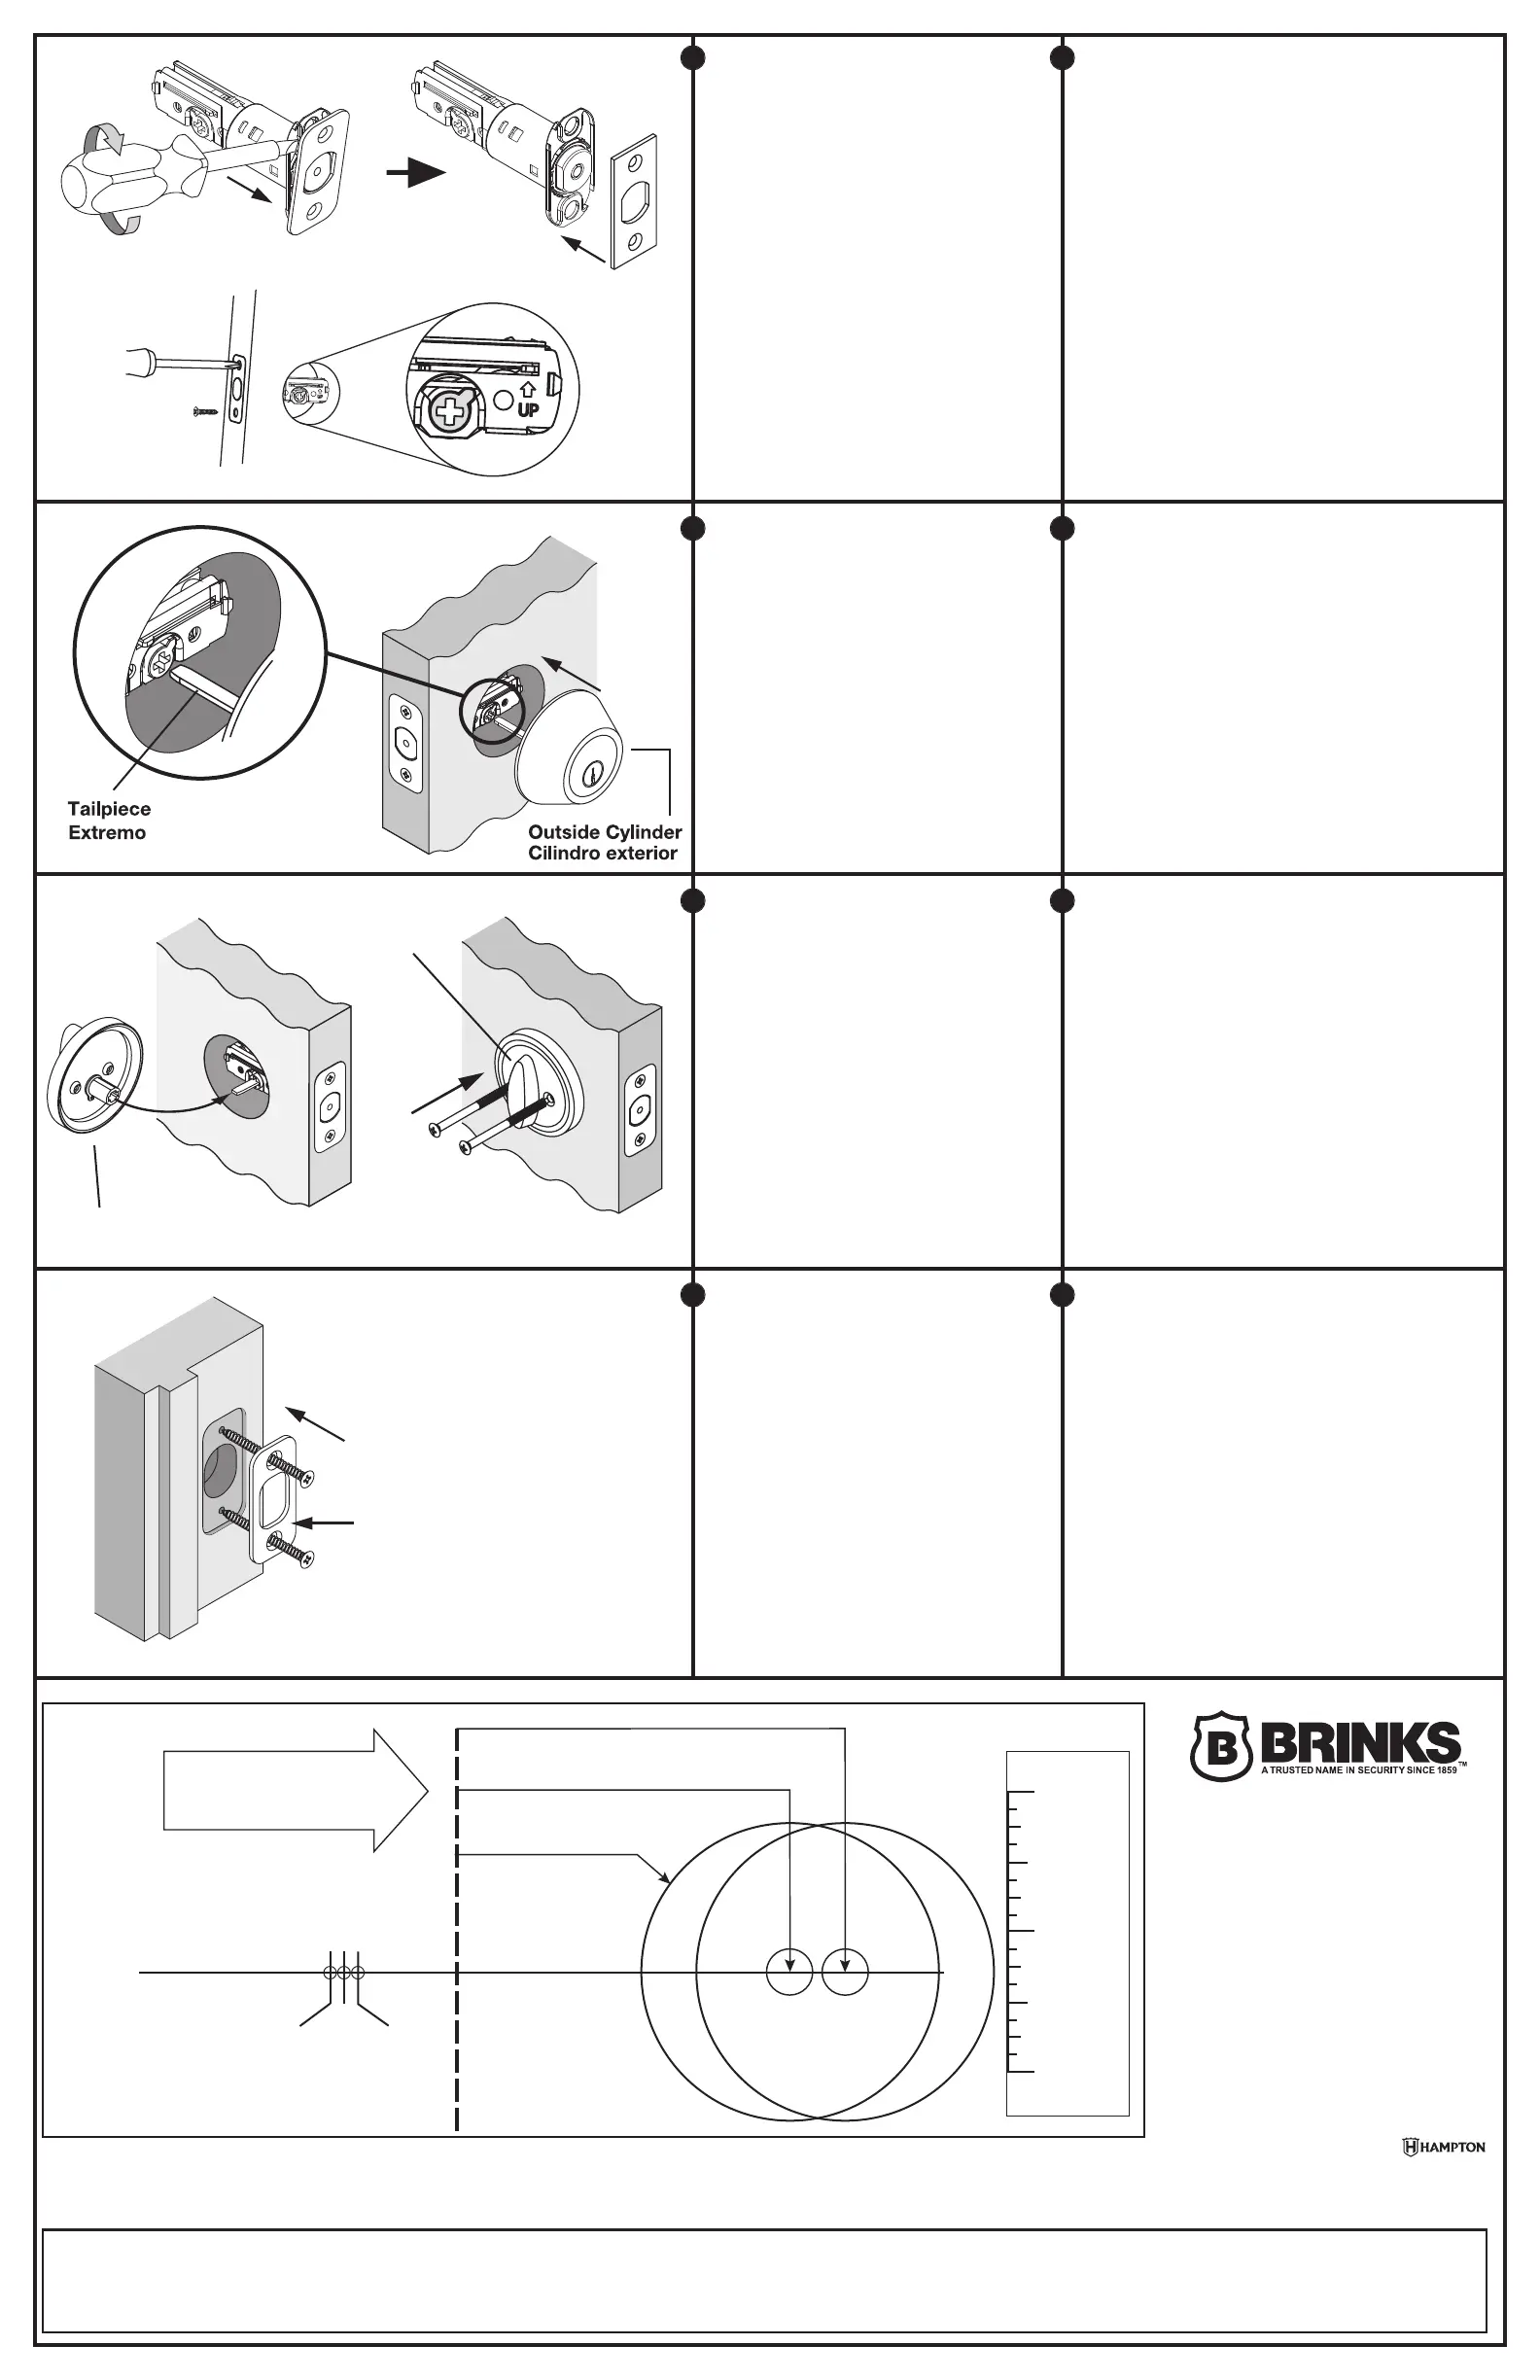
Install latch into the one inch hole in the edge of the
door in the UP position as marked on the latch with the
slotted cam at the bottom.
Insert two (S1) Latch Screws through the holes in the
faceplate and tighten rmly
The latch has a round corner faceplate that will t
most cutouts in the door edge.
Optional: You can replace the latch faceplate with a
square corner faceplate if it is a better match with the
cutout in your door. Remove the existing faceplate
using a athead screwdriver.
Select Faceplate and Install Latch
Orient the tailpiece of the cylinder in a horizontal
orientation.
Insert the tailpiece through the cam in the latch and
push the Outside Cylinder Housing Assembly until it
stops against the door.
Make sure the deadbolt latch bolt is retracted.
Install Outside Cylinder Housing Assembly
Insert the two (S3) Machine Screws through the holes
in the Thumbturn Assembly, engaging the threaded
holes in the Outside Cylinder, and tighten rmly.
Orient the Thumbturn in a vertical position and slide
the Thumbturn Assembly onto the tailpiece of the
Outside Cylinder and push until it is against the door.
Install Thumbturn Assembly
Insert two (S2) Strike Plate Screws through the holes
in the Strike Plate and tighten rmly.
Place the Strike Plate in the prepared area in the door
jamb. Make sure that the Strike Plate is positioned to
receive the bolt from the Deadbolt Latch when
extended.
Install Strike Plate
Strike Plate
Tailpiece
TEMPLATE
Fold on dotted line and t on door edge
Drill a 1" (25.4mm) hole at center of door edge
1-3/4"
1-9/16"
1-3/8"
For backset 2-3/4" (70mm)
For backset 2-3/8" (60mm)
Drill a 2-1/8" (54mm) hole
(S2)
Outside Cylinder
(S1)
Seleccione la placa frontal e instale el cerrojo
a.
b.
c.
a.
b.
c.
Instale el conjunto de la carcasa del cilindro exterior
a.
b.
c.
a.
b.
c.
Instale el Conjunto de mariposa de cierre
a.
b.
a.
b.
Para instalar la Placa hembra del cerrojo
a.
b.
a.
b.
Placa de la hembra del cerrojo
Extremo
Cilindro exterior
PLANTILLA
Doble a lo largo de la línea punteada y
coloque sobre el borde de la puerta
Perfore un agujero de 25.4 mm (1”) en el centro del
borde o canto de la puerta
Para una distancia o “entrada” de 70 mm (2-3/4”)
Para una distancia o “entrada” de 60 mm (2-3/8”)
Perfore un agujero
de 54 mm (2-1/8”)
45mm
40mm
35mm
Instale el cerrojo en el oricio de una pulgada (2.54 cm) en el borde
de la puerta en la posición hacia arriba (up) como se indica, con la
leva ranurada en la parte inferior.
Inserte dos Tornillos (S1) del cerrojo a través de los oricios en la
placa frontal y apriételos rmemente.
El cerrojo tiene una placa frontal con esquinas redondas que se
ajusta a la mayoría de los recortes en el borde de la puerta.
Opcional: Se puede reemplazar la placa frontal del cerrojo con una
placa frontal de esquinas cuadradas si corresponde mejor con el
recorte de su puerta. Retire la placa frontal existente utilizando un
desarmador plano.
Orientar el extremo del cilindro a la posición horizontal.
Inserte el extremo a través de la leva en el cerrojo y empuje el
conjunto de la carcasa del cilindro exterior hasta que se detenga
contra la puerta.
Asegúrese que el Cerrojo de pasador deslizante está retraído.
Inserte los dos tornillos para metal (S3) a través de los agujeros en
el conjunto de la mariposa de cierre, hasta que entren en los
agujeros del cilindro exterior, y apriételos rmemente.
Oriente la mariposa de cierre a la posición vertical y deslice el
conjunto de la mariposa de cierre sobre el extremo del cilindro
exterior y empuje hasta que quede contra la puerta.
Inserte dos Tornillos (S2) de la Placa hembra del cerrojo a través de
los agujeros en la Placa hembra del cerrojo y apriételos
rmemente.
Coloque la Placa hembra del cerrojo en el área preparada en el
marco o jamba de la puerta. Asegúrese que la Placa hembra del
cerrojo esta colocada para recibir el pasador del Cerrojo de
pasador deslizante al extenderse dicho pasador.
C
L
C
L
C
L
a
b
c
a
b
50 Icon, Foothill Ranch, CA 92610-3000 USA
1-800-562-5625 • www.hamptonproducts.com
©2022 Hampton Products International Corp.
999-00439 REVA 04/22
1 20
WARNING: IF THIS RULER DOES NOT MEASURE EXACTLY,
DO NOT USE THIS TEMPLATE.
ADVERTENCIA: SI ESTA REGLA NO MIDE CON PRECISIÓN,
NO UTILICE ESTA PLANTILLA.
BRINKS A TRUSTED NAME IN SECURITY SINCE 1859 and all related logos
are trademarks or registered trademarks of Brink’s Network, Inc, and are
used with permission.
BRINKS A TRUSTED NAME IN SECURITY SINCE 1859 y todos los logotipos
relacionados son marcas comerciales o marcas registradas de
Brink's Network, Inc. y son utilizados con permiso.
999-00439
brinkslocks.com
c
LIMITED LIFETIME WARRANTY - For warranty details and to make a warranty claim for repair or replacement, please visit www.hampton.care or contact Hampton Care at 1-800-562-5625. Return of defective product and receipt may be
required for warranty claims.
GARANTÍA LIMITADA DE POR VIDA – Para obtener detalles de la garantía y para hacer un reclamo de reparación o de reemplazo bajo la garantía, sírvase visitar el sitio web www.hampton.care o contacte a Hampton Care al teléfono
1-800-562-5625. Podrá requerirse la devolución del producto defectuoso y su recibo para procesar los reclamos bajo la garantía.
 Loading...