12 13
BRITAX Child Safety, Inc. EMBLEM/ALLEGIANCE User Guide
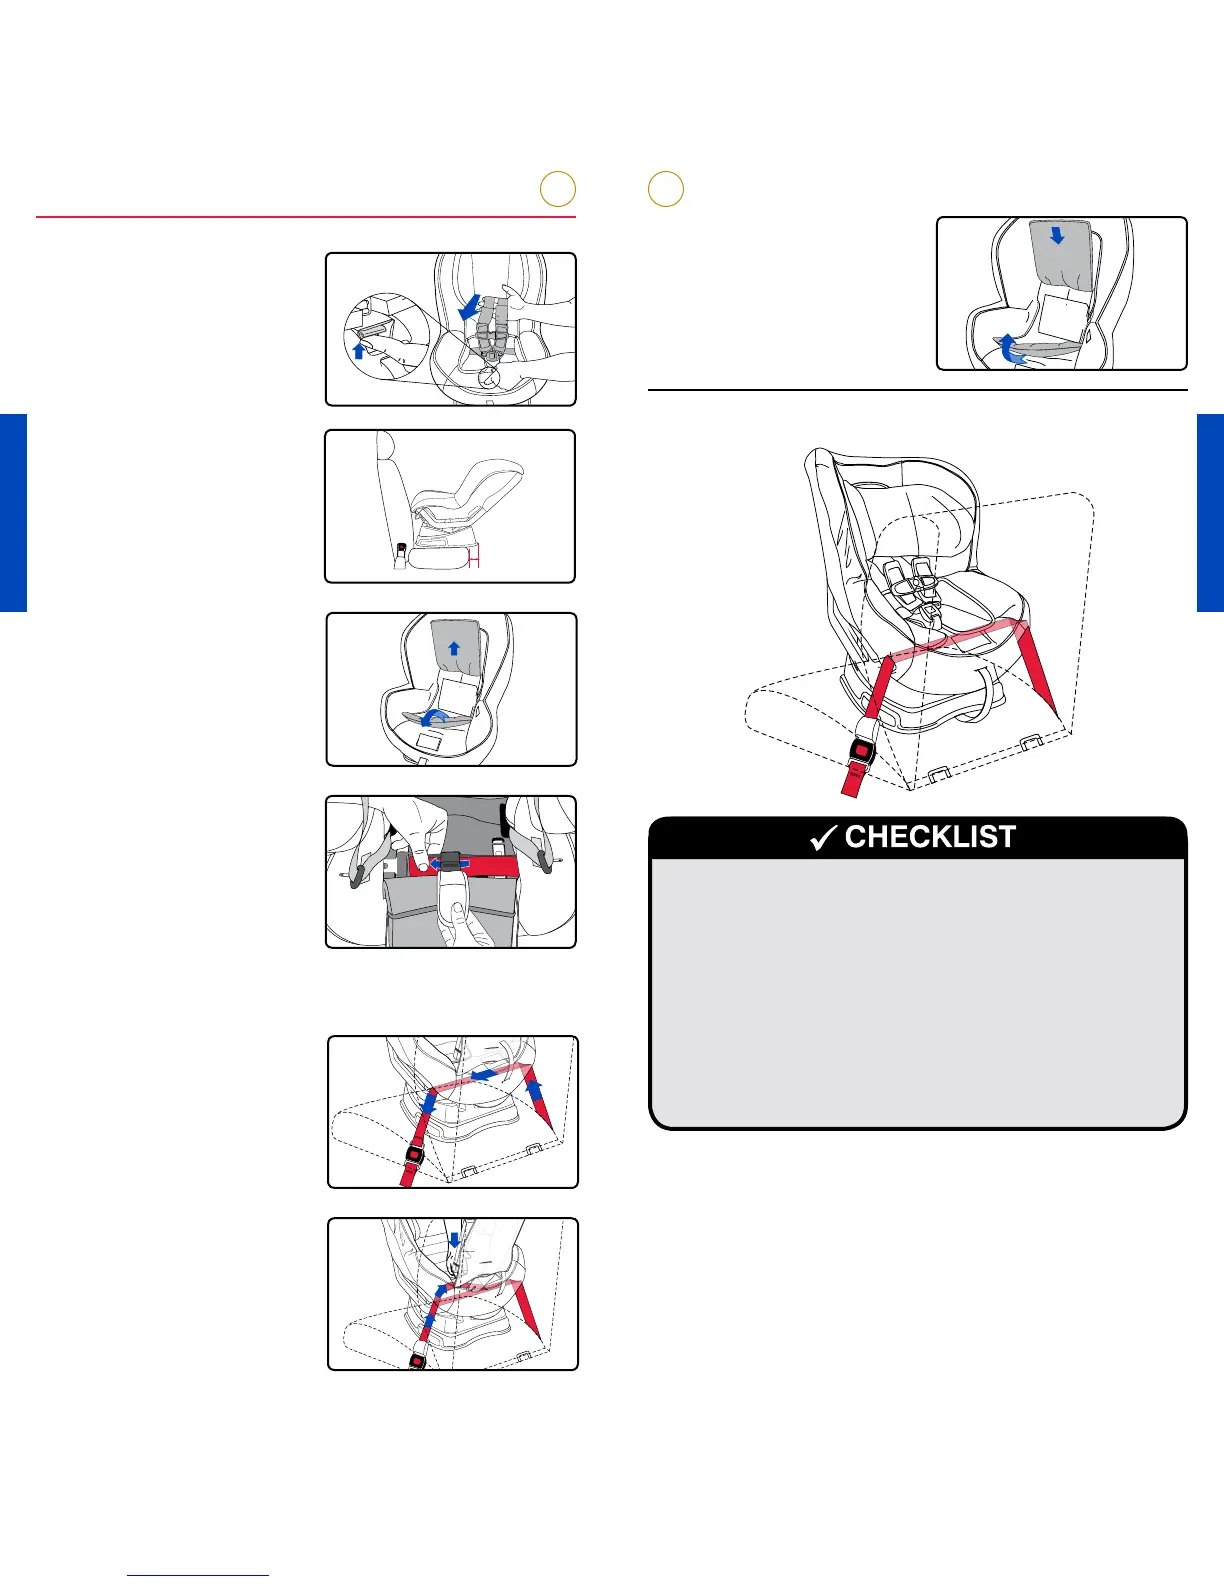
Lap Belt Installation
7. Replace the seat cover.
9 Check that all connections are secure and straps are not
twisted.
9 Check that no more than 3 in. (7.6 cm) of the base hangs
over the edge of the vehicle seat.
9 Check that the child seat cannot be moved front to back
or side to side more than 1 in. (2.5 cm) at the belt path.
If the child seat is not secure, repeat installation or use a
dierent seating location.
9 Check that the back angle of the child seat is 30° – 45°
from vertical (not to exceed 45°) when the car is parked
on a level surface. See “Seat Positions” on page 24.
1. Loosen the harness.
a. Lift harness adjuster
lever and pull both
harness straps
forward.
b. Remove the infant
positioning pillow
and unbuckle the
harness.
2. Recline the unoccupied
child seat to position 3
and place rear-facing on
the vehicle seat (see page
24). Ensure that no more
than 3 in. (7.6 cm) of the
base hangs over the edge
of the vehicle seat.
3. Pull the head restraint/
head pad cover up,
then pull the seat cover
forward to access the
rear-facing belt path.
4. Route the vehicle belt
through the rear-facing
belt slots, ensuring that
the vehicle belt is routed
under the harness buckle
strap.
NOTE: The buckle should
be in the inner slot.
IMPORTANT: Do not
use lock-os for lap belt
installations.
5. Ensure the vehicle belt is
not twisted and buckle
the seat belt.
6. Push down on the middle
of the child seat while
pulling the vehicle belt to
remove all slack.
NOTE: Ensure that the
vehicle belt is locked as
directed by your vehicle
owner’s manual.
Rear-Facing Installation with Lap Belt
IMPORTANT • ALWAYS position the buckle in the inner slot for
rear-facing use. • The vehicle belt
must pass in front of the buckle
strap for rear-facing use.
• NEVER leave the buckle in the
adjustment slot. • Use the outer
buckle slot when installing the child
seat forward-facing with a child
weighing 30 lbs (13.6 kg) and above or if the buckle is under the
child in the inner position.
INNER SLOT
OUTER SLOT
P405600_R1.05.10
A
DJUSTMENT
SLO
T
IMPORTANTE • Coloque la hebilla en la ranura interna SIEMPRE que se
vaya a utilizar el asiento orientado hacia
detrás. • Cuando el asiento se coloca
orientado hacia detrás, el cinturón del
vehículo debe pasar por delante de la
correa de la hebilla. • La hebilla NUNCA
debe dejarse en la ranura de ajuste.
• Utilice la ranura externa de la hebilla si
se va a instalar el asiento orientado hacia delante y este va a ser ocupado
por un niño con un peso mínimo de 13,6 kg (30 lb) o si la hebilla queda
RANURA INTERNA
RANURA EXTERNA
P452800_R1.01.11
RANURA
DE AJUSTE