Quick Reference Guide
Thank you for purchasing the Brother TD‑2020/2120N/2130N.
The TD‑2020/2120N/2130N (hereafter referred to as “the printer”) is a
powered desktop thermal printer.
Be sure to read the User’s Guide (CD‑ROM), Product Safety Guide
(Printed), Quick Reference Guide (this manual), Software User’s Guide
(CD‑ROM) and Network User’s Guide (CD‑ROM:TD‑2120N/2130N only)
before using the printer. We suggest that you keep these documents in a
handy place for future reference. To download the latest manuals, please
visit the Brother Solutions Center at http://solutions.brother.com/, where
you can also download the latest drivers and utilities for your printer, get
product support and answers to frequently asked questions (FAQs).
Options cannot be used with the TD‑2020.
Options can be used with the TD‑2120N/2130N. For details, refer to the
User’s Guide.
Printed in China
ENG
LBC306001
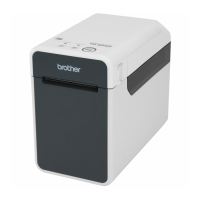
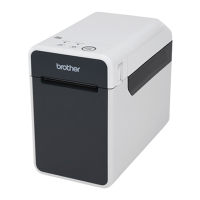
General Description
Front
Back
(TD‑2020)
(TD‑2120N/2130N)
POWE1 R indicator
2 (Power) button
Media exit3
RD Roll compartment top cover4
STATUS indicator5
6 (Feed) button
7 (Print) button
Cover release lever8
Tear bar9
NOTE: Before using the printer, remove
the cover over the tear bar.
Do not dispose of the removed cover.
In order to avoid injuries when the printer
is not being used, attach the cover to the
tear bar.
Print head10
Transmissive/gap 11 sensor
Media guide12
Medi13 a tip guide
Media guide adjustment lever14
Platen roller15
Reective/black mark sensor16
External media feed slot17
Serial port18
Power connector19
Mini‑USB port20
USB host port (TD‑2120N/2130N only)21
Ethernet network port22
(TD‑2120N/2130N only)
Attaching the Filter Core
When connecting the AC adapter, attach the lter core reduce radio
frequency interference from the cables.
Attach the lter core as shown in the gure below, pressing it closed
until you hear a click.
To printer1
Filter core2
AC adapter3
Connecting the Printer to an AC Power
Socket
Connect the AC adapter to the printer, and then plug the AC power
cord into an AC power socket to power the printer.
Connect the AC adapter to the printer.
a
Connect the AC power cord to the AC adapter.b
Connect the AC power cord to a nearby AC power socket c
(100 ‑ 240 V, 50 ‑ 60 Hz).
AC adapter1
AC power cord2
Installing the Printer Driver and
Software
The screenshot shown below may differ slightly from that of the actual
product.
NOTE
If you are using Windows
®
8, make sure that Adobe
®
Reader
®
is the
default program for opening PDF les and that Internet Explorer is
the default web browser.
Insert the installer CD‑ROM into your CD‑ROM drive. If the
a
language screen appears, choose your language.
Click [
b Standard Installation].
You can refer to the User’s Guide by clicking [ User’s Guides].
Read the licence agreement, and click [c Agree] if you agree to the
terms and conditions.
Click [
d Install] to start the installation, and follow the on‑screen
instructions to complete the Standard Installation.
For details, see the User’s Guide on the CD‑ROM.
Printing the Printer Setup Information
You can use the (Print) button to print a report that lists the following
printer settings:
Program version
Printer usage history
Missing dot test pattern
List of transferred data
Communication settings
NOTE
You can use [• Device settings] of “Printer Setting Tool” to set, in
advance, which items will be printed.
The node name will also appear in the communication settings. •
The default node name is “BRWxxxxxxxxxxxx”. (“xxxxxxxxxxxx” is
based on your printer’s MAC address/Ethernet address.)
Make sure that a roll of 58mm receipt paper has been loaded, and
a
the RD Roll compartment top cover is closed.
Turn on the printer.
b
Hold down (for at least 1 second) the c (Print) button until the
POWER indicator starts blinking in green and the printer setup
information is printed.
NOTE
For printing the printer setup information, we recommend using •
58mm receipt paper.
The length required for printing differs depending on the
information to be printed.
The printer setup information can also be printed from •
[Device settings] of “Printer Setting Tool”.
For details, see the User’s Guide on the CD‑ROM.
Inserting the RD Roll
Press and hold the a (Power) button to turn the printer off.
Press the cover release lever (1) on either side and lift up to open
the RD Roll compartment top cover.
Open the media guides by lifting up the media guide adjustment
lever (2) and pulling the media guide outwards.
Insert the RD Roll so that the labels feed with the side to be printed b
on facing up (1), as shown.
While lifting up the media guide adjustment lever (1), push in both c
the media guides (2) to t the width of the paper.
Feed the end of the RD Roll under the media tip guides (3).
Position the end of the paper centred over the platen roller and slightly d
out of the media exit.
Close the RD Roll compartment top cover by pressing down on the
e
centre, until it clicks into place.
Press the
(Power) button to turn the printer on.
After loading the paper, check that the transmissive/gap sensor and triangle on
the printer are aligned, or if there is a black mark on the paper, check that the
black mark is aligned with the centre line of the reective/black mark sensor.
Printing
Install the printer driver and the software.a
Check that the printer has the correct power source. (Make sure b
that the AC adapter is connected to an AC power socket or that a
fully charged rechargeable Li‑ion battery is installed.)
Turn on the printer. The POWER indicator lights in green.
c
Connect the printer to a computer.d
Insert the RD Roll.e
Print receipts or labels.f
Hold one edge of the ejected media and pull it up and diagonally g
toward the other edge.
For details, see the User’s Guide on the CD‑ROM.
Inserting the RD Roll (continued)
TD-2020
TD-2120N
TD-2130N
Unpacking the TD-2020/2120N/2130N
Check that the package contains the following before using the printer.
If any item is missing or damaged, contact your Brother reseller.
Printer•
AC adapter• AC power cord•
USB cable• Filter Core•
CD‑ROM•
Product Safety Guide•
Quick Reference Guide•