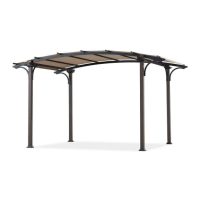
The provided document is an assembly and maintenance manual for the Broyhill Thornwood Pergola Swing/Daybed.
Function Description
The Broyhill Thornwood Pergola Swing/Daybed is a versatile outdoor furniture piece designed for residential use. It functions primarily as a swing, offering a comfortable seating area, and can be converted into a daybed for lounging. The structure includes a pergola-style frame and a canopy for shade.
Important Technical Specifications
- Item Number: SC-K-454PGS1
- SKU Number: 810494276
- Weight Limit: 750 lbs.
- Assembly Space Requirement: 1.83m or 6ft. from any obstruction (buildings, tree limbs, electrical wires).
- Canopy Fabric: Flame-resistant, meets CPAI-84 specifications (note: not fireproof; will burn if in continuous contact with flame source). Application of foreign substances may render flame-resistant properties ineffective.
- Construction: Metal frame with fabric canopy and cushion.
- Origin: Made in China.
Usage Features
- Dual Functionality: Easily converts between a swing and a daybed. The conversion involves removing cushions and two hanging bars (M) from the pin bolt on the seat back (K) for swing mode, and inserting a support bar into U-shaped brackets for daybed mode, ensuring the bed is steady.
- Canopy: Provides shade and is made from flame-resistant fabric. The canopy should be removed in heavy wind conditions to prevent tipping or damage.
- Seating/Lounge Area: Includes a cushion (P) for comfort.
- Stability: Designed for use on an even surface only. Includes lawn stakes (Sm) for securing the base plate (R) to the ground, enhancing stability.
- Safety Guidelines:
- Assembly requires four adults.
- Children should be kept away during assembly due to small parts.
- Children must be under adult supervision when using the product.
- Always inspect the swing for obstructions before each use.
- Do not stand on the product or use it as a step ladder.
- Do not pull or hang on the spreading rod/bar.
- The product is for residential use only, not commercial use.
- Improper use or failure to follow directions may result in injury.
- Branding: Features a Broyhill Legacy logo on one of the front-left leg posts (A) when facing the swing.
Maintenance Features
- Annual Inspection:
- Check all nuts and bolts for tightness each season, and more frequently if the swing is used often.
- Oil all metal moving parts with a general-purpose lubricating oil to ensure proper performance and safety.
- Cleaning:
- Wash the frame and fabric with mild soap and water.
- Rinse thoroughly.
- Dry the frame completely.
- Allow the fabric to drip dry away from direct sunlight.
- Do not use bleach, acid, or other solvents on the fabric or frame parts, as these can damage the materials or compromise the flame-resistant properties of the canopy.
- Storage: To prolong the life of the swing, it is recommended to store it in a dry area when not in use or during severe weather conditions.
- Parts and Fittings: Users are advised not to discard packaging until all parts and fittings have been checked. Assembly instructions should be retained for future reference.
- Repairs/Modifications: The manufacturer will not accept responsibility for unauthorized repairs or modifications to the product.
Assembly Overview (Step-by-Step Process)
The manual details a 16-step assembly process, emphasizing the use of specific bolts, washers, and nuts for each connection. Key steps include:
- Leg Post Assembly: Attaching leg posts (A) to post bases (Q) and base plates (R) using M6 x 12L Bolts (Sa).
- Side Panel Attachment: Connecting side panels (B) to leg posts (A) using M8 x 20L Bolts (Se), large locker washers (Ss), and large metal washers (Si). (Do not tighten completely at this stage).
- Top Crossbar Assembly: Assembling top crossbars (C and D) using M6 x 18L Bolts (Sb), small locker washers (Sr), and small metal washers (Sh). (Do not tighten completely).
- Top Crossbar Attachment to Leg Posts: Attaching assembled top crossbars (C & D) to leg posts (A) using M8 x 15L Bolts (Sd), large locker washers (Ss), and large metal washers (Si). (Do not tighten completely).
- Additional Top Crossbar Attachment: Attaching top crossbars (E) to other top crossbars (C & D) using M8 x 45L Bolts (Sf), large locker washers (Ss), and large metal washers (Si). (Do not tighten completely).
- Inside Canopy Crossbar Insertion: Inserting inside canopy crossbars (F1) into top crossbars (C & D).
- Outside Canopy Crossbar Insertion: Inserting outside canopy crossbars (F2) into top crossbars (C & D) using M6 x 18L Bolts (Sb), small locker washers (Sr), and small metal washers (Sh). (Do not tighten completely).
- Leg Support Bar Attachment: Attaching leg support bar (G) to side panels (B) using M6 x 55L Bolts (Sc), small locker washers (Sr), and small metal washers (Sh). (All bolts from steps 2, 3, 4, 5, 7, 8 should be tightened at this point).
- Rear and Front Connector Bar Connection: Connecting rear and front connector bars (J) to left (I) and right (H) arms, ensuring seat support bars are securely seated.
- Seat and Back Attachment: Attaching seat and back (K) to left (I) and right (H) arms using M8 x 77L Bolts (Sg), plastic washers (Sk), large metal washers (Si), and nuts (Sj).
- Hanging Bar Attachment: Attaching long (L) and short (M) hanging bars to arms (I & H) and top crossbars (E) with hooks (Sl).
- Lawn Stake Installation: Attaching lawn stakes (Sm) to base plates (R).
- Canopy Attachment: Attaching canopy (N) to canopy crossbars, ensuring it is placed under the brackets.
- Canopy Side Bar and Cushion Installation: Inserting canopy side bars (O) into canopy (N) and attaching the cushion (P).
- Conversion to Daybed (Part 1): Removing cushions and two hanging bars (M) from the pin bolt on the seat back (K).
- Conversion to Daybed (Part 2): Inserting the support bar on the back of seat and back (K) into the U-shaped brackets, ensuring it is firmly pressed into place for stability. Replacing cushions and locking the canopy bed in place.
The manual includes detailed illustrations for each step to guide the user through the assembly process.