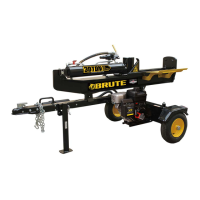
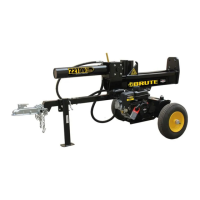
This document describes the Brute 30 Ton Log Splitter, model YTL-140-701, an outdoor power equipment designed for splitting wood logs. The log splitter features heavy-duty steel construction and delivers 30 tons of ram force, making it suitable for demanding tasks. It is designed to operate in both horizontal and vertical positions, offering versatility for different log sizes and loading preferences. The horizontal position is recommended for lighter logs that can be easily loaded onto the beam, while the vertical position is suitable for both light and heavy logs that might be difficult to lift onto the beam, helping to prevent back injuries. The log splitter is easy to tow, use, and maintain.
Usage Features:
Before operation, users must read and understand the entire manual, including all safety and warning information, operating instructions, maintenance, and storage instructions. Failure to do so can result in serious injury or property damage.
Assembly: The log splitter requires assembly before use. Due to its weight and size, it is recommended that another adult assist with the assembly process. All components should be inspected upon receipt to ensure no parts are missing or damaged. The assembly process involves several steps:
- Wheel Assembly: Attach the wheels to the oil tank axle using conical roller bearings, flat washers, and hex slotted nuts. Cotter pins secure the nuts, and axle caps are installed with a rubber hammer. It's crucial to loosen the slotted nut by 1/4 turn after tightening to allow the tire to rotate freely, preventing excessive bearing and tire wear.
- Tow Bar Attachment: The tow bar is attached to the hydraulic tank using hex bolts, flat washers, and nylon lock nuts.
- Beam Assembly Attachment: The beam assembly is secured to the hydraulic tank with a hinge pin and R-Pin.
- Engine Attachment: The engine is installed by placing polyurethane blocks and big flat washers between the mounting plate and the engine. Hex bolts, flat washers, lock washers, and nylon lock nuts secure the engine. The clear oil pipe is then attached to the gear pump and secured with a clamp.
- Hydraulic Hose, Storage Tube, Log Cradle, and Fender Attachment: Hydraulic hoses are connected to the gear pump outlet and external filter connectors, ensuring O-rings are in place. The storage tube is attached to the tow bar, and the log cradle is secured to the beam. Fenders are attached to the oil tank using hex bolts, rubber washers, flat washers, lock washers, and hex lock nuts. The control lever should be rotated to the vertical position and secured with retaining pins and spring cotter pins.
- 4-way Wedge Attachment (Optional): An optional 4-way wedge can be attached to the main wedge, with a steel wire rope passed around the piston rod and set on an O lock ring. This cross wedge is specifically for horizontal splitting.
Fluid Filling:
- Engine Oil: The engine is shipped without oil. Before starting, fill with SAE 10W-30 motor oil according to the engine manual's capacity. The oil level should be checked daily, especially during the break-in period.
- Hydraulic Oil: The hydraulic oil tank is also shipped without oil. Fill with 3.17 gallons of AW32, AW46, or universal hydraulic oil. Automatic transmission fluid should be used for temperatures below 32 degrees Fahrenheit. The oil level should read from the top of the hydraulic oil tank. After filling, start the engine and extend and retract the wedge several times to remove air from the lines, then recheck and refill the hydraulic oil if necessary.
- Gasoline: Use only clean, fresh, regular unleaded fuel with a minimum 85 octane rating. Do not mix oil with fuel. Fill the tank slowly, leaving about 1¼ inch of space for fuel expansion. Do not fill the tank indoors, when the engine is running or hot, or while smoking.
Operation:
- Safety First: Always wear safety gear, eye protection, gloves, and work boots. Keep hands and feet clear from moving parts. Ensure the work area is clean and free of debris.
- Pre-Operation Checks: Inspect the log splitter for good working condition, replacing or repairing damaged parts immediately. Check and tighten all hardware. Ensure the hydraulic oil and engine oil levels are correct. The tires must be fully inflated before towing.
- Positioning: The log splitter must be on a flat, level surface with good footing, at least seven feet away from combustible material. Avoid operating on mud, ice, brush, or snow. The support leg should be in the down position, and both tires blocked to prevent movement during operation.
- Engine Start-up: Start the engine and ensure the hydraulic oil temperature is above 10°F (-12°C) before splitting wood. If the outdoor air temperature is below 32°F (0°C), warm up the log splitter by extending and returning the wedge several times.
- Splitting Logs: Load logs onto the beam against the endplate (maximum log length 26 inches). Push the control lever forward with one hand to split the log. Push the control lever backward with one hand to return the wedge to its original position.
- Stuck Logs: If a log gets stuck or does not split completely, push the control lever in reverse to strip the log from the wedge. If it remains stuck, turn off the machine and use a sledgehammer and crowbar to remove it. Always keep hands clear of the log and wedge while it is retracting.
- Towing: When towing, use safety chains and secure the log splitter to the vehicle hitch. Do not exceed 45 MPH. Raise the support leg and slide in the lock pin. Press the coupler handle down and lock it tightly.
Maintenance Features:
Proper maintenance and storage are essential to prevent voiding the warranty and ensure trouble-free service.
- Pre-Maintenance: Before performing any maintenance, place the log splitter in maintenance mode, turn off the engine, and move the control lever forward and backward to relieve hydraulic pressure.
- Post-Maintenance: After maintenance, ensure all guards, shields, and safety features are back in place.
- Regular Checks:
- Hoses: Inspect for exposed wire mesh and leaks before each use. Replace worn or damaged hoses before starting the engine.
- Hydraulic Fittings: Inspect for cracks and leaks before each use. Replace damaged fittings before starting the engine.
- Nuts and Bolts: Check for loose bolts before each use and tighten as needed.
- Beam: Apply grease to the beam surface before each use.
- Moving Parts: Annually clean and lightly lubricate all moving parts.
- Tires: Ensure tires have the recommended pressure before operation.
- Fasteners and Hoses: Periodically check all fasteners and hoses for tightness and leaks.
- Cleaning and Touch-ups: Annually clean the log splitter. Use glossy enamel spray paint to touch up scratched or worn painted metal surfaces.
- Engine Maintenance: Refer to the Engine Owner's Manual for specific engine maintenance instructions.
- Load Capacity: Never exceed the load capacity rating of 30 tons, as this will damage the log splitter.
- Replacement Parts: Only use parts that meet the manufacturer's specifications. Using non-compliant parts can result in safety hazards or poor operation.
Storage:
- Before storing, ensure the log splitter is clean and dry.
- Lightly lubricate all log splitter surfaces and moving parts to prevent rust.
- Store the log splitter indoors or in a protected area during severe weather and winter months.