EasyManua.ls Logo

Bunker Hill Security Security 61724 - User Manual

Bunker Hill Security Security 61724
4 pages
Print Icon
To Next Page IconTo Next Page
Loading...
ELECTRONIC
DIGITAL SAFE
Model
45891
INSTALLATION AND OPERATION INSTRUCTIONS
Due to continuing improvements, actual product may differ slightly from the product described herein.
3491 Mission Oaks Blvd., Camarillo, CA 93011
Visit our website at: http://www.harborfreight.com
TO PREVENT SERIOUS INJURY, READ AND UNDERSTAND
ALL WARNINGS AND INSTRUCTIONS BEFORE USE.
Copyright
©
2001 by Harbor Freight Tools
®
. All rights reserved. No portion of this
manual or any artwork contained herein may be reproduced in any shape or form
without the express written consent of Harbor Freight Tools.
For technical questions or replacement parts, please call 1-800-444-3353.
REVISED 07b
Question and Answer IconNeed help?

Do you have a question about the Bunker Hill Security Security 61724 and is the answer not in the manual?

Summary

Safety Warnings and Precautions

General Safety Guidelines

Follow basic safety precautions, use the correct product, and check for damaged parts.

Safe Operation

Opening and Closing the Safe

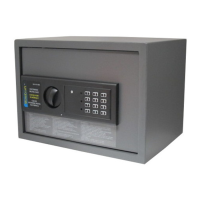
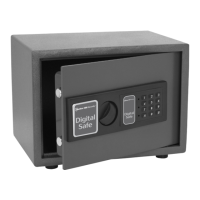
Instructions for opening the safe using the keypad and closing it to lock.

Changing the Access Code

Procedure to change the safe's access code using the internal red button.

Battery Replacement

Guidance on when and how to replace the safe's batteries.

Emergency Key Usage

Steps to access the safe using emergency keys by removing the front panel.

Safe Installation

Mounting Preparation

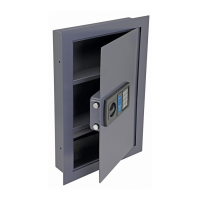
Using the template to mark placement and drilling holes for mounting.

Mounting on Wood Surfaces

Securing the safe to a wood surface using nails and self-tapping screws.

Mounting on Concrete Surfaces

Installing the safe on concrete using provided fasteners and bolts.

Overview

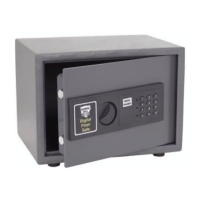
The Bunker Hill Electronic Digital Safe, Model 45891, is a robust security device designed for safeguarding valuables. Its primary function is to provide a secure storage solution with both electronic keypad access and an emergency key override system. The safe is constructed from heavy-gauge steel, ensuring durability and resistance to tampering.

Important Technical Specifications:

  • Overall Dimensions: The safe measures 9-7/8" H x 11" D (with the front panel) or 10-1/2" D (without the front panel) x 13-3/4" W.
  • Internal Dimensions: The interior offers a storage space of 13-1/2" W x 9-1/2" H x 9-5/8" D.
  • Materials: The housing is made from 9 GA. Steel Plate, while the door frame is 4 GA. Steel, and the door itself is 5 GA. Steel. This combination of steel gauges provides significant protection.
  • Door Mounting: The door is secured with 3/8" Steel Pins, which are welded for added strength.
  • Door Lock Bolt: A 1" x 5/8" throw lock bolt engages to secure the door.
  • Panel Features: The control panel includes several indicator lights: a Green LED for "Code OK/Open," a Yellow LED for "Set/Codes," and a Red LED to indicate "Battery Change." It features a hidden tumbler with two keys for emergency access, a keypad with numbers 0-9 and "A" & "B" keys, an internal "Code Set Button," and a black knob for locking/opening the door. The electronic system supports an eight-digit code capacity.
  • Included Items: The safe comes with four concrete fasteners, a felt pad to protect stored items, and a hole template for mounting.
  • Power Required: The electronic keypad operates on four "AA" batteries.
  • Weight: The safe weighs 35.6 lb., contributing to its stability and security.

Usage Features:

  • Opening the Safe: To open, users input the default code "159" (or a custom code) on the electronic keypad, followed by either the "A" or "B" key. Once the Green LED illuminates, the knob must be turned within five seconds to open the door. If the knob is not turned in time, the code needs to be re-entered.
  • Closing the Safe: To lock the safe, simply close the door and turn the knob in the opposite direction.
  • Changing the Code: The safe's default code is "159." To change it, first open the safe. Inside the door, near the hinge, there's a small Red Button. Press this button until the Yellow LED on the front control panel lights up. Then, input the new code (1 to 8 characters) on the keypad, followed by either the "A" or "B" key. The safe will beep twice to confirm the change. If it beeps three times, the code was not accepted, and the process must be repeated.
  • Emergency Key Override: The safe includes two emergency keys for situations where the code is forgotten or the batteries are dead. To use this feature, the front panel needs to be detached. This involves gently peeling off a sticker (with SKU# 45891 printed on it) located to the left of the keypad. Underneath the sticker, a screw needs to be removed. Once the screw is out, the panel can be gently removed to reveal a secret key-operated lock. The emergency key is then inserted into this lock and turned, allowing the knob to be turned and the door opened. It is crucial to never lock the emergency keys inside the safe.
  • Mounting Options: The safe can be securely mounted to either wood surfaces or concrete. For wood, a nail is used to mark pilot holes, followed by drilling 1/8" diameter pilot holes and securing the safe with four 1/4" diameter self-tapping screws (not included). For concrete, a small pilot hole is drilled through the template, then four holes are drilled with a concrete drill bit to the diameter of the fasteners and 2" deep. The concrete fasteners are hammered into these holes (flat side first, using a wood block to protect threads), and the safe is placed over the bolts. Nuts are then tightened onto the bolts, expanding the fasteners to secure the safe.

Maintenance Features:

  • Changing Batteries: The Red and Green LEDs lighting up simultaneously indicate that the batteries need to be changed. To do this, open the safe, locate the battery compartment on the inside of the door, slide off the cover, remove the old batteries, and insert four new "AA" batteries. After changing, it's recommended to test the code before closing the door.
  • No Replacement Parts: The manual explicitly states that there are no replacement parts available for this product. This implies that if a component fails, the entire unit may need to be replaced.
  • General Maintenance: The manual emphasizes the importance of checking for damaged parts and having them repaired or replaced by a qualified technician. It also advises against modifying the product or using it for unintended purposes. Regular inspection and adherence to operating procedures are crucial for safety and longevity.

Bunker Hill Security Security 61724 Specifications

General IconGeneral
BrandBunker Hill Security
ModelSecurity 61724
CategorySafes
LanguageEnglish

Related product manuals