Installing your washer-dryer
Bringing it all together
14
Installation requirements
Levelling feet
In addition to the instructions mentioned here,
special regulations of the relevant water
companies may apply. If in doubt, have the
washer-dryer connected by a qualified
technician.
The is heavy - caution when washer-dryer
lifting it.
Do not lift by projecting components (e.g.
washer-drier door).
Warning: Frozen hoses may tear/burst. Do not
install in outdoor areas or washer-dryer
where there is a risk of frost.Please operate
washer-dryer above 0 .°C
Lay hoses and cables in such a way that there is
of tripping over them.no risk
An additional space (approximately 120mm) is
required at the rear of the . washer-dryer
This is to allow
hose and drain hose connections.
enough space for the water
Unpacking
Unpacking your washer-dryer
Caution:2 people are required to unpack the
washer-dryer, it is recommended that gloves
are worn.
Carefully remove all packing materials including
the foam base, dispose of correctly.
Note: When opened,water droplets may be visible
in the drum etc. this is normal as each appliance
is tested before delivery.
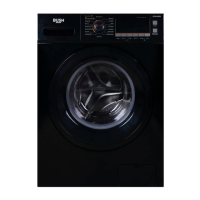
Removing the transport bolts
Important: The bolts are designed to
support the internal components during transit
these MUST be removed before use.
2: Remove the bolts by pulling them. ( 3)
transport
Fig
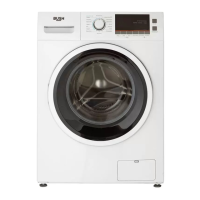
1:For your machine to work efficiently with
minimum vibration it should be settled on flat,
nonslippery,firm ground.
2:You can adjust the balance of your machine by
changing the positioning of its feet.
3:First,loosen the plastic adjustment nut. (Fig 5)
4:Adjust by rotating the feet upwards or
downwards. (Fig 6)
5:After the desired position has been reached,
tighten the plastic adjustment nut again by rotating
it upwards.
Note: Never put cartons,wooden blocks or similar
materials under the machine to balance
irregularities in the level of the ground.
Fig 1 Fig 2
•
•
•
•
•
Fig 3 Fig 4
Fig 5 Fig 6
1: Loosen the screws by rotating counterclockwise
with a suiltable wrench. (Fig 1, 2)
3: When the transport bolts have been removed,
insert the plastic hole plugs found in
the accessories bag into the holes. (Fig 4)
Installing your washer-dryer
Dimension of the machine with door open.
850
850
8kg:470
10kg:565
8kg:515
10kg:610
8kg:955
10kg:1050