Do you have a question about the Bushnell TROPHY CAM 119626C and is the answer not in the manual?
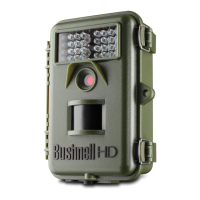
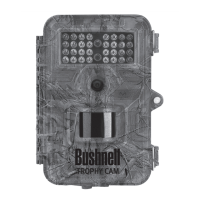
Overview of the Bushnell Trophy Cam's capabilities, features, and design.
Explains the buttons, LCD screen, and power switch on the camera's rear.
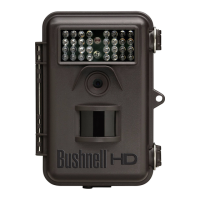
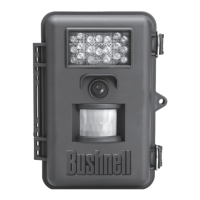
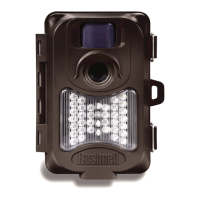
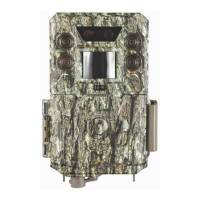
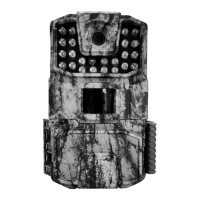
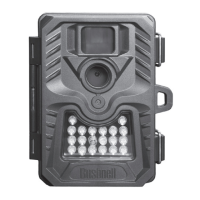
Details the camera's front-facing elements like lens, PIR sensor, and IR flash.
Illustrates the various input/output ports on the camera.
Instructions for inserting AA batteries into the camera's compartment.
Details on connecting an optional 6V DC power source for operation.
Guide on properly inserting and formatting an SD card for image storage.
Explains the three main operating modes of the camera.
Describes the safe mode for maintenance and transport.
Details the active mode for capturing photos or videos.
How to access and use the camera's setup menu for adjustments.
Explains secondary functions of keys when in SETUP mode.
Step-by-step guide to navigate and modify camera parameters.
Visual guide showing how to select and confirm parameter settings.
Demonstrates changing the camera mode from Photo to Video.
Step-by-step guide to configure and use the Field Scan time-lapse feature.
Provides an example of how to set up Field Scan time blocks and intervals.
Selects whether still photos or video clips are captured.
Selects resolution for still photos (3-6 megapixels).
Selects how many photos are taken per trigger.
Selects video resolution (pixels per frame).
Sets length per captured video clip.
Sets the wait time before responding to additional triggers.
Selects the sensitivity of the PIR sensor.
Deletes all files on an SD card to prepare it for reuse.
Selects video standard/format for the TV Out jack.
Imprints date & time on photos if set to 'On'.
Sets the camera's internal date and time.
Turns Field Scan (Time Lapse) recording mode on/off.
Selects to record audio with video clips.
Restores all parameters to original factory default settings.
Recommendations for securely mounting the camera on a tree.
Instructions for attaching the camera using the provided web belt.
Details on using the camera's bottom socket for mounting.
Method to test the camera's effective monitoring area.
Procedure to turn on the camera and enter operational mode.
Most popular method to view images by removing the SD card.
How to play back images on a TV monitor via TV Out.
Steps to connect the camera via USB to a computer for viewing.
How to delete captured photos and videos from the camera.
Detailed steps for downloading files to a PC or Mac via USB.
Addresses false triggers and their causes.
Explains factors affecting battery life and tips for maximization.
Troubleshooting steps for when the camera fails to capture images.
Solutions for issues related to the camera not powering on.
Discusses common issues with photo and video quality.
Explains reasons for dark night captures and solutions.
Addresses causes of dark daytime images and remedies.
Explains reasons for bright night captures and solutions.
Addresses causes of bright daytime images and remedies.
Solutions for streaking issues with moving subjects.
Troubleshooting color cast issues in images.
Reasons for short video clips and how to fix them.
Ensures the time stamp setting is correctly configured.
Addresses issues with the camera not capturing intended subjects.
Explains the function of the PIR sensor LED.
Troubleshooting common problems with the LCD screen.
Ensures changes made in Setup mode are saved correctly.
Precautions against environmental factors like moisture and ants.
Troubleshooting common issues with the Field Scan feature.
| Image Sensor | 5 Megapixel Color CMOS |
|---|---|
| Maximum Pixel Size | 2848x2136 (6 MP) |
| Lens | F = 3.1; FOV=50°; Auto IR-Cut-Remove (at night) |
| IR-Flash Range | 36’-45’ (12m-15m) |
| Picture Size | 6MP = 2848x2136; 5MP = 2592x1944; 3MP = 2048x1536 |
| Video Size | 720x480/30 fps, 640x480/30fps, 320x240/30fps |
| PIR sensitivity | PIR with 3 sensitivity levels: High/Normal/Low |
| Shooting Numbers | 1— 3 programmable |
| Video Length | 5-60sec. programmable |
| Display Screen | Std B&W Display: 24x32mm(1.5”) |
| Memory Card | SD or SDHC Card, Maximum capacity 32GB |
| Internal RAM | 32MB |
| Operation | Day/Night |
| Response Time | 0.8 sec |
| Triggering Interval | 1sec. - 60min. programmable |
| Power Supply | 8xAA recommended, 4xAA as emergency power |
| Stand-by Current | < 0.3mA (<7mAh/day) |
| Power Consumption | 200mA (+530mA when IR-LED lighted) |
| User Interface | LCD display |
| Interface | TV out (NTSC/PAL); USB; SD card holder; 6V DC external |
| Security | Strap; ¼-20 attachment |
| Security authentication | FCC/CE/RoHs/WEEE |
| Operating Temperature | -20 - 60°C (Storage temperature: -30 - 70°C) |
| Operating Humidity | 5% - 90% |