The Bushranger REVO Vehicle Recovery Winch is a powerful and dependable machine designed for off-road vehicle recovery. It is intended for intermittent periodic duty and requires careful operation to ensure safety and prevent property damage or injury. Users are strongly recommended to undertake off-road training, including vehicle recovery, before using this winch.
Function Description:
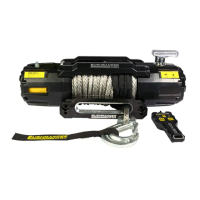
The REVO winch is primarily used for vehicle recovery, providing the necessary pulling force to overcome obstacles such as mud, snow, sand, or steep inclines. It is designed to pull a vehicle's full weight, with a maximum line pull at least 1.5 times greater than the gross vehicle weight of the vehicle being recovered. The winch operates on a 12V DC battery and is available in various models (REVO 10S, REVO 10W, REVO 12S, REVO 12W), each with specific load ratings. The winch features a clutch mechanism that allows for free spooling of the rope and a proportional brake system for controlled powering out.
Usage Features:
- Clutch Operation: The clutch handle can be set to "Engaged" for winching operations or "Disengaged" for free spooling the rope. To disengage, turn the handle 90° clockwise. To engage, turn it 90° counter-clockwise. It is crucial that the clutch is always "Engaged" before operating the winch under power and never disengaged while the rope is under load. If the clutch handle doesn't lock properly, rotating the drum slightly can help engage the gear train.
- Rope Management: The winch uses either steel wire rope or synthetic rope. Prior to first use, the rope must be tensioned onto the drum under load to ensure a tight and uniform wrap, preventing damage. The rope should always be wound in an under-wound orientation for correct brake operation. A red painted section on the rope indicates when only 3 meters of rope are left on the drum, serving as a warning not to wind out past this point.
- Remote Control: The winch can be operated via a wired hand controller or a wireless hand controller.
- Wired Operation: Connect the hand controller cable to the winch control box and the hand controller. Press and hold the "OUT" button to winch out, or the "IN" button to winch in. Release the button to stop.
- Wireless Operation: To activate wireless control, press and hold the POWER button on the wireless hand controller for 3 seconds until the "WIRELESS" green indicator light illuminates. To turn off, press and hold the POWER button again for 3 seconds. The controller also has an automatic power-off function after 2 minutes of inactivity to conserve battery power. The wireless receiver should be connected to a switched power source (ignition or accessories circuit) to ensure it's only active when the vehicle is on.
- Anchor Point Selection: When choosing an anchor point, select a firm point like a tree, stump, or rocks. Avoid wrapping the rope directly around the anchor point; instead, use a tree trunk protector strap to prevent damage. The anchor point must be strong enough to hold the gross weight of the vehicle, and the fleet angle (direction of pull) should be maintained within ±15 degrees of the winch drum's centerline.
- Vehicle Preparation: Before winching, ensure the recovery vehicle's engine is running to provide maximum power to the winch. The transmission should be in neutral, and the hand brake applied to prevent movement.
- Recovery Damper: Always use a recovery damper, placed over the middle third of the live rope, to absorb energy in case of rope failure, reducing the risk of injury or damage.
- Powering Out: The REVO winch's proportional brake allows for effortless powering out under no load. However, powering out with a load is not recommended for more than 30 seconds to prevent excessive wear on the friction brake.
- Snatch Block Usage: A snatch block can be used to increase pulling power (mechanical advantage) or change the direction of a pull. For double line pulls, the force is doubled, but the recovery speed is halved. When using multiple snatch blocks, ensure they are at least 1 meter (40 inches) apart.
- Tree Trunk Protector Strap: Essential for connecting to anchor points, it prevents damage to trees (ring barking) and should be wrapped low around the anchor point, joined with a bow shackle.
- Winch Extension Strap: Used when the winch rope is not long enough to reach the anchor point.
- Bridle/Equaliser Strap: Designed to spread the recovery load across two points on the vehicle.
- Bow Shackles: Only load-rated bow shackles (WLL or SWL) should be used for recovery, sized correctly for the task.
Maintenance Features:
- Regular Use: The winch should be used regularly to keep components in good working order. At a minimum, power the rope out and back in monthly, following the correct winching procedures.
- Rope Inspection and Replacement:
- Wire Rope: Replace if it shows signs of excessive wear, broken strands, or corrosion. To replace, disengage the clutch, spool out the old rope, remove it from the drum, then feed the new rope through the fairlead, insert it into the drum hole, and tighten the set screw. Fit the clevis hook and secure it with a split/cotter pin. Wind the red section of the rope onto the drum tightly (under hand tension) with a minimum of five wraps.
- Synthetic Rope: Replace if it shows signs of excessive wear, fused/melted fibers, fraying, kinks, or damage. Inspect both inner and outer fibers for powdered fiber, which indicates internal wear. Protect the rope from sharp or abrasive objects. An aluminum hawse fairlead is recommended for synthetic rope. Keep the rope clean and dry; rinse with fresh water after use in muddy conditions and allow to dry completely before re-spooling. Synthetic ropes are affected by UV rays, chemicals, abrasion, and heat; it is recommended to replace them every 12 months once fitted or UV exposed. To replace, disengage the clutch, spool out the old rope, remove it, and if necessary, replace the hawse fairlead. If the new rope end is not shrink-wrapped, cut it at a 45° angle and apply electrical tape to hold strands in place. Thread the rope through the hawse fairlead and under the drum, insert it into the drum hole with 15-20cm protruding. Tape the protruding section across the drum and lightly tighten the set screw. Fit the clevis hook and secure it with a split/cotter pin. Wind the red section of the rope onto the drum tightly (under hand tension) with a minimum of ten wraps.
- Drum Support Seals: These are wearing items critical for retaining the sealed design of the winch. They should be inspected and greased or replaced as needed based on usage frequency and environment.
- Lubrication: All moving parts are permanently lubricated from the factory. If gearbox re-lubrication is needed after repair or disassembly, use Shell EP2 or equivalent grease. The clutch handle should be lubricated regularly with light oil.
- Cleaning: Use low-pressure water and a soapy sponge to clean the winch and synthetic rope. Avoid directing high-pressure water at the drum area or clutch handle, as this can force water past seals and cause internal damage.
- Bolt Tension: Regularly check the tension of mounting bolts and alignment.
- Remote Control: Ensure correct operation and check for broken strands or damage to the cable.
- Clutch Assembly: Inspect for damage and ensure proper engagement.
- Motor: Check for staining or damage.
- Brake: Verify the ability to hold loads.
- Gears: Listen for smooth operation.
- Seals: Inspect for damage or wear.
- Battery: A fully charged 12V DC battery with good connections is essential. A minimum of 650 cold cranking amps (CCA) is required. Maintain the battery in good condition, as winching operations consume significant power.
- Troubleshooting: If the winch fails to operate or exhibits faults, consult the troubleshooting guide for possible causes and remedies, which include checking circuits, battery, wiring, contactor, motor, clutch, brake, gear train, and ratchet components.