EasyManua.ls Logo

Buyers 1501400 User Manual

Buyers 1501400
4 pages
To Next Page IconTo Next Page
Page #1 background imageLoading...
Page #1 background image
www.buyersproducts.com
Phone (440) 974-8888
Fax 800-841-8003
1
Installation Instructions
1501400 Aluminum Ladder Rack
1501410 Black Aluminum Ladder
Rack
Before installation please read and understand all
instructions, illustrations and warnings. Please review
the hardware list for all supplied hardware. At least two
people are necessary to install this rack.
Tools required for assembly:
Open Wrench: 10mm, 13mm, 17mm, & 18mm
ASSEMBLY
IMPORTANT: DO NOT tighten any bolts during the
following steps.
1. Assemble a Side Rail using two Side Rail Halves (3),
one Connector Plate (6), and Carriage Bolts and Lock
Nuts from Bolt Set A. Repeat for the other side. (Fig. 1)
continued inside
Fig. 1
3. Place one Connecting Clamps (10) onto each end
of the Side Rails (3). Install a third Connecting Clamp
(10) in a position that will be suitable to connect Post
A (1) and Post B (2) later. Secure them temporarily with
Carriage Bolts and Lock Nuts from Bolt Set A. (Fig. 3)
Fig. 2
2. Place M8*25 bolts from Bolt Set B into the two holes
on each of three Connecting Clamps (10). (Fig. 2)
Fig. 3
Question and Answer IconNeed help?

Do you have a question about the Buyers 1501400 and is the answer not in the manual?

Buyers 1501400 Specifications

General IconGeneral
BrandBuyers
Model1501400
CategoryAutomobile Accessories
LanguageEnglish

Summary

Installation Instructions

Tools Required for Assembly

Lists necessary open wrench sizes for assembly: 10mm, 13mm, 17mm, & 18mm.

Step 1: Assemble Side Rail

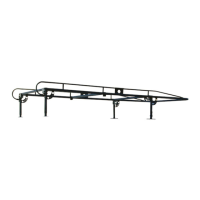
Assemble a Side Rail using two Side Rail Halves, one Connector Plate, and Carriage Bolts/Lock Nuts from Bolt Set A.

Step 2: Prepare Connecting Clamps

Place M8*25 bolts from Bolt Set B into the two holes on each of three Connecting Clamps.

Step 3: Attach Connecting Clamps to Side Rails

Place one Connecting Clamp onto each end of the Side Rails and one in the middle, securing temporarily.

Step 4: Preassemble Front Crossbar

Install carriage bolt, divider, and rubber V pad assembly onto the front crossbar.

Step 5: Preassemble Additional Crossbars

Preassemble crossbars 2 and 3 with bolts and rubber V pad assemblies, positioning bolts for posts.

Step 6: Position and Secure Posts

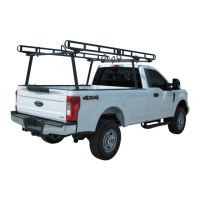
Position posts on truck bed rails and secure with J-hooks and hardware from Bolt Set E.

Step 7: Attach Crossbars to Posts and Side Rails

Secure crossbars to posts and side rails using specified bolts and hardware from Bolt Sets D and B.

Step 8: Final Tightening and Plugs

Measure, square, level, tighten all hardware, and install end plugs into crossbars.

Ladder Rack Assembly Overview

Bill of Material

Lists all components and their part numbers for both anodized and black powder coat finishes.

Hardware List

Bolt Set Details

Details the contents of Bolt Sets A through E, including part numbers, quantities, and descriptions.

Product Warranty Information

Outlines the one-year warranty for Buyers Products Co. truck/trailer hardware against defects.

Related product manuals