Do you have a question about the Byron BY206 and is the answer not in the manual?
Avoid metallic surfaces and consider environmental factors for optimal operation.
Check batteries, polarity, pairing, and external interference for no sound issues.
Details Bell Push (CR2032) and Portable Chime (AA) power, IP rating, and range.
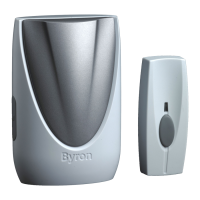
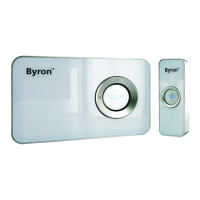
This document describes the installation, operation, and maintenance of a wireless door chime system, consisting of a bell push (transmitter) and a portable chime unit (receiver). The system is designed for ease of use and offers several customizable features.
The wireless door chime system allows for a bell push to wirelessly trigger a chime sound from a portable receiver unit. When a visitor presses the bell push, a signal is sent to the chime unit, which then plays a selected melody at a chosen volume level. The system is designed for home use, providing a convenient way to be alerted to visitors at your door.
To install the battery in the bell push, first, separate the two halves of the bell push unit. This typically involves a gentle prying or sliding motion, as indicated by the arrows in the diagram. Once opened, locate the battery compartment. Insert a CR2032 3V DC battery, ensuring the positive (+) terminal faces upwards, as marked on the battery and within the compartment. After inserting the battery, reassemble the bell push by aligning the two halves and pressing them together until they click securely into place.
For the portable chime unit, remove the battery cover, usually located on the back or bottom of the unit. Insert three 1.5V 'AA' size batteries into the designated compartments. It is crucial to observe the correct polarity; match the positive (+) and negative (-) terminals of the batteries with the internal markings within the battery compartment. Incorrect polarity will prevent the unit from functioning. Upon successful battery insertion, the chime unit will emit a 'Beep' sound, indicating it has powered on. Replace the battery cover securely.
To establish communication between the bell push and the chime unit, they must be paired. This process is referred to as 'learning mode'. a. On the portable chime unit, press and hold the 'VOL' (volume) button. Continue holding it until the chime unit emits a "Beep Beep" sound. This sound will last for approximately 6 seconds, indicating that the unit has entered learning mode. b. Once the chime unit is in learning mode, press the bell push button within 60 seconds. The chime unit will ring to confirm that the bell push has been successfully learned. c. After the chime rings, wait for 60 seconds for the chime unit to automatically exit learning mode. It is important to wait this duration before pressing the bell push again to ensure the pairing process is finalized.
If the door chime system is not working as expected, a factory reset can help resolve issues. a. Press and hold the 'VOL' button on your door chime unit. Keep holding it until the chime unit emits a "Beep Beep" sound, which will last for approximately 6 seconds. b. Release the 'VOL' button. c. Immediately re-press and hold the 'VOL' button again. Continue holding it until the chime unit emits another "Beep Beep" sound, lasting for approximately 6 seconds. d. This sequence indicates that the chime unit has been reset to its factory default settings. After the reset, you will need to re-pair the bell push with the chime unit by following the pairing instructions (Usage Feature 3).
The placement of your chime unit can significantly impact its operating range and performance. a. Before final installation, test the chime in your intended location. Internal walls and other surfaces can reduce the wireless operating range. b. Avoid mounting the chime unit onto metallic surfaces, as metal can interfere with the wireless signal and diminish the range. c. For optimal performance, consider placing the bell push slightly to the left or right of a UPVC door frame, or on an external wall, if a UPVC door is affecting performance. Always check the operating performance before final installation, as internal metal frames in doors can also affect the signal.
To change the melody played by the chime unit: a. Remove the back plate from the bell push. This will expose the internal components. b. Locate and press the melody select button inside the bell push. c. The chime unit will play the newly selected sound. d. To cycle through other available melodies, press the melody select button again. Repeat until you find your preferred melody.
The chime unit offers multiple volume levels to suit your preference. a. To adjust the chime's volume, press the 'VOL' button on the chime unit. b. Each press of the 'VOL' button will cycle through the available volume levels. There are typically 4 selectable volume levels. c. The door chime is pre-set to the loudest volume setting by default. Continue pressing the button until you reach your desired volume.
The bell push can be mounted using two methods: a. Adhesive Mounting: Peel off the protective backing from the 'Adhesive Tab' located on the back of the bell push. Press the bell push firmly onto a clean, dry, and smooth surface at your desired location. Ensure the 'UP' arrow on the bell push is pointing upwards for correct orientation. b. Screw Mounting (Optional): For a more secure installation, the bell push can be screwed into place. Remove the back plate of the bell push. Use screws (not always included) to secure the back plate to the wall through the designated screw holes. Once the back plate is secure, attach the main bell push unit to the back plate, ensuring it clicks into place and the 'UP' arrow is correctly oriented.
When the bell push battery needs replacement, separate the two halves of the unit. Remove the old CR2032 battery and insert a new one, ensuring the positive (+) terminal is correctly oriented. Reassemble the unit.
When the portable chime unit's batteries are depleted, remove the battery cover. Take out the old 1.5V 'AA' batteries and insert three new ones, paying close attention to the positive (+) and negative (-) polarity markings. Replace the battery cover.
The device is designed for indoor use only. Avoid exposing it to extreme temperatures or direct moisture. The bell push has an IP44 splash-proof rating, meaning it can withstand splashes of water, but it is not fully waterproof and should not be submerged. There are no user-serviceable parts inside the appliance; do not attempt to repair it yourself. Ensure children are supervised and do not play with the appliance.
| SIP Compatibility | Yes |
|---|---|
| Number of Door Stations | 1 |
| Audio Codec | G.711, G.722, G.729 |
| Video Codec | H.264 |
| Network Interface | 10/100 Mbps Ethernet |
| Storage Temperature | -20°C to +60°C |
| Certifications | CE, FCC, RoHS |
| Operating Voltage | 12V DC |
| Operating Current | 500mA |
| Call Features | Call Forward |
| Video Resolution | 720p |
| Power over Ethernet (PoE) | 802.3af |
| Humidity | 10% - 90% (non-condensing) |