This document is a service manual for the CAB Faby 3 slush machine, providing detailed instructions for its installation, operation, maintenance, and troubleshooting.
Function Description:
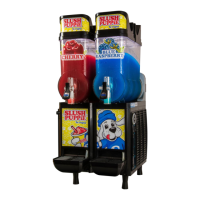
The CAB Faby 3 is a commercial slush machine designed to produce frozen beverages, such as fruit granitas, and can also function as a cold drink dispenser. It is equipped with an air-cooled condenser, requiring proper ventilation for optimal performance. The machine is available in three models (Model 1, Model 2, Model 3), differing primarily in their power consumption and physical dimensions, but all share a 2.75-gallon bowl capacity per unit.
Important Technical Specifications:
The Faby 3 machine operates on a 1-phase, 115Vac, 60 Hz electrical supply.
- Model 1: Power Absorbed: 530 W, Net Weight: 66 lbs, Gas: R404a (5.3 oz).
- Model 2: Power Absorbed: 850 W, Net Weight: 114.40 lbs, Gas: R404a (10.94 oz).
- Model 3: Power Absorbed: 1100 W, Net Weight: 154 lbs, Gas: R404a (13.58 oz).
All models have a bowl capacity of 2.75 gallons.
Dimensions:
- Width: Model 1: 7.87", Model 2: 15.75", Model 3: 23.62"
- Depth: 18.90" for all models
- Height: 33.08" for all models
The machine is ETL Listed to ANSI/UL 471 and certified to CAN/CSA/C22.2 N° 120-M91, and also carries the CE mark. It requires a minimum of 18% sugar content in the product to prevent damage to the ice scraper blade.
Usage Features:
- Placement: The machine must be placed on a flat surface with at least 8 inches of clearance on all sides for air circulation to prevent overheating. The optimal room temperature range is 77°F - 90°F. The left side serves as the air intake and must be unobstructed, while the right side is for air discharge.
- Electrical Connection: Users must ensure the correct voltage and that there is a ground pole. It is explicitly stated not to plug more than one machine into a single socket, and extension cords are not recommended.
- Slush Consistency Adjustment: The machine features a "slush adjustment wheel" located behind a mini door on the back. Rotating clockwise increases thickness, while counterclockwise decreases it. The machine is factory-adjusted for fruit granitas (normal consistency). For products containing milk or those that freeze slower, adjustment towards "MAXIMUM" thickness is recommended.
- Product Preparation and Filling: Products, especially concentrates or powders, should be mixed with water in a separate container before pouring into the tank. A minimum of 18% sugar content is crucial to protect the ice scraper blade. The liquid level in the tank must be maintained between the MIN and MAX lines (at least 1 inch above the cylinder). Hot products should not be poured into the tank. Refilling with refrigerated product is advised when the level is halfway between min and max to ensure a continuous supply of frozen product.
- Operation Control Panel: The control panel is accessed by opening a cover with a lock key.
- Timer Function (Day & Night): The TIMER switch (W) activates the night function (cold drink dispenser). The timer can be programmed by pushing in segments corresponding to desired slush operation hours (e.g., 7:00 AM to 11:00 PM for slush, remaining hours for cold drink). The timer's triangle must be set to the correct local time, observing AM/PM signs.
- Starting the Machine: Turn on individual bowl freeze switches (C), the main power switch (A) which activates all bowl upper agitators and the main gear-motor, and the light switch (B).
- Handle Lock (Optional): The handle lock can be inserted from the lower part of the tap. It offers two options:
- Complete Block (Night): Prevents opening or removing any part of the tap, thus disabling slush dispensing.
- Partial Block (Day): Allows slush dispensing but prevents removal of tap parts.
Maintenance Features:
- Cleaning Operation:
- Initial Steps: Turn off power, drain the product, fill the bowl with tepid water, wait 15 minutes, and then empty the bowl again.
- Bowl Removal: Place fingers under the front lower part of the bowl near the tap, push upwards until the legs pop out, then pull the bowl forward slowly.
- Spiral Blade Removal: Gently pull the spiral blade forward from its plate part.
- Suction Cap Gasket Removal: Remove the gasket from the front spiral.
- Bowl Gasket Removal: Remove the gasket from the back part of the evaporator tube.
- Tap Components Removal: Pull out the pin for handle fixing, remove the handle, unthread the main tap pin by pulling it downwards, and repeat for the tap spring.
- Cleaning Guidelines: All components should be cleaned with dish-washing soap and tepid water. Abrasive cleaners and excessively hot water should not be used on plastic components. Components should be placed in a safe place to avoid loss.
- Reassembly of Components:
- Preparation: Clean the evaporator tube, drip trays, and grids. Rinse the bowl gasket with water to ease reassembly.
- Bowl Gasket Reassembly: Place the bowl gasket on the back of the evaporator tube, pressing it with thumbs from the lower part upwards until it is correctly fixed.
- Suction Cap Gasket Reassembly: Insert the gasket into the spiral blade, pushing it deeply. Lubricate with provided lubricants.
- Spiral Blade Reassembly: Lubricate the front part of the evaporator tube. Insert the spiral blade gently and deeply, then lubricate the head of the spiral.
- Tap Reassembly: Lubricate the tap siege and seals. Insert the tap spring and tap pin. Ensure the small square hole on the main tap pin faces forward, press the pin upwards, and then insert the handle fixing pin.
- Bowl Reassembly: Ensure the bowl gasket is in position. Insert the bowl, aligning its back hole with the gasket. Slightly lift the back of the bowl when inserting. Press the bowl deeply. Once inserted, press down on the legs until they click into place.
- General Maintenance:
- External Filter: Clean the external filter daily by removing and washing it.
- Condenser: Clean the condenser periodically (monthly is optimal). Remove the screw and clean with an appropriate brush. A dirty condenser can damage the compressor.
- Gaskets Check: Monthly check gaskets (suction spiral's cap 2.05, tap o-ring 5.08, tap lower gasket 5.09) for damage or wear. Replace if syrup leakage is observed.
Troubleshooting:
The manual includes a comprehensive troubleshooting guide for various issues, such as the machine not starting, compressor not starting, machine not freezing, one bowl not freezing, gear motor constantly clicking, machine freezing in night position, light bowls/agitator motor not working, gear motor not working, leaks on drip tray panel, leaks on the tap, and the tap opening too hard. Each issue is linked to potential causes (e.g., electrical problems, component damage, improper assembly) and corresponding solutions (e.g., checking power, replacing parts, cleaning, reassembly).