The CanaKit Raspberry Pi Quick-Start Guide provides comprehensive instructions for setting up, configuring, and maintaining a Raspberry Pi device. This guide is designed to assist users in navigating the exciting world of Raspberry Pi, from initial setup to advanced configurations like Wi-Fi and operating system management.
Function Description:
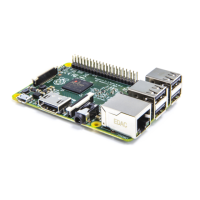
The Raspberry Pi is a series of small single-board computers developed by the Raspberry Pi Foundation. It is designed to promote the teaching of basic computer science in schools and developing countries. The CanaKit Raspberry Pi Quick-Start Guide focuses on the Raspberry Pi 2 Model B V1.1, which is a versatile and powerful microcomputer capable of performing a wide range of tasks, from basic computing and media playback to complex programming and robotics. It serves as a low-cost, high-performance platform for learning coding, building electronic projects, and creating custom applications. The guide facilitates the initial setup and configuration, ensuring users can quickly get their Raspberry Pi operational.
Important Technical Specifications (based on the Raspberry Pi 2 Model B V1.1 shown and described):
- Processor: Broadcom CPU (BCM2836RIFBG, as seen on the board diagram). The Raspberry Pi 2 Model B features a 900 MHz quad-core ARM Cortex-A7 CPU.
- Memory: While not explicitly stated in the text, the Raspberry Pi 2 Model B typically comes with 1GB LPDDR2 SDRAM.
- Storage: MicroSD Card slot for operating system and data storage. The guide mentions a "MicroSD Card loaded with 'NOOBS'" as a required item.
- Connectivity:
- USB Ports: Four USB ports for connecting peripherals like a keyboard and mouse.
- Ethernet Port: For wired network connection. The guide mentions an "[Optional] Ethernet cable for connection to a wired network."
- HDMI Port: For connecting to an HDMI monitor or TV. An "HDMI cable" and "HDMI monitor" are listed as required items.
- 40-Pin GPIO Header: General-purpose input/output pins for connecting to external hardware and electronics projects.
- DSI Display Connector: For connecting a compatible display.
- CSI Camera Connector: For connecting a compatible camera module.
- MicroUSB Power Adapter: For power input. A "MicroUSB Power Adapter" is listed as a required item.
- Audio & Composite Video: A 4-pole 3.5mm jack for audio output and composite video.
- Wireless Connectivity: [Optional] Raspberry Pi Compatible USB WiFi Adapter for wireless network connection. The guide provides detailed instructions for "Raspbian WiFi Configuration."
- Operating System: Supports various Linux-based operating systems, with "NOOBS" (New Out Of Box Software) being the recommended initial installer, allowing users to choose from options like Raspbian. The guide specifically details the installation of Raspbian.
- Power: 5V MicroUSB input.
Usage Features:
The CanaKit Raspberry Pi Quick-Start Guide outlines a step-by-step process for getting started with the Raspberry Pi, making it accessible even for beginners:
- Case Installation (Optional): If a case is purchased, the guide recommends installing the Raspberry Pi inside it first, providing a link to video instructions for CanaKit Raspberry Pi cases.
- MicroSD Card Insertion: Users are instructed to insert a pre-programmed MicroSD card (loaded with NOOBS) into the dedicated slot on the underside of the board.
- Peripheral Connection: Connect a USB keyboard and mouse to the available USB ports.
- Display Connection: Connect an HDMI monitor or TV to the Raspberry Pi using an HDMI cable, ensuring the display is on and the correct input is selected.
- Network Connection (Optional for initial OS installation): If an operating system other than Raspbian is intended for use, or if additional OS choices are desired during the first boot, connect an Ethernet cable for a wired internet connection. The guide notes that a wired internet connection during first boot will present additional OS options.
- Power On: Connect the MicroUSB Power Supply to the board. The Raspberry Pi will then boot, and the NOOBS menu will appear.
- Operating System Installation:
- Select the desired language and keyboard layout.
- Choose "Raspbian" (or another preferred OS if available) from the menu.
- Click "Install" to begin the installation process, which takes a few minutes.
- Upon completion, press OK, and the Raspberry Pi will reboot.
- Raspbian Configuration (Raspi-Config):
- The Raspi-Config tool automatically runs on the first boot of Raspbian, allowing for common configuration changes.
- Users can navigate options using arrow keys and select using the Enter key.
- Change User Password: It is highly recommended to change the default password for the "pi" user (default is "raspberry").
- Enable Boot to Desktop/Scratch: Users can choose to automatically boot into the Graphical User Interface (GUI) desktop. Otherwise, it will boot to the command line.
- Internationalisation Options: Change Locale and Timezone settings (e.g., "en_US.UTF-8" for United States, "en_CA.UTF-8" for Canada).
- After making changes, use the "Finish" button to save and reboot if prompted.
- The
sudo raspi-config command can be used to access this tool at any time from the command line.
- To load the graphical desktop from the command line, type
startx.
- Raspbian WiFi Configuration:
- For Raspberry Pi compatible WiFi adapters (like the CanaKit WiFi Adapter), configuration is done via the graphical desktop interface.
- Access the "WiFi Configuration" tool under the "Preferences" menu.
- Click "Scan" to find available wireless networks.
- Double-click the desired network, enter the password in the "PSK" field, and click "Add."
- Close the "Scan results" window, and a successful connection will be shown in the original WiFi Configuration window.
Maintenance Features:
The guide emphasizes proper shutdown procedures to prevent file system corruption:
- Proper Shutdown:
- Command Line: From the Raspbian command line, type
sudo shutdown -h now.
- Graphical Desktop: Click "Menu" and then select "Shutdown."
The guide also provides resources for ongoing support and warranty information:
- Warranty Registration: Users are advised to register their purchase within 30 days at
www.canakit.com/warranty to take advantage of the CanaKit Limited Warranty.
- Support & Resources:
- Email Support:
help@canakit.com for any issues with the kit contents.
- Raspberry Pi Foundation Resources:
www.raspberrypi.org/resources for general information about the Raspberry Pi.
- Raspberry Pi Foundation Forums:
www.raspberrypi.org/forums for technical support related to the Raspberry Pi.
Overall, the CanaKit Raspberry Pi Quick-Start Guide is a comprehensive resource that covers all essential aspects of setting up, configuring, and maintaining a Raspberry Pi, ensuring a smooth and productive user experience.