5.2 HOW TO USE OVEN
SINGLE MODE
To use the Single Mode, remove the seperator from the oven.
You can choose all the functions below with Single Mode.
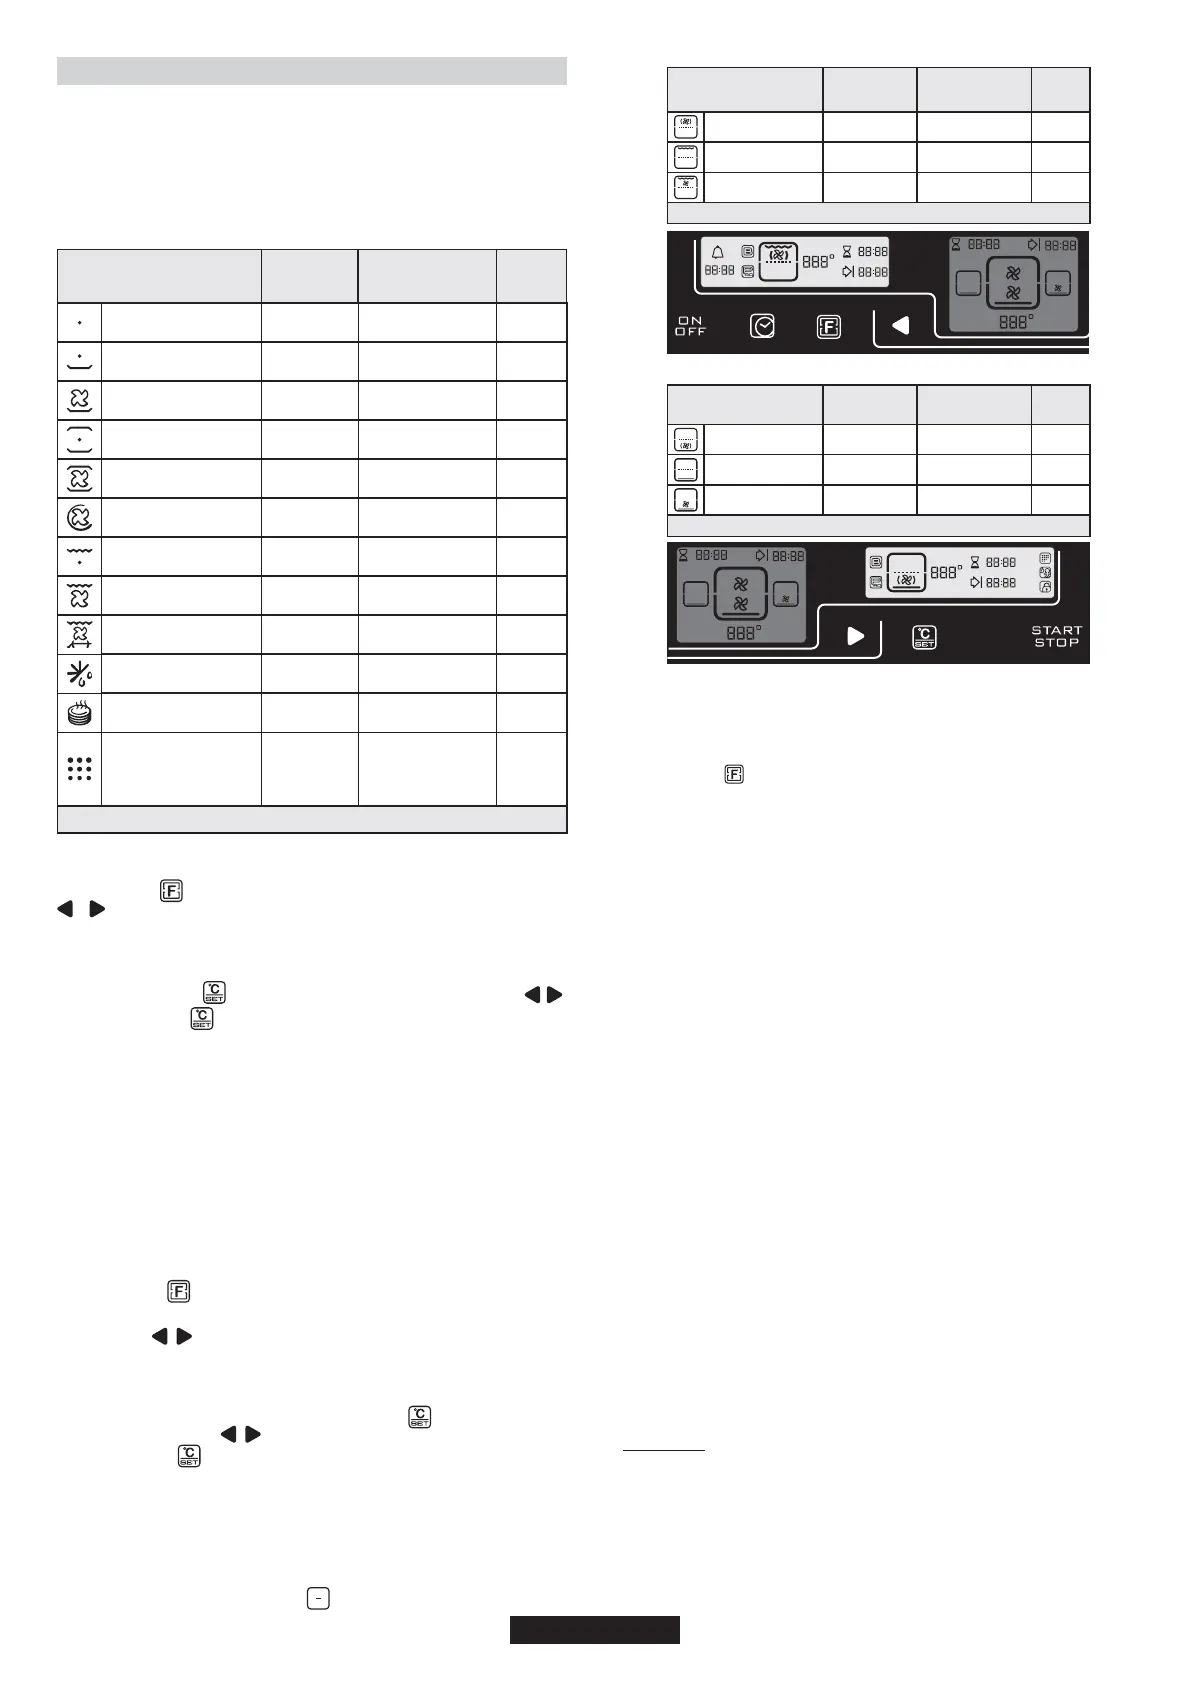
The cooking methods suggested are set out in the table below. A
temperature is also suggested for each cooking method. This can be
modified within a pre-determined range.
*Booster: rapid temperature raised
-
160
210
220
210
180
L2
210
240
40
60
NORMAL
Off
Bottom
Bottom+Fans
Bottom+Top
Bottom+Top+Fans
Circular Heating
Element +Fans
Grill
Grill+Fans
Grill+Turnspit+Fans
Defrost
Keep Warm
Pyro ***
-
50-240
50-240
50-280
50-240
50-240
L1-L3
180-230
180-240
No
No
ECO:425/65min
NORMAL:425/75min
SUP:425/1h30min
-
-
Booster
-
-
-
-
Booster
Booster
-
-
-
1.Press the “ ” to switch on the oven.
2.Press the “ ”. Choose function required to the cooking by using
.
3.The appropriate temperature or level cooking, according to the
cooking method selected is displayed. It can be modified within a pre-
determined range - see table above. To modify the temperature
setting, press the “ ” and choose the temperature by using .
Then press the “ ” again to confirm. The temperature display is
fixed but can be modified during the cooking cycle.
4.To start the cooking, press the “ ” . The oven will start
cooking and will start to heat up. The indicator light blinks until the
selection temperature has been reached. An audible sounds at the the
end of this operation and the indicator light becomes fixed.
5.To change the oven function, repeat the steps for 2 to 4.
6.To stop the cooking press the “ ”.
ON
OFF
START/STOP
START
STOP
DUAL MODE
To activate the Dual Mode, put the separator into the third position
shelf of the oven. You can choose the functions below with Dual Mode.
1- Press the “ ” switch on the oven.
2- Press the “ ” select which part of the oven cavity (UPPER or
LOWER) must be used; choose the function required to the cooking
by using the .
3- The appropriate temperature or level cooking, according to the
method selected is displayed.
It can be modified within a pre-determined range-see table below.
To modify the temperature setting, press the “ ” and choose the
temperature by using .
Then press the “ ”again to confirm. The temperature display is fixed
but can be modified during the cooking cycle.
4- To start the cooking, press the “ ” .
The oven will start cooking and will start to heat up. The indicator light
blinks until the selected temperature has been reached; an audible
sounds at the end of this operation and the indicator light becomes
fixed.
5- To stop the cooking, select the “ ”.
ON
OFF
START/STOP
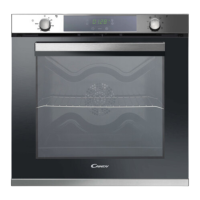
Pre-set
temperature
°C
Function Mode according
to the oven model
Pre-determined
temperature °C
Function
Booster*
09 GB
*Booster: rapid temperature raised
Pre-set
temperature °C
180
L2
190
Function Mode according
to the oven model
Circular Heating
Element +Fan
Grill
Grill+Fan
Pre-determined
temperature °C
160-240
L1-L3
160-240
Function
Booster*
-
-
-
*Booster: rapid temperature raised
Pre-set
temperature °C
Function Mode according
to the oven model
Pre-determined
temperature °C
Function
Booster*
-
-
-
180
160
160
Circular Heating
Element +Fan
Bottom
Bottom+Fan
160-240
160-240
160-240
USING UPPER AND LOWER CAVITY AT THE SAME TIME
The two cavity (UPPER and LOWER) must be used simultaneously, for
two different type of cooking; for set this modality of cooking, to set the
mode of cooking please proceed as follows:
1- Press the “ ” to select the second cavity to be used and follow the
instruction from “1” to “5” of above paragraph.
COOKING DURATION
1.Press “time set” and find “hourglass” by using “arrows”
2.Press “Temperature/Time Set” and set the cooking duration by using
“arrows”
3.To confirm your setting , press “Temperature/Time Set” again
END OF COOKING
1.Press “time set” and find “hourglass” by using “arrows”
2.Press “Temperature/Time Set” and set the end of cooking time by using
“arrows”
3.To confirm your setting , press “Temperature/Time Set” again.
NOTE: For deleting a time already set, find “barred clock” by using
“arrows” in the time set menu and press “Temperature/Time Set”
This function is typically used with “cooking duration” function.
DELAYED START
For example, if it is 10 o'clock and the dish has to be cooked for 45 minutes
and it needs to be ready by 12:30, the below steps must be followed:
- switch on the oven pressing the “ON/OFF” button
- select the desired function using the “arrows”
- select the desired temperature pressing the " °C/Time Set ” button and
using the “arrows”
- set the cooking duration to 45 minutes, that means:
•press the “Time Set” button
•press the " °C/Time Set ” button and use the “arrows” to set the
cooking duration
•confirm the choice pressing the " °C/Time Set ” button
•set the end of cooking time to 12:30, that means:
•use the “arrows” to select the “End of cooking” icon
•press the " °C/Time Set ” button and use the “arrows” to set the
end of cooking time
•confirm the choice pressing the " °C/Time Set ” button
•the oven will start to cook automatically (DO NOT press the
“START” button) at 11:45 (which means 12:30 minus 45 minutes); and the
oven will stop cooking automatically at the end of the set time.
WARNING.
If the END of cooking is selected without setting the length of
cooking time, the oven will start cooking immediately and it will stop
at the END of cooking time set.