Do you have a question about the Canon 600EXII-RT and is the answer not in the manual?
Explains how to use the Speedlite with different EOS camera types.
Explains the meaning of icons used throughout the manual.
Outlines the operational assumptions for using the Speedlite.
Provides critical warnings to prevent death or serious injury.
Lists cautions to prevent physical injury or property damage.
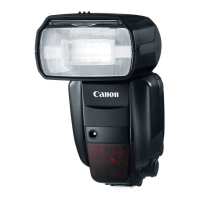
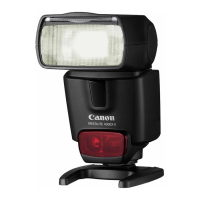
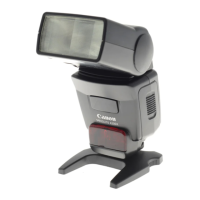
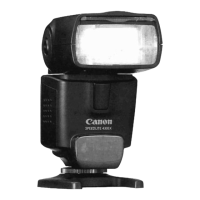
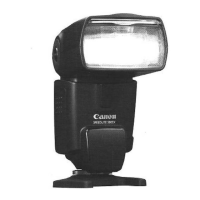
Identifies key external parts of the Speedlite.
Describes buttons, dials, and the LCD panel.
Explains the E-TTL II/E-TTL/TTL autoflash display on the LCD.
Illustrates the LCD display for manual flash settings.
Illustrates the LCD display for stroboscopic flash settings.
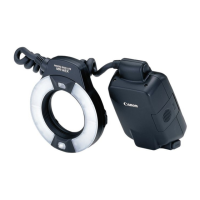
Explains the master unit's role in wireless flash photography.
Illustrates the slave unit's display for linked shooting.
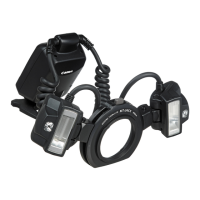
Shows included accessories like the case and mini stand.
Step-by-step guide for installing batteries.
Instructions for mounting and removing the Speedlite from a camera.
Advises on precautions for continuous flash to prevent damage.
Explains the Quick flash function for faster recycle times.
Describes the auto power off function to save battery.
Explains how to lock controls to prevent accidental changes.
Guides on focusing for automatic flash photography.
Instructions for taking the picture after setup.
Explains automatic flash coverage adjustment based on sensor size.
Details the AF-assist beam functionality for low-light focusing.
Table showing sync speeds and apertures for different camera modes.
Steps to adjust flash exposure compensation.
Instructions for setting the FEB level for bracketing.
Guides on focusing for FE Lock.
Explains how to perform FE Lock using the camera button.
Steps to activate and display High-speed Sync.
Steps to activate and display Second-curtain Sync.
How to adjust the flash head for bounce photography.
How to position the flash for short-distance shots.
Using the catchlight panel for portrait lighting.
Using the bounce adapter for wider light spread and shadow suppression.
How to set flash coverage automatically or manually.
Explains how to use the built-in wide panel for ultra-wide lenses.
Steps to set the flash to Manual mode.
How to adjust manual flash output levels.
Initial setup for metered manual flash exposure.
Steps to set the flash mode to Stroboscopic.
How to select flash output, number of flashes, and frequency.
Formula for calculating shutter speed for stroboscopic flash.
Table showing maximum continuous flashes at different Hz and output.
Explains automatic external flash metering mode.
Explains manual external flash metering mode.
How to activate modeling flash via camera button.
Instructions for attaching the color filter.
Guidance on shooting with the color filter attached.
How to reset Speedlite settings to defaults.
Steps to access Speedlite controls from the camera menu.
Lists configurable functions available via camera menu.
Setting for enabling/disabling flash firing and AF-assist beam.
Setting for E-TTL II flash metering modes (Evaluative/Average).
Setting flash sync speed in Aperture-priority AE mode.
Selecting from various flash modes like E-TTL II, Manual, MULTI.
Selecting between 1st curtain, 2nd curtain, or High-speed sync.
Adjusting flash output compensation.
Setting up Flash Exposure Bracketing.
Setting flash coverage automatically or manually.
Setting up radio and optical transmission wireless flash.
Resetting Speedlite settings via camera menu.
Steps to access custom function settings via camera menu.
How to select and set a specific function.
List of available Custom Functions and their page references.
List of available Personal Functions and their page references.
How to clear all custom and personal function settings.
Explains radio transmission wireless flash photography.
Illustrates positioning and range for wireless flash photography.
Guide to basic autoflash photography with a single slave unit.
Setting up multiple slave units and changing flash ratios.
How to configure slave units into groups for autoflash.
Setting different flash modes for individual groups.
Compares key differences between radio and optical transmission.
Details function restrictions based on camera model and release date.
Guides on setting up master/slave units and channels.
Saving and recalling wireless settings.
Basic autoflash setup with one slave unit.
Steps to configure the master unit for E-TTL wireless.
Steps to configure the slave unit for E-TTL wireless.
Verifying connection and charge status before shooting.
Performing a test flash to confirm system operation.
Capturing the image using E-TTL wireless flash.
How the master unit's LCD panel illumination behaves during wireless shooting.
Setting up autoflash with more than one slave unit.
Using advanced functions like exposure compensation in wireless mode.
Explains how to use multiple master units.
Setting up autoflash with two slave groups (A and B).
How to assign slave units to firing groups A and B.
Configuring the master unit for A:B group photography.
Adjusting the lighting balance between groups A and B.
Setting up autoflash with three slave groups (A, B, and C).
Adjusting exposure compensation for group C.
How to manage multiple slave units within a group.
Steps to set the flash to Manual mode for multiple units.
Assigning slave units to firing groups.
Controlling which groups will fire.
Choosing a group to set its manual flash output.
Adjusting the manual flash output for a selected group.
Setting the flash mode to Group mode.
Assigning slave units to firing groups (A-E).
Setting flash mode, output, and compensation for each group.
Verifying charge status before shooting in Group mode.
Accessing the slave unit's menu for test/modeling flash.
Firing test or modeling flash from a slave unit.
Accessing the slave unit's menu for remote release.
Performing remote release shooting from a slave unit.
Defines the master camera unit's role in linked shooting.
Setting the device to normal shooting mode for linked shooting.
Configuring units as master or slave for linked shooting.
Setting channel and ID for linked shooting communication.
Configuring camera settings for linked shooting.
Setting all Speedlites to master or slave role for linked shooting.
Positioning slave camera units for linked shooting.
Executing the linked shooting capture.
Using linked shooting with Live View functionality.
Explains optical transmission wireless flash photography.
Illustrates positioning and range for optical wireless flash.
Basic autoflash setup with one slave unit via optical transmission.
Setting up multiple slave units with optical transmission.
Configuring slave units into groups for optical autoflash.
Guides on setting up master/slave units and channels for optical.
Setting transmission channels for optical wireless systems.
Setting whether master unit fires or only controls slaves optically.
Saving and recalling optical wireless settings.
Basic autoflash setup with one slave unit via optical transmission.
Configuring the master unit for optical E-TTL wireless.
Configuring the slave unit for optical E-TTL wireless.
Verifying slave unit readiness in optical wireless.
Performing a test flash to confirm optical wireless operation.
Capturing the image using optical wireless flash.
Setting up autoflash with multiple slave units via optical transmission.
Using advanced functions in optical wireless mode.
Using multiple master units for optical wireless.
Setting up autoflash with two slave groups (A and B) via optical.
Assigning slave units to groups A and B for optical flash.
Configuring master unit for A:B optical flash photography.
Adjusting the flash ratio between groups A and B optically.
Setting up autoflash with three slave groups (A, B, C) via optical.
Adjusting exposure compensation for group C in optical flash.
Managing multiple slave units within a group for optical flash.
Setting flash to Manual mode for optical wireless.
Assigning slave units to firing groups for optical wireless.
Controlling which groups fire in optical wireless manual mode.
Choosing a group to set its manual flash output optically.
Adjusting manual flash output for a selected group optically.
Setting a slave unit for individual manual/stroboscopic control.
Selecting Manual or Stroboscopic flash mode on a slave unit.
Configuring stroboscopic flash settings on a slave unit.
Guides on setting Custom Functions (C.Fn) and Personal Functions (P.Fn).
List of available Custom Functions and their page references.
List of available Personal Functions and their page references.
How to clear all custom and personal function settings.
Setting the unit for the distance indicator display.
Enabling or disabling the auto power off function.
Configuring how modeling flash is activated.
Setting whether FEB automatically cancels after shooting.
Changing the FEB shooting sequence (exposure order).
Changing the automatic flash metering mode.
Enabling or disabling the AF-assist beam.
Changing the auto power off time for slave units.
Setting when slave units respond to master's test flash after power off.
Setting power source priority for flash recycle.
Setting direct adjustment of flash compensation.
Enabling beep for flash recharge completion or warnings.
Changing flash coverage distribution in auto mode.
Adjusting LCD panel illumination duration or state.
Enabling/disabling slave unit flash charge indicator blinking.
Adjusting the contrast of the LCD panel display.
Setting LCD illumination color for normal shooting.
Setting LCD illumination color for master unit.
Setting LCD illumination color for slave unit.
Enabling or disabling Quick flash functionality.
Setting whether flash fires during linked shooting.
Overview of the Speedlite system components and configurations.
Illustrates radio transmission setup for wireless flash.
Illustrates optical transmission setup for wireless flash.
Lists various devices and accessories compatible with the system.
Explains temperature increase warning levels and intervals.
Table showing flash counts before warning and rest time needed.
Troubleshooting for issues during normal shooting.
Solutions for power-related problems like no power or auto shutoff.
Solutions for when the Speedlite does not fire.
Solutions for underexposed, overexposed, or dark pictures.
Solutions for blurry images or dark picture peripheries.
Solutions for flash coverage or function setting problems.
Troubleshooting for radio transmission wireless flash issues.
Troubleshooting for optical transmission wireless flash issues.
Solutions when remote release from a slave unit is not possible.
Troubleshooting for linked shooting exposure or unit usage.
Specifies the Speedlite type and compatible cameras.
Details of the flash head, bounce angles, and adapter.
Lists flash durations and color temperature information transmission.
Lists exposure control systems and effective flash ranges.
Details on flash compensation, FEB, FE lock, HSS, Manual, Strobe.
Details on flash recharge times and AF-assist beam.
Specifications for radio transmission wireless master/slave function.
Specifications for optical transmission wireless master/slave function.
Details on Custom/Personal Functions and power source specifications.
Physical dimensions, weight, and operational environment limits.
Guide numbers for flash coverage and output levels.
Lists functions supported by Type-B cameras.
Lists functions not supported by Type-B cameras.
Lists countries where radio transmission function use is permitted.
Compliance information for FCC and Industry Canada.
| Auto Zoom Head | Yes |
|---|---|
| Power Source | 4 x AA batteries |
| Color Temperature | Approx. 5600K |
| Guide Number | 60 (m, ISO 100) |
| Bounce Head | Yes, -7 to +90° |
| Swivel Head | Yes, 180° Left & Right |
| Recycle Time | Approx. 0.1-3.3 seconds |
| Wireless Functionality | Yes, radio and optical |
| Weight | 425g (without batteries) |
| Compatible Cameras | Canon EOS Cameras |
| Flash Coverage | 24-105mm (14mm with wide panel) |
| Off-Camera Terminal | Yes, PC Sync Terminal |