EasyManua.ls Logo

Canon GL-2 User Manual

Canon GL-2
2 pages
To Next Page IconTo Next Page
Page #1 background imageLoading...
Page #1 background image
Canon GL-2 Mini-DV User Guide
What is it?
MVCC’s replacement for the Panasonic 456 SVHS camcorders, the GL-2s are high-quality, entry-level mini-DV format
cameras available for checkout.
What’s in each camera kit:
Canon GL-2 IEE 1934 Firewire Cable Headphones
Power Adapter with AC Cord, and DC Coupler (attaches to Adapter)
AV output cable (mini to 3 RCA)
Optional parts upon request:
Wireless Controller Large eye cup 8 M Memory card SVHS cable USB cable
Battery Power The 945 charges in 3.5 hours, the 915 charges in 1.5 hours
945: 4 hours of record time with viewfinder, 3.5 hours with LCD
915: 1 hour of record time with viewfinder, 50 min with LCD
DC Power The small DC coupler attaches to the camera’s battery slot Triangle DOWN and Cord UP.
* The camera automatically turns itself off if in standby for five minutes.
ON THE CAMERA
BOTTOM:
Beachtek 2-channel audio mixer:
Input for left and right sources, with audio controls at the back of the unit.
Can switch between Line and Mic inputs.
NOTE: there’s a cable that runs from the front of the Beachtek unit to the Mic Input mini-port (by the tape compartment). When
this cable is IN the mixer works but the Camera’s built in Mic DOES NOT.
Unplug the cord to use the cam’s mic.
RIGHT:
Tape Compartment:
Push the Open/Eject button, and while pressed forward simultaneously push the casing out (right) to expose the tape hatch.
Gently, gently insert the tape.
Close by pushing the part marked “PUSH,then close the outer compartment.
DC5V: DC Terminal
Mic: for plugging in external mics (Note: with mixer on bottom this isn’t needed).
Green Headphone Jack: Mini connector for headphones.
T/W: Zoom in and out
Card/Tape: Toggle from shooting video to still photos on memory card. (Card available by request)
Photo: Press to take the photo
Standby/Lock: if the power switch is set to camera, you can use the standby lever to turn the camera on and off (by switching
to lock). This saves power.
Red button: press to record.
TOP:
Eyepiece: Adjustable by sliding out first, then tilting up.
Red button: start and stop recording
T/W: Zoom in and out
Lock: slide this forward to lock the top’s zoom and record controls from accidental operation.
Camera/Off/Play: Switch between record video or VCR mode, or turn off camera.
Rec Search 1/+: when the camera is in Record Pause mode, hold the Rec Search – or + button while watching the viewfinder
to the point you wish to start restart recording. This ensures a clean record edit.
Question and Answer IconNeed help?

Do you have a question about the Canon GL-2 and is the answer not in the manual?

Canon GL-2 Specifications

General IconGeneral
Image Sensor3CCD
CCD Size1/4 inch
Optical Zoom20x
Digital Zoom100x
Image StabilizationYes
LCD Screen Size2.5 inches
Max Shutter Speed1/10000 sec
FocusAuto/Manual
Focus SystemTTL
Video RecordingYes
Video Resolution720 x 480
Audio RecordingYes
MicrophoneStereo
SpeakerYes
InterfaceIEEE 1394 (FireWire)
Storage MediaMiniDV tape
Built-in FlashNo
External FlashNo
TypeCamcorder
LensCanon 20x Optical Zoom Lens
Viewfinder TypeColor
White BalanceAuto
Video FormatDV
OutputsAV
Battery TypeLithium-ion

Summary

Camera Overview and Kit Contents

Camera Description

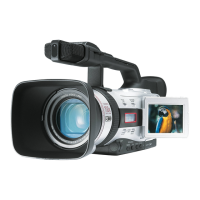
Introduction to the Canon GL-2 as a high-quality, entry-level Mini-DV format camera.

Included Camera Kit Items

List of standard accessories provided with each Canon GL-2 camera kit.

Optional Equipment Available

Optional accessories that can be requested along with the camera kit.

Battery Power Specifications

Details on battery charging times and record durations for different models.

DC Power Connection

Information on the DC coupler and automatic power-off feature.

On-Camera Controls and Features

Bottom Camera Controls

Details on the Beachtek audio mixer, its inputs, and how to use the camera's mic.

Right Side Camera Controls

Instructions for operating the tape compartment, DC terminal, and headphone jack.

Top Camera Controls

Guide to using the eyepiece, zoom controls, and recording functions.

Advanced Camera Operations

Playback and Review Function

How to review recorded footage and return to record pause mode.

Front Camera Indicators

Location of the tally light and remote control sensor.

Back Camera Operations

Correct procedure for inserting and releasing the battery.

Output Hatch Ports

Description of various terminals for connecting external devices.

Menu System Navigation

How to access shooting conditions and internal camera functions via the menu.

Clear Scan Function

Steps to enable Clear Scan mode for video output.

Audio Controls

Explanation of volume controls for audio channels and recording levels.

Program Selector Options

Overview of recording modes: Easy Recording, AUTO, and manual options.

Focus Adjustment

How to select and adjust between auto and manual focus.

ND Filter Usage

Purpose and operation of the Neutral Density filter for bright conditions.

LCD Viewfinder and Display

How to use and toggle the LCD viewfinder and its data display.

Digital Effects and Color Bars

How to select and activate digital effects or color bars.

Exposure Dial and Manual Mode

Using the exposure dial for iris adjustment in Auto and Manual modes.

White Balance Settings

Information on automatic white balance and manual adjustment procedures.

Troubleshooting Basic Issues

Guidance on resolving a common issue where no picture is displayed.

Related product manuals