Do you have a question about the Canon Image Prograf PRO-2000 and is the answer not in the manual?
Read precautions for safe printer usage and refer to Quick Guide.
Check required dimensions for printer installation and ensure adequate space.
Description of the Quick Guide printed manual.
Information on accessing and using the Online Manual.
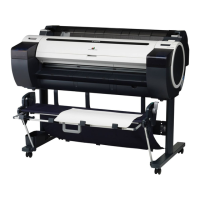
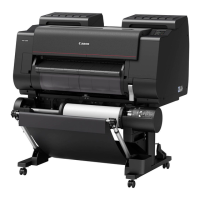
This document serves as a comprehensive setup guide for the Canon imagePROGRAF PRO-6000/PRO-6000S, PRO-4000/PRO-4000S, and PRO-2000 series printers, providing essential information for installation, initial configuration, and basic maintenance. It is designed to assist users in preparing their new printer for operation, covering everything from unpacking to connecting it to a computer or network.
The Canon imagePROGRAF PRO series printers are large-format printing devices designed for professional use, capable of producing high-quality prints for various applications such as photography, fine art, proofing, and posters. These printers utilize a multi-ink tank system, with the PRO-2000, PRO-4000, and PRO-6000 models using 12 ink tanks, and the PRO-4000S and PRO-6000S models using 8 ink tanks. The setup process involves assembling the stand (if applicable), installing the printer, attaching optional components like the roll unit and basket, installing ink tanks and the print head, loading paper, performing print head adjustments, and finally connecting the printer to a computer or network.
The initial setup begins with confirming the installation space, ensuring adequate room around the printer for operation and maintenance. The guide provides recommended dimensions, noting that space requirements may vary based on whether optional components like the printer stand and roll unit are used, and how the basket is positioned.
The physical installation involves carefully unpacking the printer, removing all packaging materials and tape, and then lifting the printer onto its stand (if used). This step is critical and requires at least six people due to the printer's significant weight, with specific instructions on how to grasp the carrying handles and avoid damage or injury. Once positioned, the printer is affixed to the stand using screws.
Following the physical installation, the guide details the process of turning on the printer. This includes opening the top cover, removing a belt stopper (which should be kept for future relocation), plugging in the power cord, and turning on the device. The initial power-on sequence involves selecting a language and region on the touch screen.
The core functionality setup includes installing the ink tanks and print head. For ink tanks, users are guided to open the ink tank covers, pull out the lock levers, shake each ink tank gently before opening its pouch, and then orient and mount them correctly in their respective holders. The guide emphasizes the importance of shaking the tanks to prevent print quality issues and warns against touching ink holes or metal contacts. For the print head, users are instructed to open the top cover, tilt the print head lock lever, open the print head locking cover, remove protective caps from the print head, and then carefully insert it into the carriage, ensuring proper alignment and securing it by pushing the lock lever down.
Paper loading for print head adjustment is another key functional step. Users are instructed to select the paper source and type on the touch screen, then insert a single sheet of paper (or two for the PRO-2000 without a stand) into the printer, ensuring it is aligned correctly and the printed side is facing up. The guide differentiates between models for paper loading instructions.
After paper loading, the printer automatically performs print head adjustment and ink charging. This process, which takes approximately 45 to 55 minutes, is crucial for optimal print quality and involves filling the ink system and performing initial cleaning. During this time, users are advised not to open covers or turn off the printer.
Finally, connecting the printer to a computer or network is covered. Users can choose between USB, wired LAN, or wireless LAN connections. The guide directs users to a Canon website to download setup files or use a provided CD-ROM for installation. It also explains how to configure wireless LAN settings directly on the printer's touch screen if a computer is not used for this step.
The Canon imagePROGRAF PRO series printers offer several features designed for ease of use and professional output. The touch screen interface provides intuitive navigation for setup, configuration, and status monitoring. The multi-ink tank system allows for individual replacement of colors, optimizing ink usage and reducing waste. The design includes specific carrying handles for safe transportation, although it requires multiple people due to the printer's size and weight.
The printer's ability to automatically perform print head adjustment and ink charging upon initial setup ensures that the device is ready for high-quality printing from the start. The option to connect via USB, wired LAN, or wireless LAN provides flexibility in integrating the printer into various work environments. The inclusion of a basket and roll unit (either standard or optional) enhances paper handling capabilities, supporting both cut sheets and roll paper for diverse printing needs.
The printer also features an accessory pocket for storing small components like the 3-inch paper core attachment, contributing to an organized workspace. The belt stopper, removed during initial setup, is designed to be kept for future use, particularly if the printer needs to be moved, highlighting a thoughtful design for long-term usability.
Maintenance is integrated into the printer's design and setup process. The initial ink charging and print head adjustment are fundamental maintenance steps that ensure the printer's optimal condition from the first use. The guide explicitly states that these processes fill the ink system and perform cleaning, which may cause the remaining ink indicator and maintenance cartridge capacity indicator to drop slightly, advising users to purchase replacement ink tanks promptly.
The guide also recommends performing color calibration after the initial setup is complete. This feature helps compensate for variations in color tone due to differences between printers or aging, ensuring consistent and accurate color output over time. Color calibration takes approximately 10 minutes and uses specific adjustment paper. Users can access this function through the printer's maintenance menu.
The provision of a cleaning brush, stored under the top cover, indicates that routine internal cleaning is expected and supported. The guide advises using this brush when opening the top cover for cleaning.
The manual also includes a "Responding to Messages" section, which is a crucial maintenance feature. It lists common error messages that may appear during setup, their causes, and corrective actions. This allows users to troubleshoot minor issues independently, such as ink tanks not being installed correctly, paper loading errors, or hardware errors. For more complex issues, it advises users to record the error code and contact Canon support, demonstrating a structured approach to problem-solving and maintenance.
Overall, the Canon imagePROGRAF PRO series printers are designed for professional performance with a clear focus on user-friendly setup, flexible usage, and integrated maintenance capabilities to ensure consistent, high-quality output.
| Printer Type | Large Format Inkjet Printer |
|---|---|
| Print Technology | Inkjet |
| Maximum Print Resolution | 2400 x 1200 dpi |
| Print Width | 24 inches |
| Number of Ink Colors | 12 |
| Memory | 1 GB |
| Ink Type | LUCIA PRO |
| Number of Nozzles | 18, 432 |
| Media Handling | Roll Paper, Cut Sheet |
| Media Thickness | 0.07 - 0.8mm |
| Media Types | Photo Paper, Fine Art Paper, Canvas |
| Connectivity | USB, Ethernet, Wi-Fi |
| Interface | USB 2.0 High-Speed, Ethernet, Wireless LAN |
| Operating System Compatibility | Windows, macOS |
| Hard Drive | No |