Do you have a question about the Canon PowerShot A20 and is the answer not in the manual?
Details Canon's liability limitations regarding accuracy, errors, omissions, and changes to specifications.
Informs users that the camera body may become warm during prolonged use.
Explains the high-precision manufacturing of the LCD monitor and pixel specifications.
Instructs users to set the camera's video signal format for TV output.
Recommends shooting trial images to confirm correct camera operation before important shots.
Warns users that personal use of digital cameras must respect copyright laws.
States that the camera's warranty is effective only in the country of sale.
Highlights critical warnings about potential dangers such as eye damage and injury.
Advises against placing the camera near strong electromagnetic fields to prevent malfunctions.
Explains how to avoid condensation by slowly adjusting to temperature changes.
Instructs immediate stop of use if condensation is detected to prevent equipment damage.
Recommends removing the battery when storing the camera for extended periods.
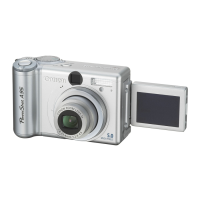
Provides an overview of the camera's front and back components with labels.
Explains how to power on the camera and what to expect on the LCD monitor.
Describes how to use the optical viewfinder to compose images.
Explains how to use the LCD monitor for composing, menus, and replaying images.
Details the information shown on the LCD monitor during shooting.
Explains the two-step action of the shutter button: halfway and fully pressed.
Describes how to adjust the zoom settings for telephoto and wide-angle shots.
Introduces the Auto, Manual, and Stitch Assist shooting modes.
Explains how to adjust image resolution and compression settings.
Details the different flash modes available for shooting.
Explains the Macro and Infinity modes for close-up and distant subjects.
Describes how to use focus lock for subjects not suited to autofocus.
Explains how to use the self-timer for delayed shots.
Describes how to shoot successive frames while the shutter button is pressed.
Explains how to correct exposure for bright backgrounds or backlighting.
Details how to set white balance to match lighting conditions for accurate color.
Explains how to use this mode to take shots for combining into a panorama.
Describes how to view recorded images one at a time on the LCD monitor.
Explains how to enlarge images for closer inspection.
Describes how to view recorded images nine at a time in an index display.
Explains how to rotate an image by 90° or 270° clockwise in the LCD monitor.
Describes how to automatically replay all images on the CF card.
Explains the feature to protect important images from accidental erasure.
Details the procedure for erasing individual images from the CF card.
Explains how to erase all unprotected images from the CF card.
Guides users on how to access and display the print order menu.
Explains how to set print styles like Standard, Index, Both, Date, and File No.
Details the process of selecting specific images for printing.
Explains how to clear all print selections and reset settings to default.
Provides instructions for connecting the printer to the camera.
Details the steps for printing images directly from the camera.
Explains how to print images marked with DPOF settings.
Guides users on selecting print styles for their prints.
Explains how to access and use the Rec. menu for basic settings.
Details how to adjust the duration the image stays on the LCD after shooting.
Explains how to select whether the camera resets the file number on new CF cards.
Describes how to turn confirmation beeps on or off.
Instructs users to format new CF cards before use for proper operation.
Covers settings like Auto Power Down and Video Signal Format.
Explains how to switch video signal format for TV monitors.
Guides on transferring images from a CF card to a computer.
Explains the file structure and naming conventions used by the camera.
Lists the Windows and Macintosh OS versions compatible with the USB connection.
Provides important precautions for connecting the camera via USB.
Details the physical connection process using the USB interface cable.
Provides step-by-step instructions for replacing the internal date battery.
Explains how to use rechargeable batteries and battery chargers.
Describes the wide converter for taking wide-angle shots.
Explains the close-up lens for taking macro shots.
Details the adapter required for attaching optional wide and close-up lenses.
Provides instructions on how to securely attach lenses and adapters to the camera.
Explains how to use the soft case to protect the camera from scratches and dust.
Addresses issues related to the camera not turning on or having no power.
Helps diagnose and resolve problems when the camera fails to take a shot.
Troubleshoots issues where the lens remains extended after the camera powers off.
Provides solutions for batteries draining faster than expected.
Offers guidance when rechargeable batteries are not charging correctly.
Addresses issues with image blurriness or unexpected shooting results.
Provides solutions for images appearing too dark due to insufficient light or settings.
Offers solutions for images appearing too bright due to exposure settings.
Troubleshoots issues where the flash fails to activate.
Explains common messages related to camera operation and status.
Details messages that may appear during image replay.
Explains messages displayed when printing to the Card Photo Printer CP-10.
| Image Sensor Type | CCD |
|---|---|
| Image Sensor Size | 1/2.7 inch |
| Effective Megapixels | 2.1 MP |
| Lens Focal Length | 5.4 - 16.2mm |
| Lens Aperture | f/2.8 - f/4.8 |
| ISO Range | Auto, 50, 100, 200, 400 |
| Display Type | LCD |
| Optical Zoom | 3x |
| Type | Compact |
| Display Size | 1.5" |
| Storage Media | CompactFlash Card |
| Battery Type | AA |
| Supported Flash Memory | CompactFlash |


 Loading...