EasyManua.ls Logo

Cardinal Gates MG15 - User Manual

Default Icon
2 pages
Print Icon
To Next Page IconTo Next Page
Loading...
Install one-way stop bracket (I) on one side of
latch if you wish to have gate open in only one
direction.
A
B
C
D
E
F
G
H
I
1
6 ”
A
C
2
C
3
REPEAT AT
BOTTOM OF
GATE
2X
D
4
B
E
H
5
LOOSEN AT TOP AND
BOTTOM OF GATE TO
ADJUST GATE WIDTH
2X
F
6
MOUNT LATCH
ASSEMBLY WITH
SCREWS
4X
•”
G
C
ONE-WAY
STOP BRACKET
OPTION
ASSEMBLY INSTRUCTIONS
1. Install hinge
bracket (A) to wall
(stationary side of
gate) using Phillips
screw (C)
beginning 6 ”
above floor
surface.
(Use ruler on left
edge of this sheet
to measure from
floor)
2. Install second
screw (C) in
top of hinge
bracket
securing it to
the wall.
THIS SIDE OF GATE HAS THREE (3) HOLES
3. Insert eye bolts (D) into top and bottom
of hinge side gate (side with three holes).
Be sure nuts are tight.
4. Hang gate by inserting hinge rod (B), through top
of mounted hinge bracket (A), through upper plastic
shoulder washer (E), through both eye bolts, through
lower plastic shoulder washer (E), and finally through
bottom of hinge bracket. To secure hinge, insert
key ring (H) through hole in end of hinge rod.
5. Use Allen wrench (F) to unscrew set screws on
top and bottom of gate to extend gate to fill door
opening. ONLY LIGHTLY TIGHTEN AND LEAVE
SHIPPING TABS IN PLACE NOT TO MAR GATE
FINISH. You will remove shipping tabs during final
tightening.
6. Hold latch assembly (G) against opposite
wall and extend gate until at least ” of
safety bracket will interlock with flange
of latch. Mark position of latch assembly
screw holes with pencil. Swing gate out
of way and mount latch assembly to wall.
Check closure of gate and tighten set
screws from STEP 5 by removing shipping
tabs to secure gate width.
GATE IS RECOMMENDED FOR CHILDREN UP TO 24 MONTHS.
MG15 Auto-Lock Gate
I
Question and Answer IconNeed help?

Do you have a question about the Cardinal Gates MG15 and is the answer not in the manual?

Summary

Gate Assembly Instructions

Install Hinge Bracket to Wall

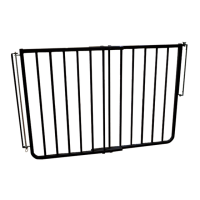
Mount the hinge bracket to the stationary wall side of the gate starting 6½ inches above the floor.

Secure Top Hinge Bracket

Install the second screw into the top of the hinge bracket to secure it firmly to the wall.

Attach Eye Bolts to Gate

Insert eye bolts into the top and bottom of the hinge side gate; ensure nuts are tight.

Hang Gate on Hinge Rod

Insert hinge rod through bracket, washers, eye bolts, and bottom bracket to hang the gate.

Adjust Gate Width

Use Allen wrench to loosen set screws and extend gate to adjust width.

Mount Latch Assembly

Mount the latch assembly to the opposite wall, ensuring it aligns with the gate's safety bracket.

Optional One-Way Stop Bracket

Install an optional stop bracket to restrict gate opening to a single direction.

Critical Safety Warnings

Warnings regarding secure installation and proper use to prevent serious injury or death.

Gate Operation and Maintenance

Opening and Closing the Gate

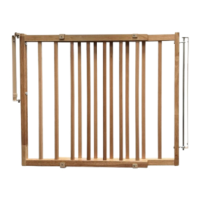
Step-by-step instructions on how to properly open and close the automatic locking gate.

Routine Gate Maintenance

Suggestions for maintaining the gate, including using corrosion inhibitors and cleaning methods.

Care and Usage Reminders

Important tips for proper gate usage, care, and periodic checks for security.

Product Warranty and Support

Gate Warranty Details

Information on the one-year limited warranty for home use and 90-day for commercial use.

How to Exercise Warranty

Instructions for shipping the gate for repair or replacement under warranty.

Customer Assistance Contact

Contact information for customer support, including phone number and website.

Cardinal Gates MG15 Specifications

General IconGeneral
BrandCardinal Gates
ModelMG15
CategoryIndoor Furnishing
LanguageEnglish

Related product manuals