The Vega RS8 is a mobility scooter designed for indoor and outdoor transportation for individuals with impaired walking ability, provided they have sufficient eyesight and are physically and mentally capable of operating an electric scooter.
Before operating the Vega RS8, users must familiarize themselves with the scooter's operation and controls by reading the instruction booklet. A personal condition assessment is recommended before driving. The scooter should not be assembled, maintained, or operated without reading the instruction booklet. Users must observe and obey all pedestrian rules and regulations. The mobility device is approved for use on traffic routes in accordance with relevant national legislation. Users should always be aware of pedestrians and situations requiring extra care on public walkways and footpaths. Driving under the influence of alcohol or medication that may affect ability is prohibited. Night driving should be avoided, and the key must be turned off before getting on or off the scooter.
It is crucial not to turn the power on before sitting securely on the seat and to ensure the power is off when getting in or out to prevent accidental activation of controls. Weight should be kept toward the middle of the deck to maintain stability. Only one person can ride the Vega RS8 Mobility Scooter at a time; carrying passengers is not permitted. New users are advised to practice in a clear, safe, and level space, such as a park or playground, to learn basic functions like acceleration, braking, reversing, turning, and ramp navigation. The speed control should initially be set to the lowest setting and gradually increased as familiarity grows. Practicing with an attendant is recommended until the user feels competent.
Daily checks are essential before each journey. Users should not extend their body over the scooter. When crossing level crossings, ensure the wheels are perpendicular to the rail. Mobile phones and wireless devices should not be used while driving. The scooter's batteries should not be used to charge other electric devices, except for original manufacturer accessories. Driving on slopes exceeding the specified limit is prohibited. Speed should be reduced when descending and increased when ascending. Obstacles exceeding the specified limit should not be crossed. Driving in rain, wet grass, or other hazardous conditions is not recommended. Lights should be on during night driving or in poor visibility. Continuous operation with drained batteries can damage the scooter.
When turning, speed should be reduced, and a stable center of gravity maintained to prevent tipping. Power should not be turned off while driving. Leaning forward is recommended when proceeding up ramps, inclines, curbs, or low rises for maximum stability. Attempting to climb or descend inordinately high obstacles can cause tipping. The scooter should not be used on escalators. Sharp turns while driving should be avoided. The scooter should never be placed in freewheel mode on an incline or decline. When parked, the N-D lever must be firmly locked in the "DRIVE" position. When descending an incline, the slowest speed possible should be used. If the descent is too fast, release the throttle lever to stop and then gently re-engage to control speed.
Batteries must be fully charged for maximum performance and longevity. The maximum load capacity is 136 kg (300 lbs); exceeding this can result in injury. The front basket has a maximum load of 3 kg; exceeding this can damage the basket. The mobility device is designed for a single occupant within the maximum permissible load. Maintenance work not described in the user manual should not be attempted. Parts, especially safety-protected components like anti-tips, should not be changed, modified, or removed. Air tires must be completely deflated before dismantling the rim.
The scooter's materials and assemblies are flame resistant. Exposure to rain, snow, ice, salt, or standing water should be avoided, and the scooter should be stored in a clean, dry condition to prevent damage to the electrical system. Anti-tip wheels should not be removed or modified. Only original chargers, accessories, or components supplied by the scooter supplier should be used. If a problem occurs, stop using the scooter immediately, turn off the power, and contact the dealer. Extra attention is needed while driving, as emergency stops can affect passengers.
Cautions When Driving on Inclines
The scooter has rated climbable height, obstacle height, and gap limits. Driving on slopes exceeding the rated slope is prohibited. The weight capacity limit varies with ramp degree: 50 kg at 10 degrees, 91 kg at 8 degrees, 136 kg at 6 degrees, and 160 kg at 4 degrees. The scooter's ability to travel up inclines is influenced by user weight, scooter speed, angle of approach, and scooter setup. Driving on long ramps or uneven terrain should be avoided to prevent motor defects. Battery voltage may increase when driving downhill; if it becomes too high, over-voltage protection (ERR3) will activate, slowing the scooter to a stop. In such cases, pull over, release the wigwags, and restart the scooter.
When driving down a ramp or uneven terrain, the speed adjustment should be set to the slowest setting. If speed is too fast, release the throttle lever to stop the scooter, then gently push it forward to regain control. Avoid turning at high speeds on ascending or descending ramps. The maximum obstacle and curb height the scooter can climb is 5 cm (A), and the maximum gap it can drive over is 17 cm (B). When driving on a ramp, adjust body's center of gravity for stability. While rated for a maximum climbable height, it is suggested not to drive over obstacles higher than 5 cm.
Electromagnetic Interference (EMI) and Warnings
Mobility scooters can be susceptible to EMI from sources like radio stations, TV stations, amateur radio transmitters, two-way radios, and mobile phones. EMI can cause unintended brake release, movement, or damage to the control system. The scooter's immunity level (resistance to EMI) is at least 20 V/m.
Sources of radiated EMI include:
- Hand-held portable transceivers: CB radios, walkie-talkies, security/police transceivers, mobile phones. Some mobile phones transmit signals even when off.
- Medium-range mobile transceivers: Used in police cars, fire trucks, ambulances, taxis.
- Long-range transmitters: Commercial broadcast transmitters, amateur (HAM) radios.
Other devices like cordless phones, laptops, AM/FM radios, TV sets, CD players, cassette players, electric shavers, and hair dryers are not likely to cause EMI problems.
Warnings to minimize EMI risk:
- Do not operate hand-held transceivers or turn on personal communication devices (e.g., mobile phones) while the scooter is on.
- Be aware of nearby transmitters (radio/TV stations) and avoid them.
- If unintended movement or brake release occurs, turn the scooter off immediately.
- Adding accessories or modifying the scooter may increase EMI susceptibility.
- Report all incidents of unintended movement or brake release to the distributor, noting any nearby EMI sources.
Safety Warning and Instruction Labels
The scooter includes several labels:
- Warning Sticker: Advises reading the instruction booklet, not driving on slippery surfaces or slopes over 6 degrees, avoiding highways/crowded roads, not turning at high speed, avoiding washing with water, and always re-engaging the emergency freewheel device.
- Do not hang baggage: On the tiller/tiller adjustment lever.
- Not a motor vehicle seat: The scooter is not intended for use as a seat in a motor vehicle.
- Tie-down points: For securing the scooter during transport; do not sit on the scooter during transport.
- N-D Lever Adjustment label: Instructions for freewheel mode operation.
- Product Information: Includes model number (HS-520), medical device symbol, serial number, date of manufacture, manufacturer, importer, EU authorized representative, WEEE conformity, consult instructions for use, UK conformity assessed, warning, UKRP, CE European conformity, and maximum weight capacity (136 kg).
- Wiring diagram Label: Indicates the location of the wiring diagram.
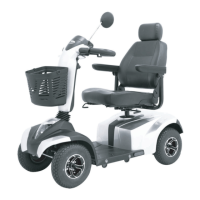
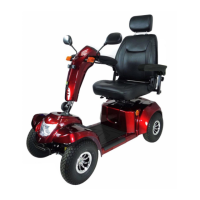
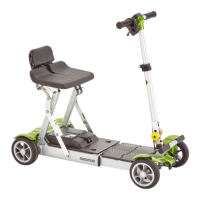
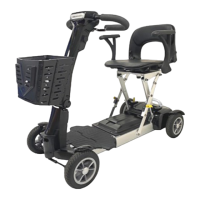
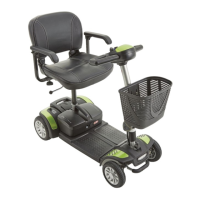
Identification of Parts
Scooter Components (Figures 3 & 4):
- Control Panel
- Front Turning Signal
- Charging Port
- Front Basket
- Headlight
- Tie-down Hook
- Reflector
- Seat Fore-Aft Adjustment Lever
- Seat Swivel Lever
- Throttle
- Rear Mirror
- Tiller Angle Adjustment
- Key Switch
- Front / Rear Wheels
- Anti-Tipper
- Tail light / Rear Turning Signal / Stop Lamp
- N-D Lever
- Adjustable Armrest (Width)
- Captain Seat
Control Panel (Figure 5):
21. Power/Self-Diagnostic Warning light: Indicates power on / error code.
22. Horn: Press for warning sound.
23. Left/Right Turning Signal: Switch for left/right turn.
24. Hazard Signal: Press for hazard lights.
25. Speed Dial Knob: Adjusts scooter speed (Rabbit for fast, Turtle for slow).
26. Battery Gauge: Displays battery charge.
Operating Your Scooter
General Operation:
- Main Key Switch / Headlight: Turn the key right to turn the scooter on. Turn left to turn it off. Turning the key to the headlight symbol turns on the headlight.
- Safety Note: Always switch off the scooter before getting on or off or removing items. Turning off the scooter while driving will cause an abrupt stop.
- Sleep Mode: The scooter enters sleep mode with a long beep if no throttle activity is detected for a programmable period (default 30 mins). The warning light will be off, and the scooter will not respond. To wake it up, turn the power off and then on again.
- Speed Dial Knob: Adjusts speed. Do not set to maximum when operating, especially on slopes. Adjust to minimum when declining.
- Turning Signal: Press the left side for a left turn signal, right side for a right turn signal.
- Headlight: Turn the key to the headlight symbol to turn on. Turn back to ON position to turn off.
- Horn: Press the button to sound the buzzer.
Throttle:
- Pulling the right throttle moves the scooter forward; pulling the left throttle moves it backward (can be reversed by a dealer). These are accelerators; further depression increases speed.
- Releasing both throttles automatically engages the brakes, slowing and stopping the scooter. Stop lamps activate for 5 seconds.
- Safety Note: Do not pull both throttles simultaneously, as this can lead to loss of control. Always ensure the scooter is off before getting on or off.
Tiller Angle Adjustment:
- Pull the tiller adjustment downwards to adjust the tiller's angle, then release to lock it in a comfortable position.
Seat Swivel Adjustment:
- Pull the swivel lever upwards to rotate the seat left and right.
Seat Length Adjustment:
- Lift the lever forward to adjust the seat to a comfortable position.
Armrest Adjustment:
- Angle: Rotate the screw to adjust the armrest angle.
- Width: Loosen thumbscrews to adjust width, then tighten to lock.
- Pull the armrest up when getting on or off the scooter.
- Safety Note: Set the seat to the foremost position when driving to prevent tipping. Do not hang heavy goods on the armrests.
Free-Wheeling (N-D Lever):
- Neutral (N) position: Scooter can be moved manually without power.
- Drive (D) position: Scooter can be driven (normal position).
- Safety Note: Freewheel operation is only recommended on flat surfaces. Never leave the scooter on a gradient with motors disengaged. Do not sit on the scooter when adjusting the N-D lever. If the lever is in Neutral, the scooter cannot be driven; turn off the scooter, switch to D, then turn on and drive.
Tie-Down Hooks:
- Four fixed hooks are provided for securing the scooter during transportation. Ensure the N-D lever is in D position when transporting. Do not sit on the scooter during transport.
Disassembling Your Scooter:
- Safety Note: Do not turn on the scooter when disassembling/assembling. Ensure the scooter is in D position. Do not modify or change the scooter with non-authorized parts.
- Disassembling seat: Lift the lever to remove the seat upwards.
- Rear Compartment cover: Open the cover upwards.
- Front basket: Lift the front basket upwards.
Disassembling Batteries:
- Release battery velcro straps and disconnect connectors.
- Safety Note: Batteries are heavy; be careful when removing. Do not connect battery terminals with metals. Connect red to red, blue to blue. When replacing, remove screws and connectors in sequence, then tighten each component back. Maintenance and repair must be done by a competent engineer or authorized dealer.
Charging the Batteries
Charging Information:
- AC Input: 100-240Vac, 50-60Hz, 2.2-1.1A
- DC Output: 24V Rated
- Operating temperature: 0°C~40°C (30°F~104°F)
- Charger Model: PF2405SL
- DC Output (Max): 5A
Important Safety Instructions for Charging:
- Read all safety instructions before use.
- Not intended for use by persons with reduced physical, sensory, or mental capabilities, or lack of experience, unless supervised.
- Children should be supervised to prevent play with the appliance.
- Failure to follow instructions can result in electric shock, fire, or injury. Save instructions for future reference.
- For indoor use only; do not expose to rain, snow, or damp conditions.
- Check charger case, cables, and socket for damage before use. Contact dealer if damaged.
- Contact dealer if unsure how to operate the charger.
- Place charger in a well-ventilated area, protected from direct sunlight and flammable surfaces.
- Do not cover or obstruct ventilation holes to reduce fire risk.
- Keep charger out of children's reach.
- Charge only 24V lead acid or Gel cell type rechargeable batteries.
- Before each use, check charger, cable, and plug. Do not use if damaged. Do not open the charger; repairs by qualified technician only.
- Disconnect AC input before plugging/unplugging battery connections.
- Unplug both DC output and AC input cords when batteries are fully charged.
- Charger may become warm (exceed 41°C) during boost charging; avoid prolonged skin contact.
- Connect DC output plug to charging port first, then AC plug to power outlet.
- Charger has a polarized plug; do not dismantle or modify.
- Risk of electric shock; do not open or modify charger.
- Explosive gases; prevent flames and sparks. Provide adequate ventilation during charging.
- Charger requires no maintenance beyond general cleaning with a soft, damp cloth.
- Power Cord EU: Certified power cord (H03VV-F or H05RR-F) with 3G, 0.75mm² minimum conductors.
- Power Cord USA/Canada: UL Certified grounding-type attachment plug (125 volts, 15 amp) with SJT, SP-2, SPE-2, SV, SVE or SVT cord, 18 AWG minimum, 1.8m-3m length.
Indicator Functions (Bi-coloured LED light):
- Flash-rapid Red: Faulty
- Flash Red: Standby
- Solid Red: Charging
- Solid Green: Fully Charged
- Yellow: Power
Symbols on Charger:
- Warning!
- Read the instructions
- For indoor use only
- Service & repairs by authorized person only
- Avoid naked flames and sparks
- Caution, hot surface
- Alternating current
- Direct current
- CE (EN60335-2-29, EN55014 Class B)
- TÜV SÜD (ANSI/AAMI ES60601-1:2005/R:2012-8, CAN/CSA-C22.2 NO.60601-1:2014, EN60601-1:2006/A1:2013)
- AS/NZS (AS/NZS 60335.2.29, AS/NZS CISPR 14.1.2010)
Care and Maintenance
Daily Check:
- N-D lever: Check function. If failed, contact dealer.
- Horn: Check function. If failed, contact dealer.
- Throttles: Pull wigwag to test movement. If failed, contact dealer.
- Electromechanical brake and Emergency hand brake: Pull wigwag slightly and release to test brake. If failed, contact dealer.
- Battery Gauge: Check display and power level. If not working, contact dealer. If low, recharge immediately.
- Rear mirror(s): Check cleanliness, tightness, and stability. Clean with damp cloth. Tighten screws/clamping stem if loose.
- Lighting: Check all lights (head, rear, turn signals) function correctly. If failed, contact dealer.
Weekly Check:
- Speed Dial Knob: Check function. If failed, contact dealer.
- Armrests: Check cleanliness, tightness, and stability. Tighten screw knob if loose.
- Wheels/Tyres: Inflate to 35-40 psi. Check drive wheels rotate without wobbling. Tread depth not less than 0.5mm. Check for foreign objects. If issues, contact dealer.
- Motor: Observe while driving. Check function. If issues, contact dealer.
- Battery Charger: Check function and if batteries are charged. If issues, contact dealer.
Monthly Check:
- Seat / Upholstery: Check for movement and wear. If issues, contact dealer.
- Electronics: Check all battery cables and connectors are firmly tightened. If issues, contact dealer.
Cleaning Your Scooter:
- Do not use abrasive or scouring liquids. Use a damp cloth and gentle detergent.
- Do not use a hose pipe or splash water directly onto the scooter to avoid damage to electronics.
Maintenance:
- Regular inspection by user to keep in good running order.
- Check electrical cable connectors are fully connected.
- All maintenance and repair must be done by an authorized dealer.
Seat Upholstery:
- Use a damp cloth and a little soap to wipe the seat. Do not use abrasive cleaners.
Storage:
- Store in a dry location. For long-term storage, disconnect battery terminals.
- Do not store near direct heat, damp, oil, acid, alkaline, or ozone sources, as this will minimize scooter/tire cycle and shorten lifetime.
Tyre Replacement:
- User should frequently inspect tires for damage, foreign bodies, unusual wear, and tread depth. Contact dealer for replacements.
- Periodic Inspection: Tyre pressure 35-40 psi. Tread depth drops below 0.5 mm.
- Recommended Storage Range: Temperature: -30°C to +50°C, Humidity: 25% to 85%.
- Steps to replace tyre:
- Turn off scooter, remove key. Ensure N-D lever is in D position before lifting scooter.
- Use ratchet and socket to remove drive wheel screw from center hub. Pull wheel off axle.
- Separate tyre from rim.
- Remove old tyre, replace with new.
- Slide wheel back onto shaft.
- Install drive wheel nut into center hub, verify key aligns with axle and wheel, then tighten (Torque 300±30kgf-cm).
- All maintenance and repair must be done by an authorized dealer.
Recycling & Disposal:
- Equipment wrapping is recyclable.
- Metal parts are for scrap metal recycling.
- Plastic parts are for plastic recycling.
- Electric components and printed circuit boards are disposed of as electronic scrap.
- Exhausted or damaged batteries can be returned to the medical equipment supplier.
- Disposal must comply with national legal provisions.
- Contact local waste management companies for details.
Service Life:
- Estimated service life of five years, provided strict adherence to intended use, maintenance, and service requirements. This can be exceeded with careful use and maintenance, or reduced by extreme/incorrect usage or technical limitations. This estimate does not constitute an additional warranty.
Trouble Shooting
The scooter has a self-diagnostic warning light on the control panel. Count the blinks to identify errors.
Scooter Won't Move When Key is Turned On:
- Power off: Turn power on.
- N-D lever in Neutral: Switch to D (drive) position, turn off/on again.
- Battery power under 25%: Recharge battery, retest.
- Charger power cord plugged in: Unplug charger power cord.
Error Code (Flash Count and Description):
- 1 Flash (Battery Low): Batteries running low. Recharge.
- 2 Flashes (Low Battery Fault): Batteries run out of charge. Recharge. Check battery and connections.
- 3 Flashes (High Battery Fault): Battery voltage too high (overcharged or downhill travel). Reduce speed on slopes to minimize regenerative charging.
- 4 Flashes (Current limit time-out or controller overheat): Motor exceeding max current rating. Scooter may have stalled. Turn controller off, wait, turn on again. Motor may be faulty. Check motor and connections.
- 5 Flashes (Park Brake): Park brake release switch active or park brake faulty. Check park brake and connections. Ensure switches are in correct positions.
- 6 Flashes (Drive Inhibit): Stop function active or charger inhibits/OONAPU condition. Release stop condition (seat raised etc.). Disconnect battery charger. Ensure throttle is in Neutral when turning controller on. Throttle may require re-calibration.
- 7 Flashes (Speed Pot): Throttle, speed limit pot. SRW or wiring faulty. Check throttle, speed pot, and connections.
- 8 Flashes (Motor Voltage): Motor or wiring faulty. Check motor and connections.
- 9 Flashes (Other Error): Controller internal fault. Check all connections and wiring.
Other Problems:
- Tyre: Low tyre pressure. Pump to 35-40 psi.
- Charger: Light on charger doesn't change to green during charging. Refer to section 5-2.
Options
Available options to add functionality (contact authorized dealer for more info):
- Height Adjustable Armrests: Allows adjustment of armrest height.
- Handbrake: Provides an additional braking mechanism.
- Hi / Lo Switch: Enables switching between high and low-speed modes.
- Safety Turning Speed Reduction (Gyro Meter): Automatically reduces speed when turning left or right based on turning space to ensure safety.
Technical Specifications (Rev. 6, 2023/01/11)
- Overall Length: 1200 mm / 47.2"
- Overall Width: 640 mm / 25.2" (Armrest Width)
- Overall Height: 1155 mm / 45.5"
- Front Wheels: 290 mm / 11"
- Rear Wheels: 290 mm / 11"
- Weight W/ Batteries: 94 kg / 208 lbs
- Max. Speed: 12 kmph / 7.5 mph
- Weight Capacity: 136 kg / 300 lbs
- Ground Clearance: 65 mm / 2.6"
- Grade Climbable: 10 degree
- Curb Climbable: 60 mm / 2.4"
- Turning Radius: 1400 mm / 55.1"
- Suspension: Front & Rear
- Brake: Electro-Mechanical
- Seat Type: Swivel Mid-Back W/ Headrest & Seat Sliding Mechanism
- Seat Width: 465 mm / 18.3"
- Motor Size: 700W, 4500 r.p.m
- Battery Size: (2) 12V. 50Ah
- Battery Weight: 30.5 kg / 67.2 lbs
- Travel Range: 39 km / 24.2 Miles
- Battery Charger: 5A Off Board
- Electronics: On / Off Key Switch, Battery Level Indicator, Speed Control Knob
Specifications subject to change without notice.