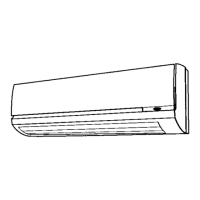
Drill at Slope
Indoor side
0 Outdoor side
o
Oo°O
_1/4 to 1/2 in. lower
o Ooe
o o _
Fig. 9 -- Placement of Connection Piping
Complete the following when installing the wall hanging
bracket:
1. Before installing the wall hanging bracket to the wall re-
move it from the indoor unit by pushing at the indicated
pressure points at the bottom of the unit.
2. Install the wall hanging bracket in a location that is strong
enough to withstand the weight of the unit.
3. Install the wall hanging bracket so that it is level. Use a
plumb line if necessary.
NOTE: Be sure that the wall hanging bracket is level. If the
wall hanging bracket is not level water will leak from the
indoor unit
4. Fasten the wall hanging bracket to the wall with 4 or
more screw anchors through the holes near the outer edge
of the bracket.
5. Install the wall hanging bracket flush to the wall, and en-
sm'e the bracket does not move.
6. If the unit is removed from the wall hanging bracket after
installing it on to the wall, remove it by pushing up on the
indicated marks at the bottom of the unit body.
Step 3 -- Complete Refrigerant Piping
Connections
INDOOR UNITS- When running the piping for indoor
units the piping can be connected as rear piping or side or bot-
tom piping. Refer to Fig. 8 and 9.
Rear Pinin_ -- Route the piping behind the indoor unit so that
the piping is concealed by the unit. For rear piping installation
drill a 2V2 in. diameter hole in the wall at point A or B in
Fig. 8. Drill the hole at a slope so that the outside end is lower
(V4 in. to I/2in.) than the inside end to ensure optimal drainage.
Cut the wall sleeve to mateh the wall thickness and pass the
pipe through the hole.
Side or Bottom Piping -- Remove the knockout in the unit
and pass the piping through the wall. The pipe should slope
downward and away from the unit to ensure optimal drainage.
Routing the Drain Hose and Refrigerant Piping -- The drain
hose and drain cap are assembled as shown in Fig. 10 in the
factory. To do right-side ((9), right-bottom (_) or right-back
((9) piping in Fig. 6 draw the drain hose to right-side piping
direction. (It is not always necessary to exchange the location
of drain hose and drain cap.)
1. Tie together the refrigerant piping, the drain hose, and the
electrical cormection wire.
2. Route the refrigerant piping in the required direction, and
bend carefully avoiding pipe deformation.
3. Bind the drain hose and the electrical connection wire
together with fastening tape.
4. The drain hose should be at the bottom. See Fig. 1! and
12.
5. For left-hand piping, fit the pipes and the wiring into the
recess at the back of the uniL
Fig. 10 -- Location of Drain Hose and Cap
®
0 Indoor unit piping
(9 Left-hand piping
Bind with fastening tape
Drain hose
Connection wire
Fig. 11 -- Location of Piping
_) Indoor unit piping
Drain hose
(9 Connection wiring
Fig. 12 -- Location of Piping, Hose and Wiring
7
 Loading...