Manufacturer reserves the right to discontinue, or change at any time, specifications or designs without notice and without incurring obligations.
PC 111 Catalog No. 535-050 Printed in U.S.A. Form 50BY-1SI Pg 1 1-02 Replaces: New
Book 1 4
Ta b 2 b 7 a
Installation, Start-Up and
Service Instructions
CONTENTS
Page
SAFETY CONSIDERATIONS
. . . . . . . . . . . . . . . . . . . . . . 1
GENERAL
. . . . . . . . . . . . . . . . . . . . . . . . . . . . . . . . . . . . . . . . 1
INSTALLATION
. . . . . . . . . . . . . . . . . . . . . . . . . . . . . . . . 1-14
Step 1 — Complete Pre-Installation Checks
. . . . . . 1
Step 2 — Rig and Place Unit
. . . . . . . . . . . . . . . . . . . . . 2
Splitting a 50BYN024
. . . . . . . . . . . . . . . . . . . . . . . . . . . . . 2
Unit Discharge
. . . . . . . . . . . . . . . . . . . . . . . . . . . . . . . . . . . 2
Vibration Isolation
. . . . . . . . . . . . . . . . . . . . . . . . . . . . . . . . 2
Step 3 — Install Accessories
. . . . . . . . . . . . . . . . . . . . . 2
Step 4 — Install Ductwork
. . . . . . . . . . . . . . . . . . . . . . . . 7
Step 5 — Install Rain/Condensate Drain Line
. . . . 11
Step 6 — Complete Electrical Connections
. . . . . . 13
START-UP
. . . . . . . . . . . . . . . . . . . . . . . . . . . . . . . . . . . . 13-20
General
. . . . . . . . . . . . . . . . . . . . . . . . . . . . . . . . . . . . . . . . . 13
Compressor Rotation
. . . . . . . . . . . . . . . . . . . . . . . . . . . 19
Operating Sequence
. . . . . . . . . . . . . . . . . . . . . . . . . . . . 19
SERVICE
. . . . . . . . . . . . . . . . . . . . . . . . . . . . . . . . . . . . . 20, 21
Cleaning Evaporator and Condenser Coils
. . . . . . 20
Lubrication
. . . . . . . . . . . . . . . . . . . . . . . . . . . . . . . . . . . . . . 20
Condenser Fan Adjustment
. . . . . . . . . . . . . . . . . . . . . 20
Pulley Alignment
. . . . . . . . . . . . . . . . . . . . . . . . . . . . . . . . 20
Belt Tension Adjustment
. . . . . . . . . . . . . . . . . . . . . . . . 20
Changing Fan Wheel
. . . . . . . . . . . . . . . . . . . . . . . . . . . . 20
Fan Bearing Replacement
. . . . . . . . . . . . . . . . . . . . . . . 20
Concentric Alignment
. . . . . . . . . . . . . . . . . . . . . . . . . . . 20
MAINTENANCE
. . . . . . . . . . . . . . . . . . . . . . . . . . . . . . 21, 22
Cleaning
. . . . . . . . . . . . . . . . . . . . . . . . . . . . . . . . . . . . . . . . 21
Inspection
. . . . . . . . . . . . . . . . . . . . . . . . . . . . . . . . . . . . . . . 21
Air Filters
. . . . . . . . . . . . . . . . . . . . . . . . . . . . . . . . . . . . . . . 21
Condensate Drain
. . . . . . . . . . . . . . . . . . . . . . . . . . . . . . . 21
Checking System Charge
. . . . . . . . . . . . . . . . . . . . . . . 21
Access Panel Removal
. . . . . . . . . . . . . . . . . . . . . . . . . . 22
Evaporator-Fan Motor Removal
. . . . . . . . . . . . . . . . . 22
Pressure Relief Device
. . . . . . . . . . . . . . . . . . . . . . . . . . 22
Cycle-LOC™ Protection Device
. . . . . . . . . . . . . . . . . 22
Time Guard® II Control
. . . . . . . . . . . . . . . . . . . . . . . . . . 22
High and Low Pressurestats
. . . . . . . . . . . . . . . . . . . . 22
Oil Charge
. . . . . . . . . . . . . . . . . . . . . . . . . . . . . . . . . . . . . . . 22
TROUBLESHOOTING
. . . . . . . . . . . . . . . . . . . . . . . . . 23-25
START-UP CHECKLIST
. . . . . . . . . . . . . . . . . . CL-1, CL-2
SAFETY CONSIDERATIONS
Installing, starting up, and servicing air-conditioning
com-
ponents and equipment can be dangerous. Only trained, quali-
fied installers and service mechanics should install, start-up,
and service this equipment.
When working on the equipment, observe precautions in the
literature and on tags, stickers, and labels attached to the equip-
ment. Follow all safety codes. Wear safety glasses and work
gloves.
GENERAL
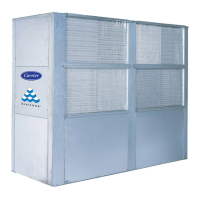
ECOZONE indoor package units are designed to provide
the flexibility required in replacement, renovation, and new
construction. Units are available in 6 sizes from 5 tons to
20 tons. Belt-drive condensers provide adequate static to over-
come ducting and louver static losses. This allows units to be
positioned against an existing window or wall louver, or ducted
to the outside as required.
Convenient rear connections allow easy access for outside
air connections and air side economizer. Unit supply air
discharge may be vertical or horizontal
front. These
packaged
vertical packaged units are fully piped and wired. Units are
complete with a belt drive evaporator section and built-in
ducted air-cooled condenser. Airflow is horizontal or vertical.
All units are designed to fit through most standard doors.
The 20 ton size may be easily field split to simplify moving the
units into existing buildings. See Fig. 1-3 for unit dimensions
and refer to Table 1 for unit operating weights.
INSTALLATION
ECOZONE 50BY units are intended for indoor installation
only. Determine building alterations required to run piping,
wiring and ductwork. Follow dimensional drawings for duct-
work, piping locations, electrical wiring (refer to Table 2 for
electrical data) and overall unit dimensions.
Read all installation instructions before installing the unit.
Step 1 — Complete Pre-Installation Checks —
Examine unit for damage incurred during shipment. File claim
immediately with transit company if damage is found. Check
the shipment for completeness. Verify that the nameplate elec-
trical
requirements match the available power supply.
DO NOT place the unit in a horizontal position that would
allow oil to drain into the top of the compressor. Do not allow
refrigerant lines to come into contact with wiring or sharp ob-
jects or edges. Do not lift or move unit by putting pressure on
refrigerant lines.
Before performing service or maintenance operations on
unit, turn off main power switch to unit. Electrical shock
could cause personal injury.
Use care in handling, rigging, and setting bulky equipment.
50BYN006-024
ECOZONE Vertical Single Package
Air-Cooled Units
5 to 20 Tons