6.Replacecondenser-fanassembly.
Step 6--Electrical Controls and Wiring
Inspect and check the electrical controls and wiring annually. Be
.sur(, to furlz (_'tlle electrical power to the unit.
Remove the top panel to locate all the electrical controls and
wiring. Check all electrical connections lor tightness. Tighten all
screw connections. If any smoky or burned connections are
noticed, disassemble the connectiom clean all the parts, restrip the
wire end and reassemble the connection properly and securely.
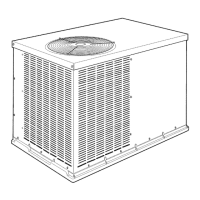
3.125 in.
C00021
Fig. 21--Condenser-Fan Adjustment
After inspecting the electrical controls and wiring, replace all the
panels. Start the unit, and observe at least one complete cooling
cycle to ensure proper operation. If discrepancies are observed in
operating cycle, or iX'a suspected malfunction has occurred, check
each electrical component with the proper electrical instrnmenta-
tion. Reli:r to the unit wiring label when making these checkouts.
NOTE: Reli:r to the Sequence of Operation section as an aid in
deterndning proper control operation. (See Table of Contents Iiw
page number. )
Step 7--Refrigerant Circuit
Inspect all refrigerant tubing connections and the unit base Iiw oil
accumulations annually. Detecting oil generally indicates a refi'ig-
erant leak.
If oil is detected or if low cooling perli_rmance is suspected,
leak-test all refi"igerant robing using an electronic leak-detector, or
liquid-soap solution. Ira reli"igerant leak is detected, relierto Check
fiw Refi"igerant Leaks section. (See Table of Contents li)r page
nun'_ber.)
If no refrigerant leaks are limnd and low cooling perfkwmance is
suspected, reli:r to Reli"igerant Charge. (See Table of Contents lor
page nnmber.)
Step 8--Evaporator Airflow
The cooling airflow does not require checking unless in,proper
perlkwmance is suspected. !_J"u problem ('xL_t_, be m_r(, that cHl
SUl_plv-cmd returll-_tir grille,s are ol)ell ut_d_)'('e.f}'omol)structiot*,s,
und theft the c_ir,_i'lteris clecm. When necessary, reler to Indoor
Airflow and AirlIow Adjustments section to check the system
airflow. (See Table of Contents fkw page number.)
Step 9--1Vletering Devices
Rel)'igerant metering devices are fixed orifices and are located in
the inlet header to the evaporator coil.
Step lO--Liquid Line Strainer
The liquid line strainer (to protect metering device) is made of wire
mesh and is located in the liquid line on the inlet side of the
metering device.
18
 Loading...