7
ACCESSORY INSTALLATION
Accessory Hinged Panels —
The following parts are
needed to field install an EconoMi$er on a unit with hinged ac-
cess panels:
3-6 Ton Unit Chassis
7-10 Ton Unit Chassis
12
1
/
2
Ton Unit Chassis
The hinged access panel parts should be installed in place of
corresponding existing parts only on units equipped with
hinged access panels.
Standard Hood —
To assemble the standard hood assem-
bly to either the vertical or horizontal EconoMi$er:
1. Remove the EconoMi$er hood from its packaging, and
locate the outdoor air (OA) panel. See Fig. 16.
2. Install the
3
/
4
x
3
/
4
in. (horizontal) or
1
/
2
x
3
/
4
in. (verti-
cal) seal strip on the Exhaust Air (EA) hood top panel.
Install the
1
/
8
x
7
/
8
in. (horizontal) or
1
/
8
x
3
/
4
in. (verti-
cal) seal strip on the EA hood side panels and bottom
brackets. Assemble the EA hood to the OA panel as
shown in Fig. 20, using the screws provided. Do not
attach hood assembly to unit at this time.
3. Install the
1
/
8
x
7
/
8
in. (horizontal) or
1
/
8
x
3
/
4
in. (verti-
cal) seal strip on the OA hood top and side panels.
Assemble the OA hood to the OA panel as shown in
Fig. 21, using the screws provided. Do not attach hood
assembly to the unit at this time.
4. Slide the OA inlet screens into the screen track on the
hood side panels. While holding the screens in place,
fasten the screen retainer to the hood using the screws
provided. Repeat the process for the EA screen.
5. Install the complete hood assembly on the unit, and
secure using the screws provided. See Fig. 22.
ITEM QUANTITY PART NO. DESCRIPTION
1
1 50DK508295 Label, JCI Economizer
2
5 AL48AM217 Screw
3
1 50CK504722 Label
4
1 HY76TB035 Wire Tie
5
1 AL56AU126 Screw
6
1 50HJ402257
Upper Filter Panel Assembly
(or reuse existing panel)
7
1 50HJ440057 Lower Filter Panel Assembly
ITEM QUANTITY PART NO. DESCRIPTION
1
1 50DK508295 Label, JCI Economizer
2
5 AL48AM217 Screw
3
1 50CK504722 Label
4
1 HY76TB035 Wire Tie
5
1 AL56AU126 Screw
6
1 50HJ402260
Upper Filter Panel Assembly
(or reuse existing panel)
7
1 50HJ440056 Lower Filter Panel Assembly
ITEM QUANTITY PART NO. DESCRIPTION
1
1 50DK508295 Label, JCI Economizer
2
5 AL48AM217 Screw
3
1 50CK504722 Label
4
1 HY76TB035 Wire Tie
5
1 AL56AU126 Screw
6
1 50HJ402261
Upper Filter Panel Assembly
(or reuse existing panel)
7
1 50HJ440056 Lower Filter Panel Assembly
LOWER
EXHAUST HOOD
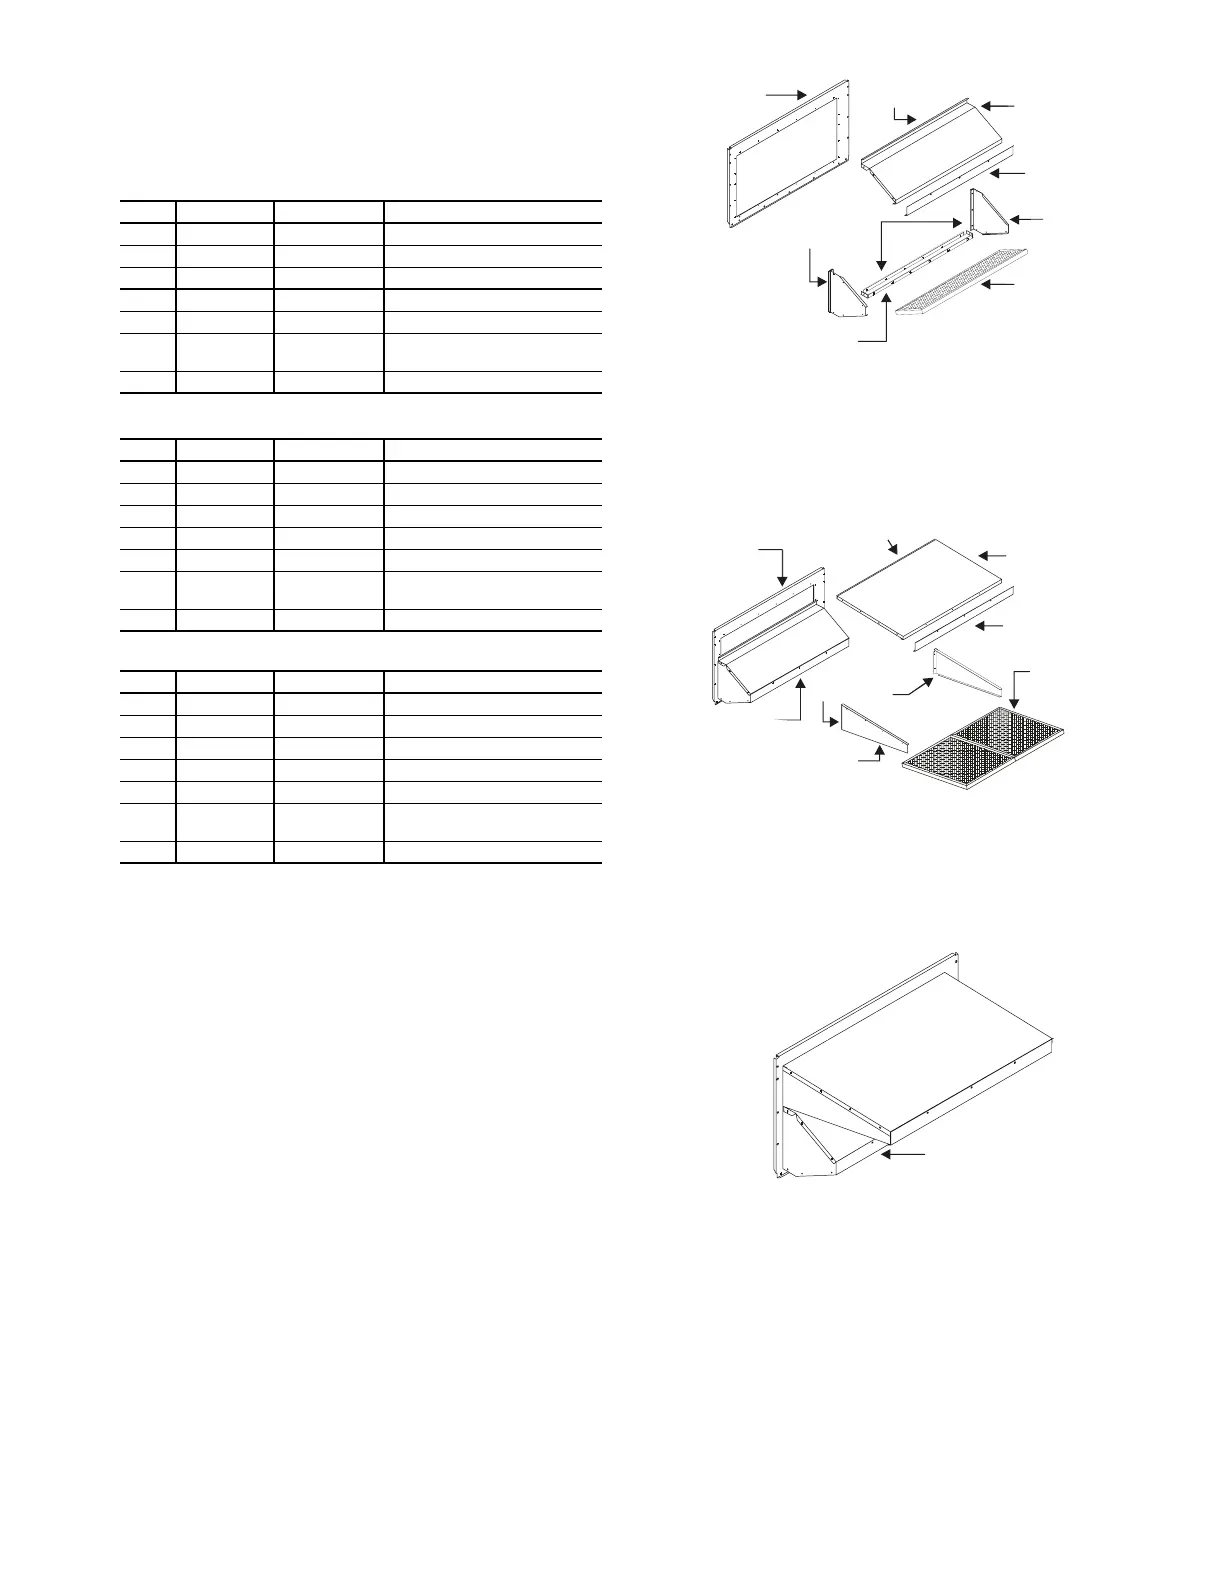
Fig. 22 — Completed Hood Assembly
EXHAUST AIR
HOOD TOP
SCREEN
RETAINER
AIR EXHAUST
HOOD SIDES
EXHAUST
AIR SCREEN
3/4 x 3/4 IN.
SEAL STRIP
1/8 x 7/8 IN.
SEAL STRIP
OUTDOOR
AIR
PANEL
EXHAUST AIR
BOTTOM BRACKET
Fig. 20 — Exhaust Air Hood Assembly
(Horizontal EconoMi$er)
OUTDOOR AIR
HOOD TOP
SCREEN
RETAINER
OUTDOOR AIR
INLET SCREENS
1/8 x 7/8 IN.
SEAL STRIP
OUTDOOR AIR
HOOD SIDES
1/8 x 7/8 IN.
SEAL STRIP
OUTDOOR
AIR PANEL
ASSEMBLED
LOWER
EXHAUST HOOD
Fig. 21 — Outdoor Air Hood Assembly
(Horizontal EconoMi$er)
 Loading...