EasyManua.ls Logo

Casio 2782 User Manual

Casio 2782
8 pages
To Next Page IconTo Next Page
Page #1 background imageLoading...
Page #1 background image
Operation Guide 2782
1
MO0407-EB
Getting Acquainted
Congratulations upon your selection of this CASIO watch. To get the most out
of your purchase, be sure to carefully read this manual and keep it on hand
for later reference when necessary.
Applications
The built-in sensors of this watch measure altitude, barometric pressure,
temperature and underwater depth. Measured values are then shown on the
display. Such features make this watch useful when hiking, mountain
climbing, skin diving, or snorkeling, or when engaging in other such outdoor
activities.
For a watch with the elapsed time bezel
Rotate the elapsed time bezel to align the
mark with the minute hand.
After that, the number of minutes that elapse is
indicated by how far the minute hand has moved
from
.
Elapsed time bezel
Warning!
The measurement functions built into this watch are not intended for
taking measurements that require professional or industrial precision.
Values produced by this watch should be considered as reasonable
representations only.
This watch is intended for use up to skin diving and snorkeling. Never
use this watch while scuba diving.
Never operate the buttons of the watch while underwater.
CASIO COMPUTER CO., LTD. assumes no responsibility for any loss,
or any claims by third parties that may arise through the use of this
watch.
About This Manual
Button operations are indicated using the
letters shown in the illustration.
Each section of this manual provides you with
the information you need to perform operations
in each mode. Further details and technical
information can be found in the “Reference”
section.
Most of the display examples in this manual
show only the digital display, without the analog
hands, as shown in the lower illustration.
(Light)
Timekeeping Mode
Barometer/
Thermometer Mode
Depth Gauge Mode
Press B.
From the Timekeeping Mode, you can press B to directly enter the
Barometer/Thermometer Mode or D to enter the Altimeter Mode. You can
also use B and D to switch between the Barometer/Thermometer Mode
and the Altimeter Mode.
General Guide
The illustration below shows which buttons you need to press to navigate
between modes.
In any mode, press L to illuminate the display.
Countdown
Timer Mode
Stopwatch Mode
C
Altimeter Mode
C
Press C.
Press D.
Alarm Mode
Hand Setting Mode
C
Press C.
C
C
Timekeeping
This watch features separate digital and analog
timekeeping. The procedures for setting the
digital time and analog time are different.
Whenever you need to adjust both the digital
and the analog time settings, make sure you
adjust the digital setting first.
Digital Time and Date
Use the Timekeeping Mode to set and view a
digital display of the current time and date. When
setting the digital time, you can also configure
settings for the 12/24-hour format.
Hour : Minutes
PM indicator
Seconds
Month – Day
Day of week
To set the digital time and date
1. In the Timekeeping Mode, hold down A until the seconds start to flash,
which indicates the setting screen.
2. Press C to move the flashing in the sequence shown below to select other
settings.
Year
Seconds
Hour
Minutes
Day
Month
12/24-Hour
Format
4. Press A to exit the setting screen.
Note
Resetting the seconds to 00 while the current count is in the range of 30 to
59 causes the minutes to be increased by 1. In the range of 00 to 29, the
seconds are reset to 00 without changing the minutes.
With the 12-hour format, the P (PM) indicator appears on the display for
times in the range of noon to 11:59 p.m. and no indicator appears for times
in the range of midnight to 11:59 a.m.
Setting
Seconds
Hour, Minutes
12/24-Hour
format
Year, Month,
Day
Button Operations
Press D to reset the seconds to 00.
Use D (+) and B (–) to change the setting.
Use D to toggle between 12-hour (12H)
and 24-hour (24H) timekeeping.
Use D (+) and B (–) to change the setting.
Screen
3. When the setting you want to change is flashing, use D and/or B to
change it as described below.
With the 24-hour format, times are displayed in the range of 0:00 to 23:59,
without any indicator.
The 12-hour/24-hour timekeeping format you select in the Timekeeping
Mode is applied in all modes.
The year can be set in the range of 2000 to 2039. The day of the week is
calculated automatically in accordance with the date you set.
The watch’s built-in full automatic calendar automatically makes allowances
for different month lengths and leap years. Once you set the date, there
should be no reason to change it except after you have the watch’s battery
replaced.
Question and Answer IconNeed help?

Do you have a question about the Casio 2782 and is the answer not in the manual?

Casio 2782 Specifications

General IconGeneral
TypeDigital
Model2782
CategoryWatch
MovementQuartz
DisplayDigital
Water Resistance50 meters
AlarmYes
StopwatchYes
BacklightYes

Summary

Getting Acquainted

Applications

Describes the watch's built-in sensors for measuring altitude, pressure, and temperature for outdoor activities.

Warning!

Provides critical safety warnings regarding the watch's measurement precision and intended use.

About This Manual

General Guide

Timekeeping

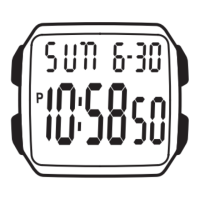
Explains separate digital and analog timekeeping and the procedure for setting digital time and date.

Setting the Analog Time

Barometer/Thermometer

Barometric Pressure History Graph

Describes how to interpret the graph for weather prediction based on atmospheric pressure changes.

Barometer and Thermometer Precautions

Outlines important safety and usage precautions for pressure and temperature measurements.

Altimeter

How the Altimeter Works

Details how the watch estimates altitude using preset ISA values and optional reference altitudes.

Important! (Altimeter)

Provides crucial warnings and advice for accurate altitude measurement and safe usage.

Setting a Reference Altitude

Depth Gauge

Important! (Depth Gauge)

Lists critical safety checks and precautions before skin diving or snorkeling.

What is "a dive"?

Defines the start and end of a dive for the watch's measurement and logging purposes.

Depth Gauge Precautions

While Skin Diving/Snorkeling

Provides advice for skin diving and snorkeling, including checking the watch and avoiding hazards.

After Skin Diving/Snorkeling

Instructs on rinsing the watch with fresh water after diving to prevent corrosion and maintain cleanliness.

Log Data

Countdown Timer

Configuring the Countdown Timer

Details the settings for countdown start time, auto-repeat, and progress beeper.

Stopwatch

Alarms

Alarm Operation

Describes how alarms sound, how to test them, and how to enable/disable alarms and hourly time signal.

Warning! (Alarms/Backlight)

Provides critical safety warnings for using the auto light switch, especially while operating vehicles.

Backlight

About the Auto Light Switch

Details the auto light switch function, how it activates the backlight based on wrist movement, and its limitations.

Questions & Answers

How does the altimeter work?

Explains the principles behind the watch's altimeter, relating air pressure to altitude using ISA values.

Diving at high altitudes or in fresh water

Provides guidance on using the depth gauge at high altitudes and the impact of fresh water on readings.

How does the barometer work?

Explains how the barometer measures atmospheric pressure and its relation to weather prediction.

How does the watch calculate depth values?

Details how the watch uses water pressure measurements to determine depth.

Reference

Auto Return Features

Describes how the watch automatically returns to the Timekeeping Mode from other modes after a period of inactivity.

Sensor Malfunction Indicator

Explains the 'Err' indicator for sensor malfunction and troubleshooting steps.

Precautions Concerning Simultaneous Measurement of Altitude and Temperature

Offers advice on prioritizing altitude or temperature measurements based on watch placement.

BATTERY and RECOVER Indicators

Backlight Precautions

Auto light switch precautions

Changing the Barometric Pressure and Temperature Units

Calibrating the Temperature Sensor

Calibrating the Barometric Pressure Sensor

Changing the Altitude Unit

To Manually Reset the Reference Depth to 0 Meters (Feet)

Related product manuals