Do you have a question about the Casio PRG-270 and is the answer not in the manual?
Verify battery charge and take action if low.
Configure Home City and DST for accurate timekeeping.
Adjust the watch's current time and date settings.
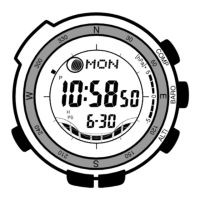
Displays day of the week and date.
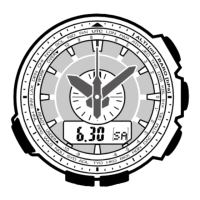
Displays month and day.
Shows a graph of recent barometric pressure readings.
Select Home City and set daylight saving time (DST).
Adjust the watch's current time and date parameters.
Explains the difference between magnetic and true north.
Precautions on where to take readings.
Set display units for pressure, temperature, and altitude.
Interpret the pointer indicating pressure change.
Understand pressure change alerts.
Control display of pressure change alerts.
Adjust pressure and temperature sensors for accuracy.
Prepare for altitude readings by setting format and interval.
Choose between screen formats for altitude display.
Set how often altitude readings are taken.
Measure altitude change from a reference point.
Apply altitude difference for navigation.
Set a known altitude for accurate measurements.
Access saved altitude data.
Access the mode for sunrise/sunset time lookups.
Access the stopwatch function.
Measure elapsed time.
Pause timing to record split times.
Access the countdown timer function.
Set the initial countdown duration.
Start and stop the countdown timer.
Access the alarm settings.
Configure a specific alarm time.
Access the World Time Mode.
Activate the display light manually.
Set how long the light stays on.
Enable or disable button press sounds.
Resolve issues with incorrect time settings.
Address issues with unit settings.
Resolve charging issues.
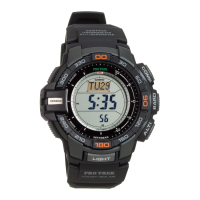
This document describes the operation of a CASIO watch, model 3415, which incorporates built-in sensors for measuring direction, barometric pressure, temperature, and altitude. These features make the watch particularly useful for outdoor activities like hiking and mountain climbing.
The watch features 10 distinct modes: Timekeeping, Digital Compass, Barometer/Thermometer, Altimeter, Sunrise/Sunset, Data Recall, Stopwatch, Countdown Timer, Alarm, and World Time. Users can navigate between these modes by pressing specific buttons. To return to the Timekeeping Mode from any other mode, the user can hold down the 'D' button for approximately two seconds. The watch also has an auto-return feature, automatically reverting to Timekeeping Mode if no button operations are performed for a certain period, which varies by mode (e.g., 3 minutes for Sunrise/Sunset, Data Recall, Alarm, and Digital Compass; 1 hour minimum for Altimeter; 12 hours maximum for Barometer/Thermometer; 1 hour for setting screens). If a screen with flashing digits is left unattended for two or three minutes, the watch automatically exits the setting screen. The 'A' and 'C' buttons are used for scrolling through data on setting screens, with holding them down enabling high-speed scrolling.
The Timekeeping Mode displays the current time and date. Users can cycle through different screen contents, including the day of the week/date, month/day, and a barometric pressure graph, by pressing the 'D' button.
To configure Home City settings, the user holds down 'D' in Timekeeping Mode for at least two seconds. The display will show "SET Hold" and "CITY", then scroll through the selected city code and name. Users can scroll through available city codes using 'A' (East) and 'C' (West) buttons. Pressing 'D' again displays the DST setting screen, where 'A' toggles between Daylight Saving Time (ON) and standard time (OFF). Once settings are complete, pressing 'D' twice exits the setting screen. The watch uses UTC offsets to calculate times for other time zones based on the Home City time.
To change current time and date settings, the user follows a similar procedure, holding down 'D' in Timekeeping Mode. After the city code display, pressing 'D' cycles through various settings like DST, 12/24-hour format, Power Saving, illumination duration, button operation tone, seconds, hour, minutes, year, month, and day. 'A' and 'C' buttons are used to adjust the flashing item. Pressing 'D' twice exits the setting screen. The watch's full auto-calendar accounts for different month lengths and leap years, so the date only needs to be changed after a battery replacement or power drop to Level 5.
The Digital Compass Mode utilizes a built-in direction sensor to take direction readings. North is indicated by three graphic segments, and the watch displays literal direction indications and an angle value. To take a reading, the user ensures the watch is in Timekeeping or a sensor mode, places it on a flat surface (or keeps the wrist horizontal if worn), points the 12 o'clock position in the desired direction, and presses 'B'. "COMP" appears, followed by direction pointers, literal indicators, and an angle value. The watch continues to take readings automatically every second for up to 60 seconds. If the four pointers and direction letters do not appear, it may indicate that bearing memory information is displayed, and pressing 'B' will clear it. Pressing 'D' returns to Timekeeping Mode.
To ensure correct direction readings, bidirectional calibration is recommended, especially if the watch becomes magnetized. This involves holding down 'B' in Digital Compass Mode, then pressing 'B' to calibrate the first direction, rotating the watch 180 degrees, and pressing 'B' again for the second direction. Magnetic declination correction allows inputting a magnetic declination angle (difference between magnetic north and true north) to indicate true north. This is done by holding down 'B' in Digital Compass Mode, pressing 'D', and using 'A' and 'C' to adjust the angle and direction (E for east declination, W for west declination, OFF for no correction).
Bearing Memory temporarily stores and displays a direction reading as a reference for subsequent digital compass readings. It shows the stored direction angle and a pointer. When taking new readings, both the current and stored direction angles are displayed. To store a reading, the user starts a digital compass reading (press 'B'), then presses 'C' during the 60-second reading operation. The stored angle flashes, and a new 60-second reading operation begins. Pressing 'C' again clears the stored reading and starts a new 60-second reading.
The digital compass can be used to set a map and find the current location by aligning the map's northerly direction with the watch's north indication. To find the bearing to an objective, the user sets the map, then aligns their body until the watch's north and the map's northerly direction are aligned, with the desired direction straight ahead. To determine the direction angle to an objective on a map and head in that direction, the user sets the map, points the watch's 12 o'clock position towards the objective, takes a compass reading, and records it in Bearing Memory. Then, they can advance while monitoring the Bearing Memory pointer.
This mode uses a pressure sensor for barometric pressure and a temperature sensor for temperature. To take readings, the user presses 'B' in Timekeeping or a sensor mode. "BARO" appears, and readings are displayed after about one second. The watch takes readings every five seconds for the first three minutes, then every two minutes. Pressing 'D' returns to Timekeeping Mode. Barometric pressure is displayed in hPa or inHg, and temperature in °C or °F. The watch automatically takes barometric pressure readings every two hours to produce a barometric pressure graph and differential pointer. The barometric pressure graph shows a chronological history of pressure readings, indicating rising pressure for improving weather and falling pressure for deteriorating weather. The barometric pressure change indicator alerts the user to significant pressure changes with a beep and flashing graphic segments. This indicator can be enabled or disabled by holding down 'B' in Barometer/Thermometer Mode until "INFO Hold ON" or "INFO Hold OFF" flashes.
The pressure and temperature sensors are factory-calibrated but can be recalibrated if significant errors are noticed. To calibrate, the user takes a reading with another reliable device, then in Barometer/Thermometer Mode, holds down 'D' for at least two seconds until "TEMP" appears. Pressing 'D' cycles between temperature and barometric pressure calibration. 'A' and 'C' adjust the values. Pressing 'D' returns to the Barometer/Thermometer screen.
The Altimeter Mode takes altitude readings based on air pressure measurements. Users can select one of two screen formats: Altitude Tendency Graph or Relative Altitude. The altitude auto reading interval can be set to 0'05 (one-second intervals for 3 minutes, then five-second intervals for 1 hour) or 2'00 (one-second intervals for 3 minutes, then two-minute intervals for 12 hours). To take readings, the user presses 'A' in Altimeter Mode. The current altitude is displayed in meters or feet. The watch can also display an altitude differential value, showing the change in altitude from a specified reference point. To set this, the user selects Screen 2 in Altimeter Mode and presses 'D'.
To minimize reading errors, users should update the reference altitude value before activities. This is done by holding down 'D' in Altimeter Mode, then using 'A' and 'C' to adjust the reference altitude value. Pressing 'D' exits the setting screen.
The watch can record three types of altitude data: manually saved records (up to 30, with date and time), auto save values (high/low altitude, total ascent/descent, with date and time), and trek log values (high/low altitude, cumulative ascent/descent for up to 14 treks, with date and time). Auto save values are updated automatically during altitude auto measurements. Trek log updating, when enabled, continuously updates values even if the Altimeter Mode is exited. To start trek log updating, the user holds down 'A' in Altimeter Mode for five seconds. To stop, they hold down 'A' again for five seconds.
In Data Recall Mode, users can view manually saved records, auto save values, and trek log values. To access, the user selects Data Recall Mode (REC), then uses 'D' to select the memory area. 'A' and 'C' scroll through the records.
This mode displays sunrise and sunset times for a particular date and location. To enter, the user presses 'D' in Timekeeping Mode. The times are based on the specified city code, latitude, and longitude. Users can scroll through dates using 'A' and 'C'. To look up times for a specific location, the user first configures the Home City settings, then adjusts latitude and longitude in the Timekeeping Mode settings.
The stopwatch measures elapsed time, split times, and two finishes. To enter, the user presses 'D' in Timekeeping Mode. 'A' starts/stops/restarts the timer, and 'C' resets it. 'C' also pauses at a split time.
The countdown timer can be set to a preset time and sounds an alarm when it reaches zero. To enter, the user presses 'D' in Timekeeping Mode. To specify the start time, the user holds down 'D', then uses 'A' and 'C' to adjust the hour and minute settings. 'A' starts/stops/restarts the timer, and 'C' resets it. The alarm sounds for ten seconds and can be stopped by pressing any button.
The watch has five independent daily alarms (four one-time, one snooze) and an Hourly Time Signal. To enter, the user presses 'D' in Timekeeping Mode. 'A' and 'C' scroll through alarm screens. To set an alarm time, the user holds down 'D', then uses 'A' and 'C' to adjust the hour and minute. To turn an alarm or the Hourly Time Signal on/off, the user selects it and presses 'C'. The snooze alarm sounds up to seven times at five-minute intervals.
This mode displays the current time in one of 48 cities (31 time zones) around the globe. To enter, the user presses 'D' in Timekeeping Mode. 'A' (East) and 'C' (West) scroll through city codes.
The watch's display is illuminated for easy reading in the dark. The auto light switch automatically turns on illumination when the watch is angled towards the face (more than 40 degrees from parallel to the ground). To turn on illumination manually, the user presses 'B' in any mode. The illumination duration can be set to 1.5 or 3 seconds by holding down 'D' in Timekeeping Mode, cycling to "LIGHT", and using 'A' to toggle the duration. The auto light switch can be turned on/off by holding down 'D' in Timekeeping Mode for three seconds.
The button operation tone sounds with each button press and can be turned on/off. To do this, the user holds down 'D' in Timekeeping Mode, cycles to "MUTE" or "KEY", and uses 'A' to toggle.
When turned on, Power Saving enters a sleep state automatically when the watch is left in the dark for a certain period. In "display sleep," the display is off, but functions are enabled. In "function sleep," all functions are disabled, but timekeeping is maintained. To turn Power Saving on/off, the user holds down 'D' in Timekeeping Mode, cycles to "POWER SAVING", and uses 'A' to toggle.
The watch's face is a solar panel that generates power from light, charging a built-in rechargeable battery. It charges whenever exposed to light. For optimal charging, the watch should be placed in a location with strong light exposure, such as outdoor sunlight. When wearing the watch, ensure the face is not blocked by clothing. The watch may enter a sleep state if its face is blocked.
The watch displays its power level using an indicator:
Performing multiple sensor, illumination, or beeper operations in a short period may cause all battery power indicators (H, M, L) to flash, indicating Power Recovery Mode. During this time, illumination, alarm, countdown timer alarm, hourly time signal, and sensor operations are disabled until power recovers (approximately 15 minutes). If all indicators flash along with "CHG", the battery level is very low, and the watch needs bright light exposure. Frequent flashing of all indicators suggests low remaining power.
To prevent the watch from becoming magnetized, which can deteriorate the precision of the bearing sensor, it should be stored away from magnets and other strong magnetic sources, such as household appliances. If magnetization is suspected, bidirectional calibration should be performed.
| Brand | Casio |
|---|---|
| Model | PRG-270 |
| Category | Watch |
| Series | Pro Trek |
| Type | Digital |
| Movement | Quartz |
| Display | Digital |
| Water Resistance | 100 meters |
| Power Source | Solar |
| Case Material | Resin |
| Band Material | Resin |
| Weight | 67 g |
| Alarm | 5 Daily Alarms |
| Features | Altimeter, Barometer, Compass, Thermometer, World Time, Stopwatch, Countdown Timer |
| Battery Life | 9 months on full charge without further exposure to light |
| Case Size | 54.6 x 52.4 x 14.4 mm |