E-31
To return the hands to their normal positions
Press any one of the following buttons:
A
,
B
,
C
, or
D
.
Note
• The hands will also return to their normal positions if you do not perform any operation for about 10
seconds.
• If the hands have moved to 2 o’clock because you pulled out the crown,* they will return to their normal
positions when you push the crown back in. In this case, the hands will return to normal timekeeping
when you push the crown back in.
* The hands will not move to 2 o’clock if you pull out the crown while confi guring the city code
s
etting (pages E-24, E-82) or the summer time setting (pages E-24, E-82), or while confi guring time
and date settings (page E-26).
Auto Hand Shift
If the hour hand and/or minute hand is over the digital display when a displayed altitude, barometric
pressure, or temperature reading is updated, the hand(s) will shift automatically (to 4 o’clock or 8 o’clock)
and provide a better view of the information on the display.
The hands will return to their normal position after about three seconds.
E-30
Moving the Hands for Easy Viewing of the Digital Dials
You can use the procedure below to move the analog hands in order to better view the digital display.
Note
• The analog hands will not move while battery power is low.
To shift the hands and view digital info
While holding down
L
, press
B
.
• This will cause all hands to move to 2 o’clock.
E-29
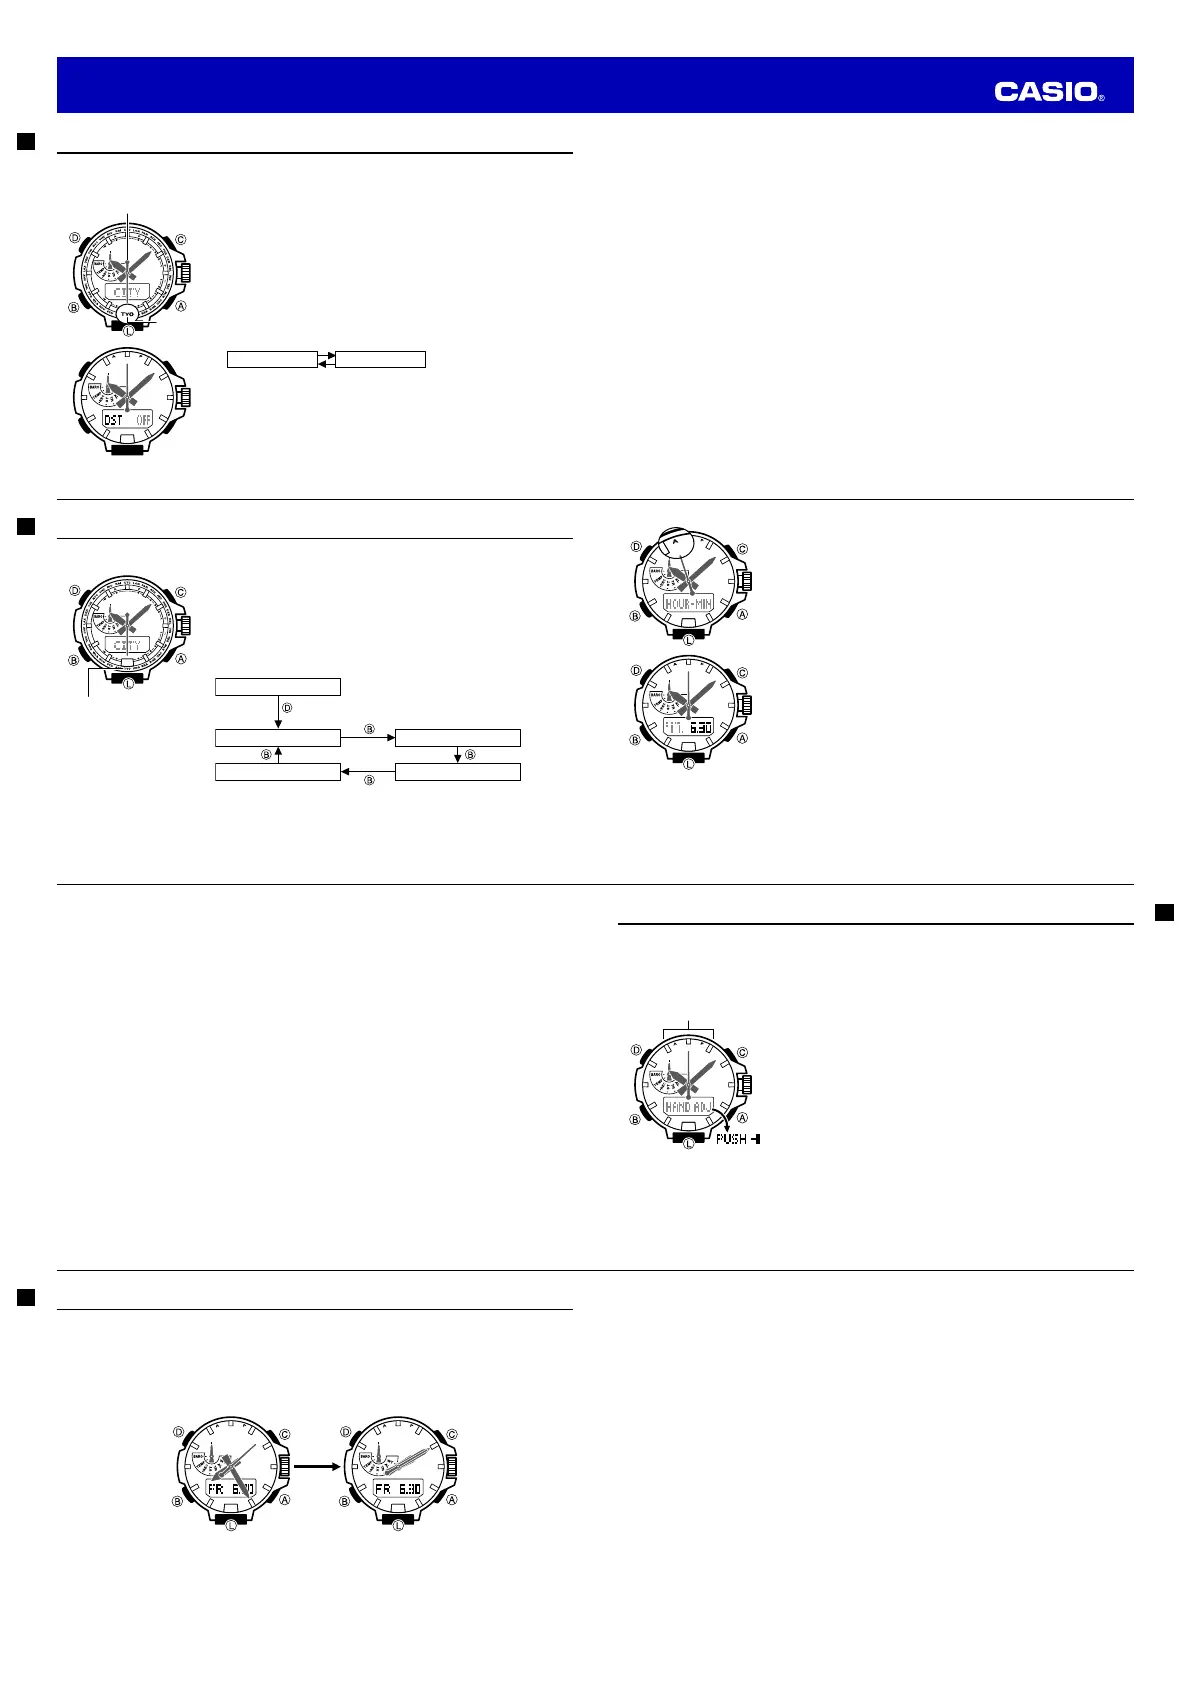
Hand Home Position Adjustment
If the watch is exposed to strong magnetism or impact, its hands can go out of alignment with the time on
the digital display. The watch periodically adjusts hand alignment automatically. You can also use the
procedure below to execute the adjustment operation manually.
To adjust home positions
1. In the Timekeeping Mode, pull out the crown.
2. Hold down
A
for at least fi ve seconds until
HAND SET
fl ashes and
then
HAND ADJ
appears on the digital display.
• This indicates the hand home position adjustment mode.
Important!
• Before performing step 3, below, make sure that all hands have
re
turned to the 12 o’clock position. Pushing the crown back in
while any hand is not at the 12 o’clock position will not perform
home position adjustment.
3. Push the crown back in.
• This will cause all of the hands (mode, hour, minute, second) to
re
turn to their normal positions.
Note
After performing home position adjustment, enter the Timekeeping Mode and check to make sure that the
analog hands and the display indicate the same time. If they do not, perform home position adjustment
again.
Wait until all of the hands
move to 12 o’clock.
E-28
Note
• For information about selecting a Home City and confi guring the DST setting, see “Confi guring
H
ome City Settings” (page E-24).
• While 12-hour timekeeping is in use, P (
p.m.) is displayed from noon to midnight (11:59 p.m.) A
(a.m.) is displayed from midnight to noon (11:59 a.m.) These indicators are not displayed while 24-
hour timekeeping (displays times from 00:00 to 23:59) is being used.
• The watch’s built-in full automatic calendar makes allowances for different month lengths and leap
ye
ars. Once you set the date, there should be no reason to change it except after you have the
watch’s rechargeable battery replaced or after power drops to Level 5 (page E-14).
• The day of the week changes automatically when the date changes.
To switch between 12-hour and 24-hour timekeeping
1. Pull out the crown.
2. Press
B
fi
ve times.
• This causes the current timekeeping setting (12
H or 24H) to fl ash on the digital display.
3. Rotate the crown to select either 12-hour (
12H
) or 24-hour (
24H
) timekeeping.
4. After the setting is the way you want, push the crown back in.
E-27
3. Rotate the crown to change the minute setting.
4. Press
B
.
• This will cause HOUR to fl
ash on the digital display.
5. Rotate the crown to change the hour setting.
6. Press
B
.
• This causes the currently set year, month, and day to appear on
t
he digital display, with the year setting fl ashing.
7. Rotate the crown to adjust the year setting.
8. Press
B
.
• This causes the currently set date (month, day) to fl ash on the
displa
y.
9. Rotate the crown to adjust the month and day setting.
• Pressing
B
w
ill return to the hour and minute setting screen.
10. After the settings are the way you want, push the crown back in.
• This will cause timekeeping to start from 0 seconds.
l
l
l
l
l
l
l
l
l
l
l
l
l
l
l
l
l
l
l
l
l
l
l
l
l
l
l
E-26
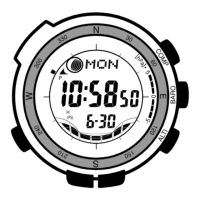
Confi guring Current Time and Date Settings
To change the current time and date settings
1. In the Timekeeping Mode, pull out the crown. This will cause
CITY
to
fl ash on the digital display.
2. Press
D
.
• This will cause HOUR
-MIN to fl ash on the digital display.
• The second hand will point to either A (
a.m.) or P (p.m.)
• This is the time setting mode.
• In the following steps, each press of
B
c
ycles between settings
as shown below.
Home City/DST
Hour, minute
Month, day
Hour
Year
City code
E-25
5. After the settings are the way you want, push the crown back in.
• Daylight Saving Time is turned on when the DST i
ndicator is on the display.
Note
• After you specify a city code, the watch will use UTC* offsets in the World Time Mode to calculate
t
he current time for other time zones based on the current time in your Home City.
* Coordinated Universal Time, the world-wide scientifi c standard of timekeeping.
The reference point for UTC is Greenwich, England.
E-24
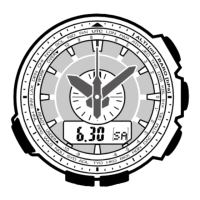
Confi guring Home City Settings
There are two Home City settings: actually selecting the Home City and selecting either standard time or
daylight saving time (DST).
To confi gure Home City and summer time settings
1. In the Timekeeping Mode, pull out the crown.
• CIT
Y will fl ash on the digital display indicating that the Home City
setting can be changed.
• For details about city codes, see the “City Code Table” at the back
of
this manual.
2. Rotate the crown to move the second hand to the city code of the city
you want you use as your Home City.
3. Press
B
to display the DST setting screen.
4. Rotate the crown away from you to switch between the DST settings
as shown below.
DST off (
OFF
) DST on (
ON
)
• Note that you cannot switch between standard time and daylight
saving time (DST) while UTC is selected as your Home City.
Second Hand
City code
Operation Guide 5497
 Loading...