6. Install new Gasket, then O-Ring, then Back-up-Ring onto
each Plunger Retainer.
NOTE: OEM models have a longer Plunger Retainer Stud.
7. Apply Loctite 242 to exposed threads of Stud and thread
Plunger Retainer onto Plunger Rod. Torque per chart.
8. Install the seal Retainer with NEW Wick onto each rod with
tab down and wick out.
NOTE: Do not lubricate wicks at initial start-up.
Operate for 10 to 15 minutes to allow grease from
LPS to penetrate the plunger surface, then lubricate
as needed.
9. Rotate Crankshaft by hand so the two outside plungers
are extended equally.
10.Lightly lubricate the Ceramic Plungers, then carefully slide
the Manifold Head over the Ceramic Plungers supporting it
from the underside to avoid damage to the Ceramic
Plungers or Seals. On the high pressure V-Packing models
or larger manifolds, it may be necessary to gently tap with a
soft mallet until the manifold is flush with the crankcase.
11.Replace two (2) Lockwashers, two (2) Socket Head
Screws or four (4) Flanged Nuts and torque per chart.
SERVICING THE CRANKCASE SECTION
1. While Manifold, Plungers and Seal Retainers are
removed, examine Crankcase Oil Seals for leaking and
wear.
2. Check for any signs of leaking at Bearing Covers, Rear
Cover, Drain Plug or Bubble Gauge.
3. Check oil level and for evidence of water in oil.
4. Rotate Crankshaft by hand to feel for smooth bearing
movement.
5. Examine Crankshaft Oil Seals externally for drying, crack-
ing or leaking.
6. Consult CAT PUMPS or your local distributor if crankcase
service is evidenced.
See Section I of the Plunger Pump Service Video for addi-
tional information.
TECHNICAL BULLETIN REFERENCE CHART
No. Subject Models
003 Power Unit Drive Packages 3PFR - 68PFR, 10FR - 60FR
024 Lubrication of Lo-Pressure Seals All Models
027 Spring Retainer 5PFR, 7PFR, 15PFR
032 Shaft Extension and Manifold Port 310, 317, 323, 530, 550
035 Servicing Crankcase Section 7PFR - 60PFR
036 Cylinder and Plunger Reference Chart All Models
043 LPS and HPS Servicing All Plunger Models
045 One-Piece S.S. Plunger Retainer w/Stud 5PFR, 7PFR, 15PFR
046 Valve Plug with Coil Spring 317, 347, 357, 1057
047 Blind Bearing Shaft Cover Gearbox Plunger Pumps
048 Extended Valve Plug 7PFR and 15PFR
049 Stainless Steel Hardware 3PFR7, 5PFR7, 15PFR7
051 M10 Manifold and Crankcase 7PFR and OEM
052 Plunger Rod and Stud 3PFR, 5PFR, 15PFR, 35PFR, 60PFR
053 Liquid Gasket All Plunger NAB-S.S. Models
054 2 Piece Seal Retainer 5PFR and 7PFR
058 Forged Manifold and Extended Valve Plugs 56, 57, 59, 60
060 Baffle Assembly 34170
061 Installation and Adjustment Procedure 8100
062 Manifold and Seal Case 650 and 651
064 By-Pass Hose Sizing All Unloaders/Regulators
067 S.S. Plunger Retainer 3PFR, 5PFR, 7PFR
072 Manifold Head and V-Packing 1050, 1051, 1057
073 Hi-Temp HPS 3PFR, 5PFR, 2SF
074 Torque Chart Piston and Plunger Pumps
077 Oil Drain Kit All Models (except 2SF/4SF)
083 Winterizing a Pump All Models
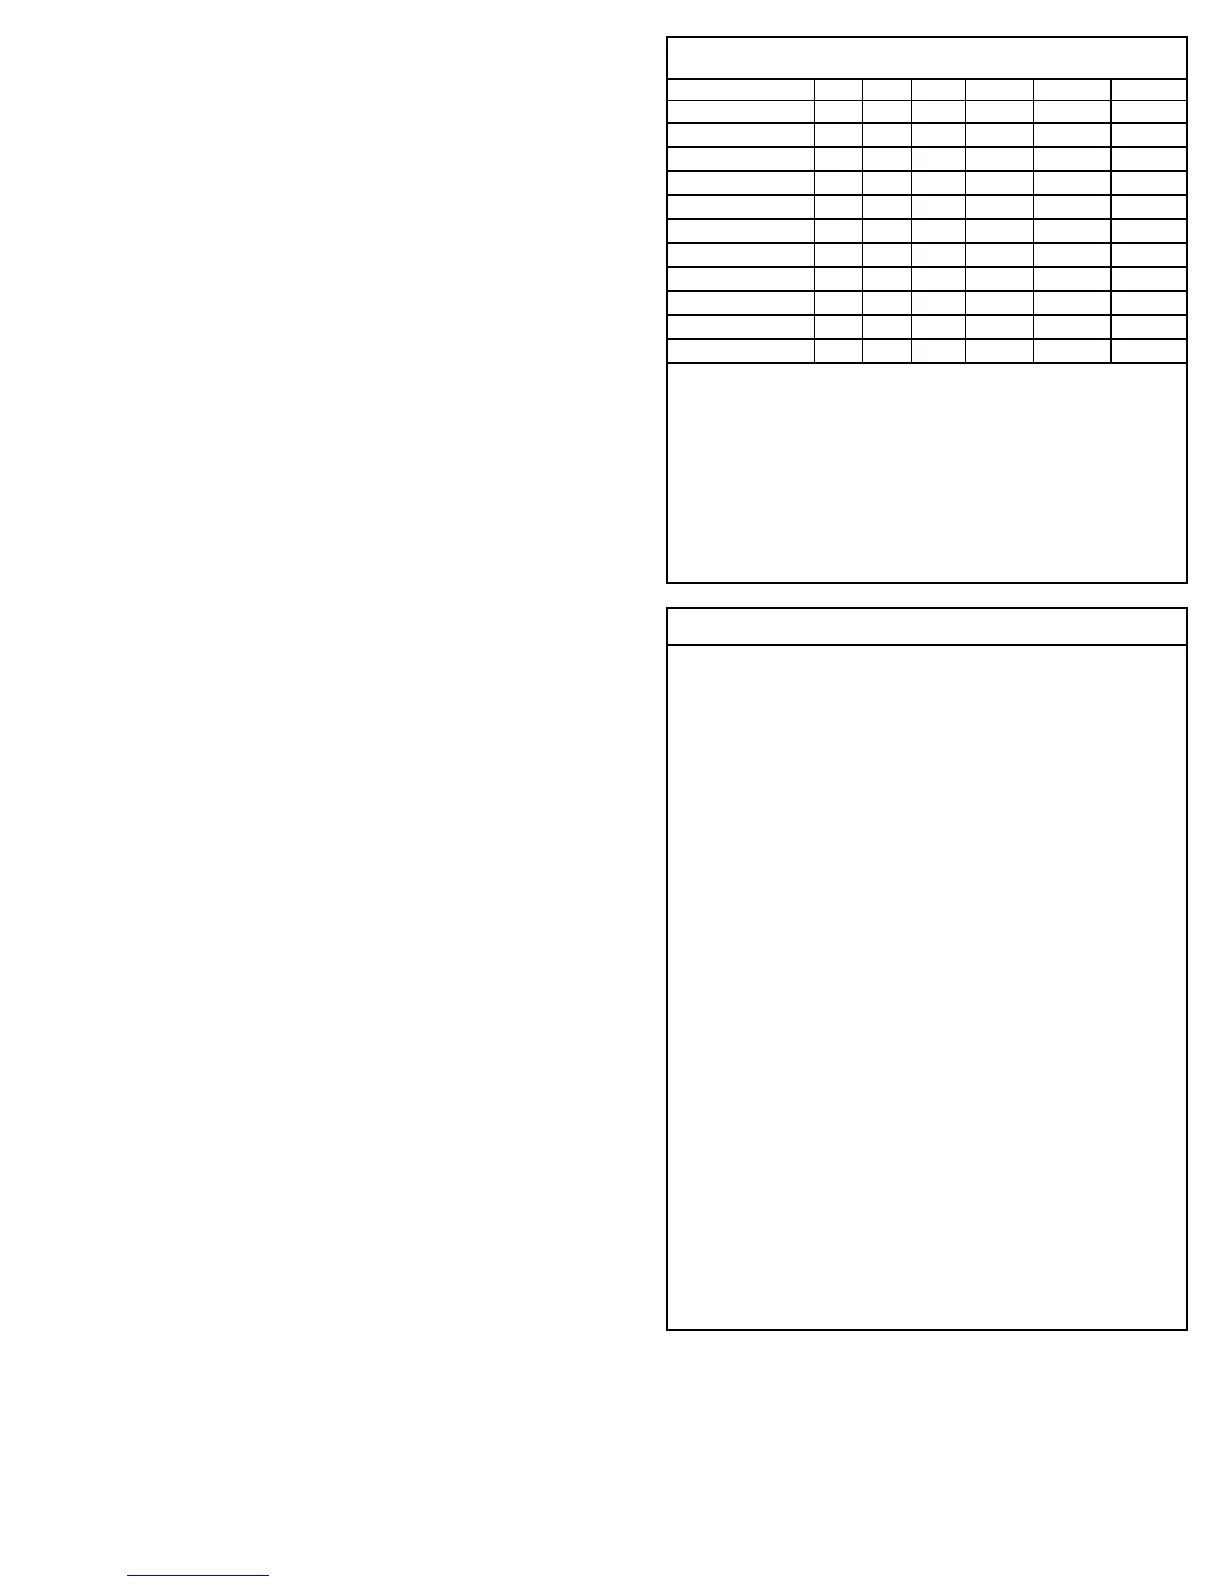
PREVENTATIVE MAINTENANCE CHECK-LIST
Check Daily Weekly 50 hrs. 500 hrs.* 1500 hrs.** 3000 hrs.**
Clean Filters x
Oil Level/Quality x
Oil Leaks x
Water Leaks x
Belts, Pulley x
Plumbing x
Initial Oil Change x
Oil Change x
Seal Change x
Valve Change x
Accessories x
* If other than CAT PUMPS special multi-viscosity ISO68 oil is used, change
cycle should be every 300 hours.
** Each system’s maintenance cycle will be exclusive. If system performance
decreases, check immediately. If no wear at 1500 hours, check again at
2000 hours and each 500 hours until wear is observed. Valves typically
require changing every other seal change.
Duty cycle, temperature, quality of pumped liquid and inlet feed conditions all
effect the life of pump wear parts and service cycle.
** Remember to service the regulator/unloader at each seal servicing and check
all system accessories and connections before resuming operation.
Refer to video for additional assistance.
 Loading...