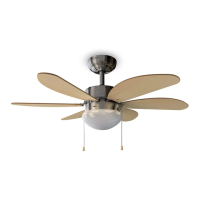
4. Pass the same cables through the hanging ball.
5. Then, pass the cables again through the downrod. Fix the downrod to the mounting plate
using the clevis pin and 2 screws provided. Make sure both pieces are securely fixed.
6. Insert the pin through the pin holes located on the upper end of the downrod. Once it is
inserted, slide the hanging ball towards the top in order to place it in the same downrod’s
upper end and fix it with one of the screws provided. Make sure the pin fits in the slots
located inside the hanging ball before screwing it.
7. Use both self-tapping screws provided with its corresponding washers and lock washers
to fix the mounting bracket to a wooden ceiling.
NOTE: self-tapping screws are only suitable for wooden ceilings. In case of installing the cei-
ling fan to concrete ceilings or joists, use a drill for making the holes and stoppers or expansion
screws (not included).
8. Once the mounting bracket is screwed to the ceiling, connect the mains power supply to
the fan’s terminal block. Make sure the cables are connected properly paying attention to
the colour codes and that there is an earthed cable (green and yellow).
9. Lift the fan previously mounted to the mounting bracket and insert the hanging ball
through the mounting bracket’s hole.
10. Connect the cables that come out from the downrod to those from the mounting bracket
paying attention to the colour codes.
11. Slide the canopy upwards so that all the connections are stored inside it and screw it to
the mounting bracket using the 4 screws (2 to each side) removed at the beginning of the
installation process.
12. Remove the screws located on the motor’s lower part through the lamp bracket’s hole.
13. Screw the blade brackets to the motor through the hole in the lamp bracket paying
attention to the warning sticker located on one of the blade brackets.
14. Screw the blades to the blade supports using screws, washers and nuts provided. As
blades are reversible, choose the side you desire to be visible and screw them in such way
that the nuts are located on the blade’s top part.
15. Tighten the bulb to the bulb hanger (not included).
16. Fit the glass shade into the unit’s lower part introducing the lamp bracket’s tabs inside
the glass shade and ensure it stays securely fixed.
17. Attach the chain.
5. OPERATION
Pull from the chain to turn the fan on and off.
 Loading...