4 • Assembling Your Celestron C5 Spotting Scope
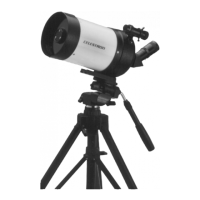
This section covers the correct set up and operating procedures for your Celestron C5
spotting scope and includes information on visual and photographic observations. The
C5 spotting scope uses a combination of mirrors and lenses to produce an image. Such
an optical system is known as a compound lens. This particular design, known as a
Schmidt-Cassegrain, is one of the most compact and rugged optical systems on the
market today. The C5 (#11029) comes standard with the following accessories:
· 26mm Plossl Eyepiece 1.25” (48x)
· 8x20 Erect Image Finderscope
· 45° Erect Image Diagonal - 1.25”
· Photo Tripod Adapter block
· Lens Cap
The Celestron C5 lens cap is made of spun aluminum with a felt-lined inner diam-
eter. The lens cap slides over the outer diameter of the C5’s front cell for a snug fit.
To remove the lens cap, simply hold onto the outer edge of the lens cap and pull
away from the front cell.
C5 Spotting Scope
Removing the Lens Cap
There are several accessories that come standard with all the Celestron C5's. The
installation and use of each of these is described in this section.
The Visual Back
The visual back allows you to attach all visual accessories to the spotting scope (See
Figure 1-1).
To attach the visual back:
1. Remove the plastic cover on the rear cell.
2. Place the knurled slip ring on the visual back over the threads on the rear
cell.
3. Hold the visual back with the thumbscrew in a convenient position and
rotate the knurled slip ring clockwise until tight.
Once this is done, you are ready to attach other accessories, such as eye-
pieces, diagonal prisms, etc.
If you want to remove the visual back, rotate the slip ring counterclockwise until
it is free of the rear cell.
The Erect Image Diagonal
The diagonal is a prism that diverts the light at a right angle from the light path of
the spotting scope. The C5 spotting scope comes with an erect image diagonal that
is designed for terrestrial viewing. To attach the diagonal:
1. Turn the thumbscrew on the visual back until its tip no longer extends into (i.e.,
obstructs) the inner diameter of the visual back.
Attaching the Visual
Accessories
ASSEMBLING YOUR C5 S P O T T I N G SCOPE