Page 13;&(%$*4.8"4,7%<'*#$"&8#=%/7*,#*%4,77%>?@@@?@AA?BCDC1Item 60801
EF;6GHIJ6KFGLIMNFLMG6MFMO6 E6GPJ
Q&(Y%J"*4*%,89%Q&(Y%F(*,%E*$%P/
1. Designate a work area that is clean and well-lit.
The work area must not allow access by children
or pets to prevent distraction and injury.
2. Isolate the work piece to make sure no damage
can occur to nearby personal property.
3. Route the air hose along a safe route to reach
the work area without creating a tripping hazard
or exposing the air hose to possible damage.
The air hose must be long enough to reach
the work area with enough extra length to
allow free movement while working.
4. Secure loose work pieces using a vise or clamps
(not included) to prevent movement while working.
5. There must not be hazardous objects
(such as utility lines or foreign objects) nearby
that will present a hazard while working.
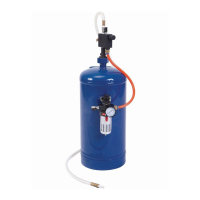
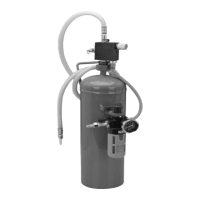
R*8*(,7%I/*(,$"83%L8#$('4$"&8#
QFKMLMRc%%GI%JK6!6MG%E6KLIPE%LMXPKH-%
Q*,(%FMEL?,//(&]*9%#,2*$[%3&337*#%,89%MLIEW?
,//(&]*9%(*#/"(,$&(%'89*(%E,2*$[%W&&9=%,89%.*,][?
9'$[%+7,#$%37&]*#=%).*8%&/*(,$"83%$.*%S7,#$*(1
1. To protect the compressor and its engine or
motor from damage by abrasive or dust from
abrasive blasting, keep the compressor upwind
of the Blaster or in a separate room.
2. O7&#*%$.*%F"(%E'//7[%!,7]*=%F+(,#"]*%
!,7]*=%,89%G.(&$$7*%!,7]*=%$.*8%4&88*4$%
,89%$'(8%&8%$.*%,"(%#'//7[1
3. Open the Air Valve.
4. Grip the Media Hose and Nozzle firmly,
and point them at the start point. Open the
Media Valve completely to release the media.
MIGLO6- To prevent damage, only use
the Media Valve to turn the flow on or off.
Do not use it to adjust the flow rate. Only use the
Media Regulator Knob to adjust the flow rate.
5. Spray the abrasive media onto the work material,
moving the Nozzle from side to side.
MIG6- The flow rate of the media may be irregular
when first started. Provided the media is dry,
the flow rate will normalize in approximately one minute.
6. Use Media Regulator Knob to
adjust the media flow rate.
7. Adjust the Air Regulator to adjust the air flow and
pressure. Do not set the pressure higher than 90 PSI.
8. If the Soda Blaster requires more force to accomplish
the task, verify that the Soda Blaster receives
sufficient, unobstructed airflow (CFM) and increase
the pressure (PSI) output of the regulator up to the
maximum air pressure rating of this Soda Blaster.
OFPGLIMc%%GI%JK6!6MG%LMXPKH%;KIN%GIIT%
IK%FOO6EEIKH%;FLTPK6-%U&%8&$%*\4**9%$.*%
E&9,%S7,#$*(f#%5,\"5'5%,"(%/(*##'(*%(,$"831
If the Soda Blaster still does not have sufficient
force at maximum pressure and sufficient airflow,
then a larger Soda Blaster may be required.
9. If excessive air pressure is used, or Media Regulator
becomes clogged, the Safety Valve may open,
releasing air pressure. To correct:
a. Shut OFF Air Valve.
b. Adjust Air Regulator to below 90 PSI.
c. Turn the Air Valve back on.
d. If the problem happens again,
detach the air supply and clean out the
Media Regulator and Media Hose.
10. To prevent accidents, close the Valves on the
Soda Blaster, detach the air supply, safely
discharge any residual air pressure in the
Soda Blaster, and close the Valves again. Empty
the Tank, and clean external surfaces of the
Soda Blaster with clean, dry cloth. Then store the
Soda Blaster indoors out of children’s reach.
 Loading...