Do you have a question about the Chalmit Protecta III and is the answer not in the manual?
Consult MCB manufacturer as unit contains electronic control gear with inrush current.
Store luminaires in cool dry conditions, prevent moisture and condensation.
Read instructions carefully before attempting installation.
3mm/4mm flat blade, large crosshead screwdrivers, spanners, pliers, knife.
Install for practical maintenance access and in accordance with lighting design.
Use 70°C cable, approved glands/plugs maintaining IP rating.
Isolate luminaire from system before any work. Follow testing procedures carefully.
Seamless transition to emergency mode at >=60% supply voltage.
Charge time increases below 10°C battery temperature; consider heater option.
Use screwdriver as fulcrum to lever diffuser open; retain by hinge.
Press clamping bar towards closed position, tip forward to release from body.
Isolate supply to avoid ignition risk when accessing live mains terminals.
Loosen four fixing screws; tray hangs on retaining cords without stressing wiring.
Release tray, disconnect cables, unhook retaining cord and lift clear.
Disconnect LED strip wires, remove screws/clips, replace strips, reconnect.
Driver has no serviceable parts; disconnect wires and remove from tray.
Only in non-hazardous atmosphere. Disconnect wires, loosen screws, slide pack axially.
Clean body with mild detergent/water. Do not polish diffuser or use dry cloth.
Nickel cadmium batteries are 'controlled waste'; observe duty of care.
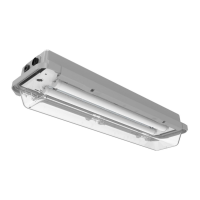
| Lamp Type | LED |
|---|---|
| Ingress Protection | IP66/67 |
| Frequency | 50/60Hz |
| IK Rating | IK10 |
| Color Temperature | 5000K |
| Lifespan | 50, 000 hours |
| Materials | Polycarbonate |
| Power Supply | Electronic driver |
| CRI | 70 |
| Beam Angle | 120 degrees |
| Rated Voltage | 220-240V AC |