EasyManua.ls Logo

Chamberlain 8500W User Manual

Chamberlain 8500W
41 pages
To Next Page IconTo Next Page
Page #1 background imageLoading...
Page #1 background image
Please read this manual and the
enclosed safety materials carefully!
The door WILL NOT CLOSE unless the
Protector System
®
and cable tension
monitor are connected and properly aligned.
Periodic checks of the garage door opener
are required to ensure safe operation.
The model number is located on the
front cover of the opener.
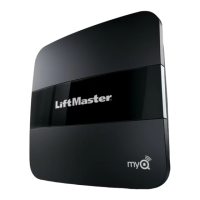
This garage door opener is ONLY
compatible with myQ
®
and Security+ 2.0
®
accessories.
Attach warning labels to the location
indicated on label.
This product is intended for installation only by trained garage door technicians. This product may
require adjustments to door springs and/or track configurations. This product is not intended for
use on low headroom tracks or garage doors utilizing extension springs.
For Residential Use
Install On Sectional Doors With Torsion Assemblies Only
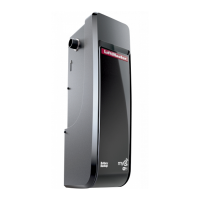
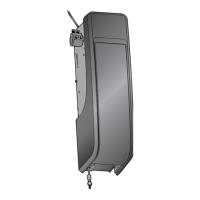
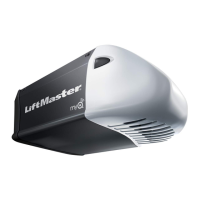
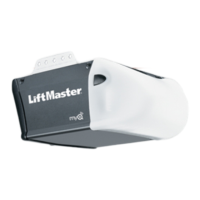
Wall Mount Wi-Fi
®
Garage Door Opener
Models 8500W, 8500W-267
LiftMaster
300 Windsor Drive
Oak Brook, IL 60523
Register your garage door opener to receive
updates and offers from LiftMaster
Take a photo of the
camera icon including
the points (
).
Send it in by texting
the photo to 71403
(US) or visit
www.Liftmaster.photo
(Global).com
SM
For more information, please visit www.devancocanada.com or call toll free at 855-931-3334

Other manuals for Chamberlain 8500W

Questions and Answers:

Chamberlain 8500W Specifications

General IconGeneral
Motor TypeDC
Drive TypeBelt Drive
Speed7 inches per second
Voltage120V
Smart TechnologyYes
Battery BackupYes
Remote ControlYes
Wi-Fi CapableYes
Drive SystemBelt
Max Door Height7 ft (extendable to 8 ft with extension kit)
Smart Home CompatibilityAmazon Alexa, Google Assistant
SecuritySecurity+ 2.0 rolling code technology
Safety FeaturesSafety Sensors
WarrantyLifetime (Motor and Belt), 5-Year (Parts), 1-Year (Accessories)

Summary

Preparation

myQ Serial Number

Record your myQ serial number for future reference.

Safety Symbol and Signal Word Review

Understand safety symbols and signal words to prevent injury or damage.

Unattended Operation

Information on features allowing door to close without direct supervision.

Planning

Survey installation area and check compatibility requirements for the opener.

Before You Connect with Your Smartphone

Requirements and steps to test Wi-Fi signal strength for smartphone connectivity.

Preparing Your Garage Door

Steps to ensure the garage door is balanced and not sticking before installation.

Tools Needed

List of hand tools required for assembly, installation, and adjustment.

Carton Inventory

Check packing material for all included parts and hardware.

Additional Items You May Need

List of optional or required items not included in the carton.

Assembly

Attach the Collar to the Garage Door Opener

Securely attach the collar to the opener motor shaft and torsion bar.

Attach Mounting Bracket to Garage Door Opener

Loosely attach the mounting bracket to the opener before tightening.

Installation

Important Installation Safety Instructions

Critical safety warnings and guidelines to follow before and during installation.

Position and Mount the Garage Door Opener

Steps to correctly position and secure the garage door opener to the torsion bar.

Attach the Emergency Release Rope and Handle

Instructions for attaching the emergency release rope and handle for manual operation.

Install the Automatic Door Lock

Steps to install the automatic door lock on the garage door track.

Attach the Cable Tension Monitor (Required)

Install the cable tension monitor to detect slack and ensure opener function.

Install the Door Control (Smart Control Panel®)

Guide to installing the wall-mounted door control panel and wiring.

Install myQ Remote LED Light

Steps for mounting and connecting the myQ Remote LED Light.

Install the Protector System

Instructions for installing and aligning the safety reversing sensors.

Installing the Brackets

Options and steps for mounting safety reversing sensor brackets.

Mounting and Wiring the Safety Reversing Sensors

Steps for mounting sensors and connecting their wires to the opener.

Connect Power

Options for connecting power to the garage door opener, typical or permanent wiring.

Sensor Alignment and Door Control Wiring

Ensure sensors are aligned and door control is wired correctly for operation.

Install the Battery Backup

Steps to install the battery backup unit and understand its status LEDs.

Adjustment

Program the Travel

Set the upper and lower travel limits for the garage door opener.

Test the Safety Reversal System

Procedures to test the safety reversal system's functionality.

Test the Protector System

How to test the protector system's response to obstructions.

Test Cable Tension Monitor

Test the cable tension monitor for proper function and diagnostic codes.

Test Automatic Door Lock

Verify the automatic door lock retracts and secures the door correctly.

To Open the Door Manually

How to disengage and operate the door opener manually.

Operation

Important Safety Instructions

Crucial safety rules for operating the garage door opener.

Feature Overview

Description of key features like Alert2Close, Timer-to-Close, myQ, Protector System, and Battery Backup.

Connect With Your Smartphone

Guide to connecting the opener to a smartphone via the myQ app.

Using the Door Control

How to use the wall-mounted door control for various functions.

Door Control Setup and Settings

Programming features, settings, and service options via the door control.

Programming

893MAX Remote Control

Instructions for programming the 893MAX remote control.

Program the myQ Remote LED Light

Steps to program the myQ Remote LED Light to the opener or remote.

To Erase the Memory

Procedures to erase remote controls, keyless entries, and Wi-Fi settings.

HomeLink®

Information on programming HomeLink systems and using repeater kits.

Maintenance

Care of Your Garage Door Opener

Monthly and yearly maintenance schedule and cleaning instructions.

The Remote Control Battery

How to replace the battery in the remote control.

Troubleshooting

Diagnostic Chart

Troubleshooting guide correlating diagnostic codes with symptoms and solutions.

Additional Troubleshooting

Solutions for common issues not covered in the diagnostic chart.

Repair Parts

Installation Parts

List of replacement parts for installation and their corresponding part numbers.

Garage Door Opener Assembly Parts

List of internal assembly parts for the garage door opener.

Contact Information

Accessories

MAX ACCESSORIES

Compatible accessories for LiftMaster openers manufactured since 1993.

myQ ACCESSORIES

Accessories that utilize myQ technology for smart control.

STANDARD ACCESSORIES

List of standard accessories included or available.

Warranty

Automatic Garage Door Opener Safety & Maintenance Guide

Routine Maintenance Can Prevent Tragedies

Monthly inspection and testing of the door and opener system.

Related product manuals