EasyManua.ls Logo

Chamberlain HD200DM User Manual

Chamberlain HD200DM
40 pages
To Next Page IconTo Next Page
Page #1 background imageLoading...
Page #1 background image
The Chamberlain Group, Inc.
845 Larch Avenue
Elmhurst, Illinois 60126-1196
www.chamberlain.com
GARAGE DOOR OPENER
Model HD200DM • 1/2 HP
For Residential Use Only
®
®
Owner’s Manual
Please read this manual and the enclosed safety materials carefully!
Fasten the manual near the garage door after installation.
The door WILL NOT CLOSE unless the Protector System
®
is connected and
properly aligned.
Periodic checks of the opener are required to ensure safe operation.
The model number label is located on the front panel of your opener.
Question and Answer IconNeed help?

Do you have a question about the Chamberlain HD200DM and is the answer not in the manual?

Chamberlain HD200DM Specifications

General IconGeneral
TypeChain Drive
Horsepower1/2 HP
Max Door Height7 ft
Battery BackupNo
Voltage120V
Frequency60 Hz
Smart TechnologyYes (myQ compatible)
Safety FeaturesSafety sensors
LightingLED
SecurityRolling code technology

Summary

Preparing Your Garage Door

Safety Warnings and Cautions

Review safety warnings and cautions for preparing the garage door before installation.

Assembly Step 1: Rail and Trolley

Rail Assembly Procedure

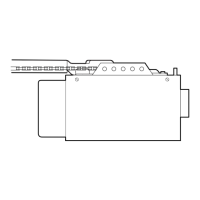
Instructions for assembling the garage door opener rail sections and attaching the trolley.

Trolley Installation on Rail

Procedure for sliding the trolley assembly onto the assembled garage door opener rail.

Assembly Step 2: Rail to Motor Unit

Fastening Rail to Motor Unit

Steps for securely attaching the assembled rail to the garage door opener motor unit.

Assembly Step 3: Idler Pulley Installation

Installing the Idler Pulley

Procedure for installing the idler pulley into the front of the rail section.

Assembly Step 4: Chain Installation

Connecting the Chain to Trolley

Steps to connect the chain to the trolley assembly and threaded shaft, ensuring proper alignment.

Assembly Step 5: Chain Adjustment

Tensioning the Garage Door Opener Chain

Instructions on how to properly tighten the garage door opener chain for correct operation.

Important Installation Instructions

General Installation Safety Warnings

Critical safety warnings and instructions to be followed before and during garage door opener installation.

Installation Step 1: Header Bracket Location

Determining Header Bracket Placement

Guidance on identifying the correct location for the header bracket based on door type and travel height.

Wall vs. Ceiling Mounting Options

Explains options for wall or ceiling mounting the header bracket, including height considerations.

Installation Step 2: Header Bracket Installation

Wall Mounting the Header Bracket

Procedure for securely fastening the header bracket to the wall above the garage door.

Ceiling Mounting the Header Bracket

Procedure for securely fastening the header bracket to the ceiling structure.

Installation Step 3: Attach Rail to Header Bracket

Installation Step 4: Position the Opener

Installation Step 5: Hang the Opener

Installation Step 6: Install Door Control

Installation Step 7: Install Light

Installation Step 8: Attach Emergency Release

Installation Step 9: Electrical Requirements

Installation Step 10: Install Protector System

Safety Reversing Sensor Installation

Instructions for installing and aligning the safety reversing sensors across the garage door opening.

Installing the Safety Sensor Brackets

Mounting and Wiring Safety Sensors

Aligning and Troubleshooting Safety Sensors

Troubleshooting Safety Reversing Sensors

Common issues and solutions for safety reversing sensor indicator lights and functionality.

Installation Step 11: Fasten Door Bracket

One-Piece Door Bracket Installation

Installation Step 12: Connect Door Arm to Trolley

One-Piece Door Arm Connection and Adjustment

Adjustment Step 1: Travel Limits

Adjusting UP and DOWN Travel Limits

Detailed steps for adjusting the opener's UP and DOWN travel limits for proper door stopping points.

Adjustment Step 2: Adjust Force

Adjusting DOWN (Close) Force

Procedure for testing and adjusting the DOWN force setting to ensure proper door closing.

Adjusting UP (Open) Force

Procedure for testing and adjusting the UP force setting to ensure proper door opening.

Adjustment Step 3: Safety Reversal System Test

Testing the Safety Reversal System

Instructions for testing the safety reversal system with an obstruction to ensure proper function.

Adjustment Step 4: Protector System Test

Testing the Protector System

Procedure for testing the Protector System by obstructing the safety reversing sensor beam.

Operation

Important Safety Instructions for Operation

Critical safety guidelines to follow when operating the garage door opener and door.

Using the Wall-Mounted Door Control

Troubleshooting Common Problems

Diagnostic Chart

Programming

Keyless Entry PIN Management

Related product manuals