RESET
12-24H/MONTH
OFF-SET
*
ZONE
HR/DAY
OFF-SET
*
DST
MIN/YR
OFF-SET CLR
ZONE CLR
DST
HOME
ON
AL. SET
ZONE/DST CALENDAR
LOCK
TIME SET
OFF
OFF-SET
JAPAN
USA
UK
EU
SYNC
PRESS RESET TO ACTIVATE
SYNCHRONIZATION
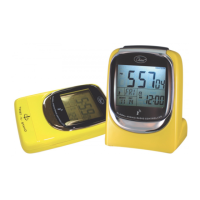
LEFT SWITCH
UPPER LEFT
UPPER
MIDDLE
UPPER
RIGHT
ALARM
SWITCH
BOTTOM
SWITCH
(Fig. 3 Country Selection)
Select the proper Country or Continent, by
sliding the Switch on the Left to the correct
position.
When setting or traveling between the
different time zones in the USA, it is also
necessary to select the right time zone.
P.4
This effect is only temporary and the numbers
will become clear in only a few days ). These
batteries will last 6 months to 1 year (depending
on the frequency of alarm and backlight usage).
Please dispose of the used batteries properly,
in accordance to the environmental laws in your
area.
4. Setting the Clock
Set the Bottom Switch in LOCK position.
Push Reset button to activate the receiver,
using a pointed object, such as a pen point.
RADIO
SIGNAL
P.5
Note: The clock will automatically default
to Mountain Time, when the Reset button
is pushed and the Switch on the Left is set
for USA.
To set for your time zone, slide the Bottom
Switch to ZONE/DST.
5. Synchronizing the Time
Final Important Step: Slide Bottom Switch,
back to the LOCK position for the clock to
operate.
Push button ZONE ( Upper Left Button) to
select from Eastern, Central, Mountain or
Pacific. It will change each time when the
ZONE button is pressed. (If you do not want
the zone to be displayed on the LCD dial,
push ZONE CLR (Upper Right Button) after
selection.) ( In order to allow adjustment of
setting, the OFF-SET time must be at 00. )
To improve initial synchronization or when the
signal strength falls to 2 bars or below, signal
may be improved by twisting the base stand to
the flat position.
The synchronization procedure is automatic
when the above steps are followed. To indicate
that the receiver circuit is in operation, the
Antenna Icon on the LCD blinks ( see Fig. 4a ).
Signal
Strength
Very
Weak / No
Weak Medium Strong
Fig 4a Blinking Antenna
Icon(Clock attempting to
sychronize)
Fig 4b Synchronization &
radio Signal strength
indication
The bars facing the Antenna indicate the
strength of the radio signal. No bar means
there is no signal or only a very weak signal is
being received. One bar indicates a weak
signal and 5 bars indicate a very strong signal
(see Fig. 4b ). Use this radio signal strength
indicator to find a location with the strongest
reception.
P.6
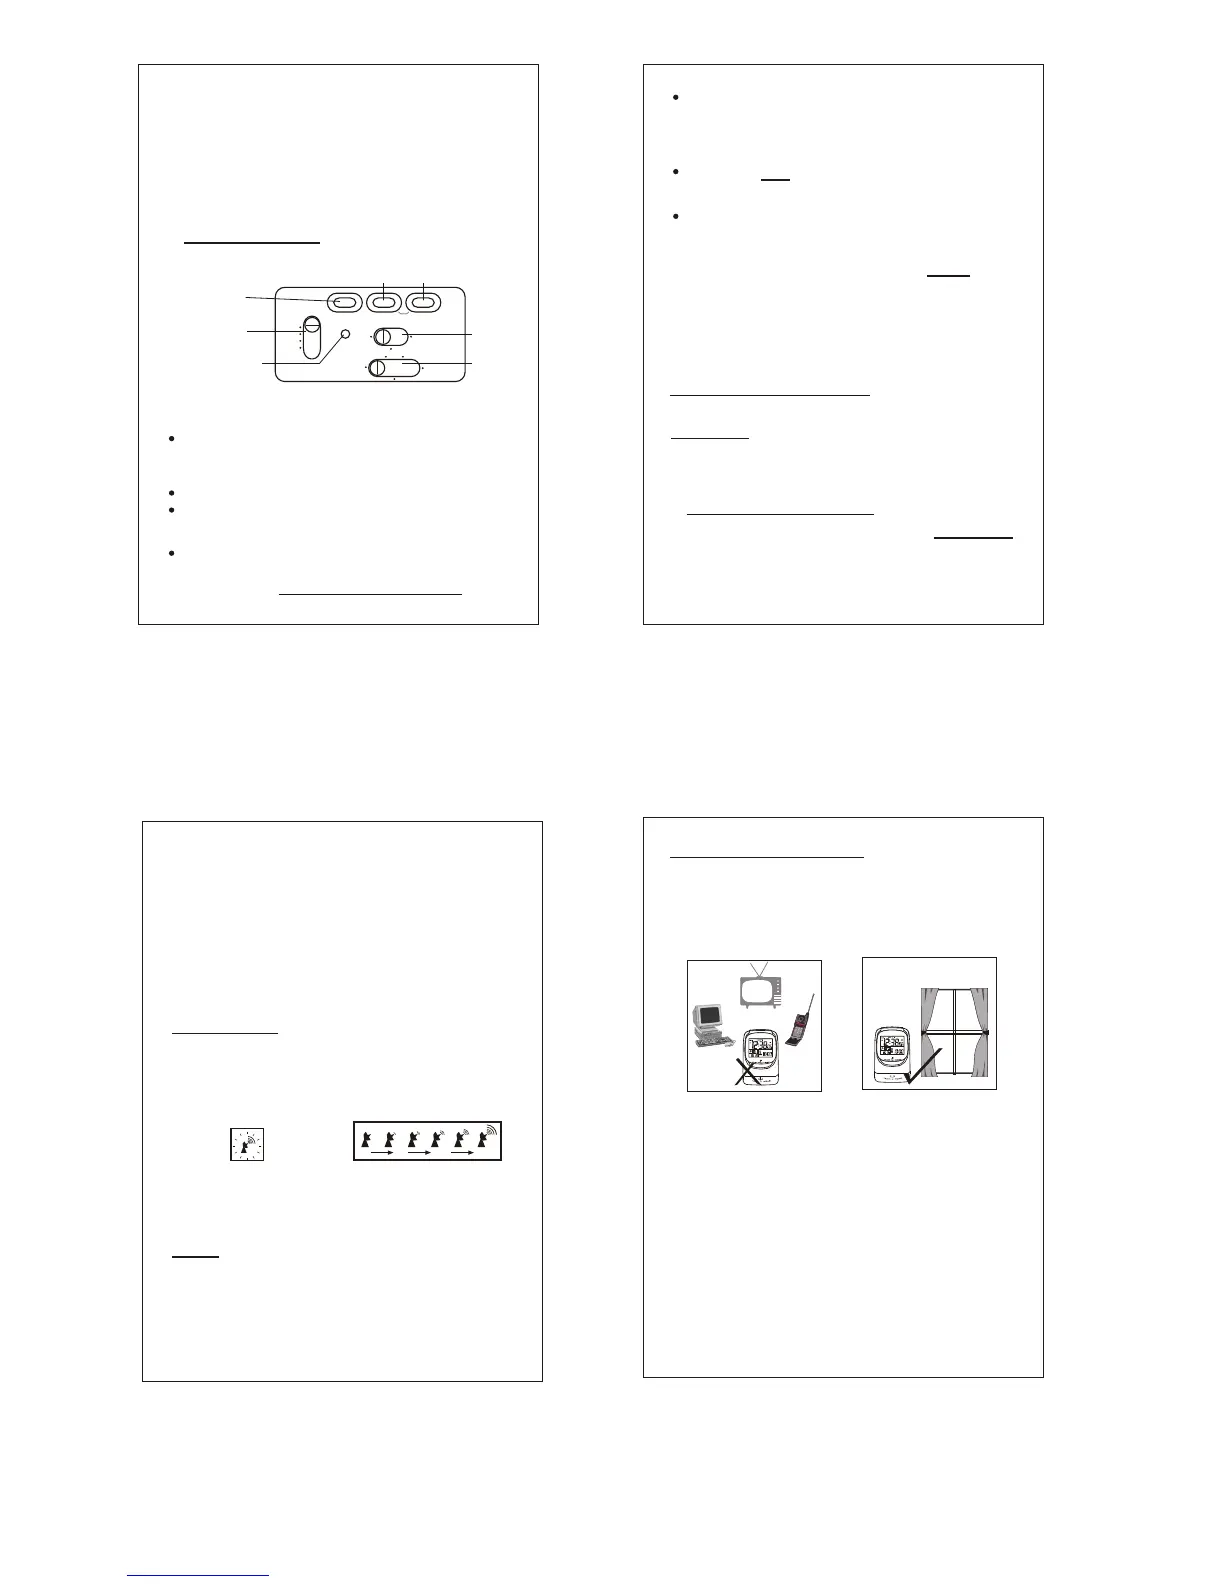
Strong Signals, are normally found close to a
window. In some areas where the signal is
poor, you may need to position and rotate the
clock until the best signal strength is obtained.
Do Not put the clock on a desk or any other
object with a metal top. If the clock is in close
proximity to electrical appliances, such as TV,
mobile phone or a computer, they may cause
interference. Buildings with lots of steel
construction may also interfere with the signal.
Keep the clock by
twisting the stand
Fig.5 How to position the clock for the best signal reception
Once you have found the optimal position, leave
the clock still, so it can pick up a good signal.
Under normal conditions, it takes the clock only
minutes to synchronize, but under less than
perfect conditions, the clock may need to be left
overnight to successfully receive a
synchronized signal.
When the synchronization is achieved, it is
symbolized by an image of an antenna and a
radiating beacon (Fig. 6). A synchronized clock
or manually set clock, attempts to refresh itself
with a radio signal at least once a day, usually
in the evening or early morning hours when the
P.7
To force synchronization. At any time you can
force the clock to attempt synchronization. With
the Bottom Switch at LOCK position and alarm
switch at AL. ON or AL. OFF position, push
Upper Center (DST) and Upper Right (HOME)
buttons simultaneously.
 Loading...