7
of our Guided Cooking recipes, which provide you with directions
based on the internal temperature of the specific food you’re cook-
ing. You can also take advantage of Times & Temps—our interactive
cooking guide—to benefit from hundreds of hours of testing by our
culinary team. Simply input the type of food you want to cook, and
this guide will suggest the method, temperature, time (and more!)
to ensure perfect results. For best results, follow these steps:
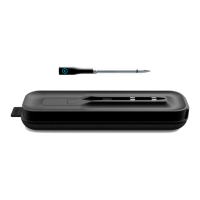
1. Ensure the hub is charged and turned on, and that the probe
is charged. The hub not only charges the probe but also relays
information from the probe to the CHEF iQ App for you to
receive on your smartphone or tablet.
2. Preheat your cooking appliance as needed, prep your ingre-
dients, and season your food as desired or directed. You can
use the probe in the oven, grill, or smoker, on the stove, and in
an air fryer. Because it’s waterproof, you can use the probe for
simmering, boiling, cooking sous vide, and even for deep frying
when inserted into the food to be fried. IMPORTANT: The
probe should not be used when microwaving or pressure cook-
ing. It should also not be used as a candy or deep-fry thermom-
eter because some components toward the tip cannot exceed
225˚F.
3. Place the hub near (but never in or on) the cooking appli-
ance. Though it has a Bluetooth® connectivity range of 200
feet in the open air, the hub works quickest and most eiciently
if placed near the probe during cooking, especially if the probe
is in a closed environment, such as an oven or closed grill. Be
aware that the hub shell is plastic, however, and so can melt if
placed too close to the heat source.
4. Set the temperature as desired via the CHEF iQ App. You can
either quickly set a custom temperature using Cook Control
on the app, or—if you choose to follow a Guided Cooking
recipe—a temperature will be set for you (some recipes oer a
choice of doneness). Additionally, you have the option of using
the Times & Temps feature; type in what you want to cook,
and this interactive guide will share with you the best way to
do it. NOTE: When using the Times & Temps feature, you’ll
see suggestions for the remove-from-heat temperature as well
as the target temperature. The target temperature is the final
temperature of the food after being taken o the heat and
resting. In almost all cases, the remove-from-heat temperature
will be lower than the final temperature due to residual carry-
over cooking that occurs after the food is o the heat.
5. When ready to cook, insert the probe into the thickest part
of your food, avoiding any bones. IMPORTANT: Insert the
probe up to the point at which it widens to prevent damage
to the probe. Also be sure the tip, which is where the internal
temperature sensor is located, is positioned in the food properly
for the most accurate reading. For more detailed probe place-
ment instruction, refer to the illustrations in the Times & Temps
section on the app and/or recipe videos in the Guided Cooking
section.
6. Cook your food. When cooking, be sure that the exposed end
of the probe, which houses the ambient temperature sensor, is
not directly touching the heat source or any hot surfaces (such
as the grates on a grill or the sides or edges of pots and pans).
Although it’s heat resistant to 572˚F, the probe can break at
temperatures hotter than that.
7. Follow your cooking progress on your smartphone or tablet—
from anywhere, if using Wi-Fi. (If using Bluetooth only, your
range will be more limited.) The app, as well as the hub, will
keep you informed.
8. Cook your food until done. You’ll get an alert when it’s time to
take your food o the heat.
9. Remove the probe carefully. When it’s time to remove the
probe (usually after the food has rested), be extremely careful
as it may still be hot and can cause burns. Use a towel, pothold-
er, or oven mitt when pulling the probe out of the food.6.
Pair your hub and probe as directed on the app to set up and
activate your new thermometer.
CLEANING AND MAINTENANCE
1. Be sure to clean the probe well and dry it before placing it in
the charging nest in the hub. A dirty probe may not charge.
Wash the probe by hand with soapy water. Avoid using very
abrasive sponges and cleansers to avoid scratching.
2. If the hub gets dirty, wipe it down with a damp cloth. The
hub is not dishwasher-safe and is not waterproof. Do not
immerse it in water.
 Loading...