13
Voice activated operation set
(only in Baby Monitor mode)
Sleep reminder set
Measure fever reminder set
Meal reminder set
Medicine reminder set
Nappy change reminder set
volume muted
Maximum volume level
Photo capture in progress (only
in Baby Monitor mode)
Video recording in progress
(only in Baby Monitor mode)
Video duration
(only in Gallery mode)
2. Description of features
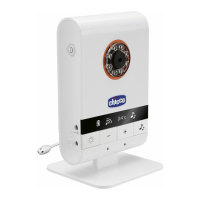
2.1 Child unit (primarily in image and
sound transmitter mode)
2.1.1 Power:
Power via 100-240 V~ 50/60 Hz /6.5
V
550 mA switching mains
adapter (1) or via four 1.5V AAA/LR6
alkaline batteries (not included)
When power is supplied with mains
adapter (1):
- check that the mains voltage cor-
responds to that shown on the rat-
ing plate of the adapters referred to
above;
- insert the mains adapter jack (1) in
the power connector (11) on the side
of the unit.
- insert the mains adapter plug in an
easily accessible power socket.
CAUTION:
- The adapter cord could cause stran-
gulation. Keep out of reach of children.
- Periodically inspect mains adapters
(1). If the power cord or plastic parts
show signs of damage, do not use
them and contact a qualified techni-
cian.
- Do not leave mains adapters (1)
plugged into the outlet when appli-
ances are not in use and/or not con-
nected to the mains adapters (1).
2.1.2 Modes of use - Switching on and
adjustment.
The child unit (primarily in image and
sound transmitter mode) must be
positioned about 1 - 1.5 metres from
the child, on a flat, stable surface and
with the microphone (6) and the video
camera (5) directed toward the child.
Caution: the child unit, the mains
adapter (1) and its power cord must be
kept out of reach of children.
Switching on/off the child unit in
Baby Monitor mode
Press the on/off button (2) for about
2 seconds. The child unit (primarily in
image and sound transmitter mode)
will switch on.
The power and link indicator light (9)
will begin to flash green and the dis-
play (17) will show the icon
to indi-
cate that the parent unit is attempt-
ing to establish a connection with the
child unit. Once connection has been
established between the 2 units, the
power and link indicator light will light
up steady green and the
icon will
appear on the display.
Keep the button (2) pressed for 2 sec-
onds. The power and link indicator (9)
and the child unit (primarily in image
and sound transmitter mode) will
switch off.
For details on the icons shown on the
display (17) in Baby Monitor mode, re-
fer to paragraph 1.4.
+ - child unit loudspeaker
volume adjustment
The + (16a) and - (16b) volume adjust-
ment buttons regulate sound volume
from the parent unit if the Talk func-
tion is used in Baby Monitor mode
and the volume of the lullabies played
from the child unit in Music mode.
Press the + (16a) and – (16b) buttons
to adjust the volume of the child unit
loudspeaker (19) and select the de-
sired level. The unit offers 9 volume
setting levels. The factory set level is 5.
The change in the volume level will be
shown on the display (17).
Note: the volume variation icon in-
cludes 5 bars. Each bar lights up after
2 presses of the + (16a) and - (16b)
volume adjustment buttons.
Press the “+” button (16a) once to in-
crease the volume by one level.
Press the “-“ (16b) button once to de-
crease the volume by one level.
A double beep will be heard each time
the maximum or minimum level is
reached.
 Loading...