During the pre-alarm sequence you can
press and hold one buon on Chiptech
GO to cancel your request for help.
Chiptech GO will announce: “Cancelled.”
If the alarm has proceeded to the Alarm
Receiving Centre, simply speak to the
operator and let them know you do not
require assistance.
Overview
Requesng Help
To send an alert for help, any me of the
day or night, press and hold both buons
at the same me on your Chiptech GO.
This will start the short pre-alarm
sequence with a disnct tone and
vibraon.
The light-ring around Chiptech GO will
ash red to let you know an alert is being
sent to the Alarm Receiving Centre (ARC).
A voice message will play, “Help alert in
progress.”
Once the alarm has been received, a voice
message will play and repeat: “The alert
has been received by monitoring; you will
soon be contacted by an operator.”
An ARC operator will call back;
Chiptech GO will ring and automacally
answer. Chiptech GO has a hands-free
speakerphone system; speak clearly and
slowly to the operator.
While you are speaking with an operator,
Chiptech GO will work in the background
to obtain your current locaon and send
it to the ARC.
Once you have been located, the
operator will send assistance, or organise
emergency services if required, to your
locaon.
When an operator ends the call Chiptech
GO will ash green to indicate that the
ARC can sll call back, and your locaon
connues to be sent.
Chiptech GO automacally stops
reporng your locaon aer
a period of me, the green lights
will no longer appear.
6
7
3
4
5
1
2
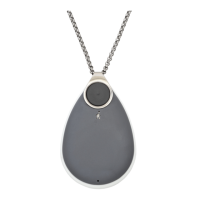
Chiptech GO is a wearable device with 3G cellular and GPS technology. When acvated
it sends an alert along with your GPS locaon data to the Alarm Receiving Centre (ARC).
You will be able to talk with the operator over the speakerphone, and they will organise
assistance if required.
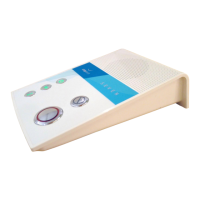
1. Connect the plug pack and supplied cable to the charging base, plug into power.
2. Place your device on the wireless charger. Be sure to check that the ‘walking person’
symbol faces upwards; the charger and Chiptech GO will illuminate blue to indicate
that charging has started.
3. Charging duraon is approximately three to ve hours from low baery.
4. When Chiptech GO is charged its light ring will illuminate green. If Chiptech
GO has automacally updated during charging, it will ash white and if setup to do so,
it will announce: “Update completed,” when removed from the charger.
5. To use your device at any me, simply remove it from the wireless charger.
Please Note: You will need to perform a System Check at the locaon of your charger to ensure
Chiptech GO has coverage for any automac updates.
Chiptech GO will need a charge approximately every month with regular use, however, it
will inform you when it needs to be placed on the charger. Chiptech GO will also need to be
charged if you have recently sent an alert for help, as this event uses more baery power.
Charging and Baery Nocaons
Speaker
Split ring
• Requesng Help: press and hold both buons.
• System Check: press and hold one buon.
• Cancel: press and hold one buon.
Wearing Chiptech GO with a Pacemaker:
If you have a pacemaker you cannot wear Chiptech GO as a pendant. Instead, aach Chiptech
GO to the supplied split ring, which can be aached to a belt clip or keys. Chiptech GO must be
kept at a minimum distance of 25cm from your pacemaker at all mes.
If you have a Chiptech Base Unit at Home:
When you send an alert, and Chiptech GO is in range of your base unit, it will report that you are
‘Home’ to the ARC so they quickly know where you are located. Once the ARC has received your
alert, they will speak with you over Chiptech GO’s speakerphone system, no maer where you
are on the property. In the unlikely event that Chiptech GO cannot communicate with the ARC,
the base unit will take over and try to send the alert for help.
Stainless steel
Hypoallergenic chain
Microphone
Light ring
illuminates
around
Chiptech GO
Important Charging Notes:
• If you have a pacemaker, you should be sure to keep the wireless charger and
Chiptech GO at least 25cm away from your pacemaker during charging.
• Place the charger on a at surface and please make sure all parts of the charger are
properly connected before use.
• Do not use the charger if any parts of the charging system are damaged.
• Do not place anything metal on top of the charger.
• Do not cover the charger with any material, including the chain.
• Do not place the charger in direct sunlight, recommended charging temperature
between 10°C to 35°C.
• During charging Chiptech GO can become warm to the touch.
Low Baery Nocaons:
• When your baery is low, Chiptech GO will periodically play the following voice
message: “Low baery, please place me on the charger today,” and will ash orange.
• When your baery is crically low, Chiptech GO will periodically play the following
voice message: “Crically low baery, please place me on the charger immediately.
An alert may fail,” and will ash red.
• Automated voice messages will only play during day me hours.
Charging Cord
Charger
Plug Pack
Charging Components
Blue when charging