Disassembly of one piece axle on front BMX hub
(see fi gure 7)
2.5mm
Hex Bolt
Adjusting
Clamp
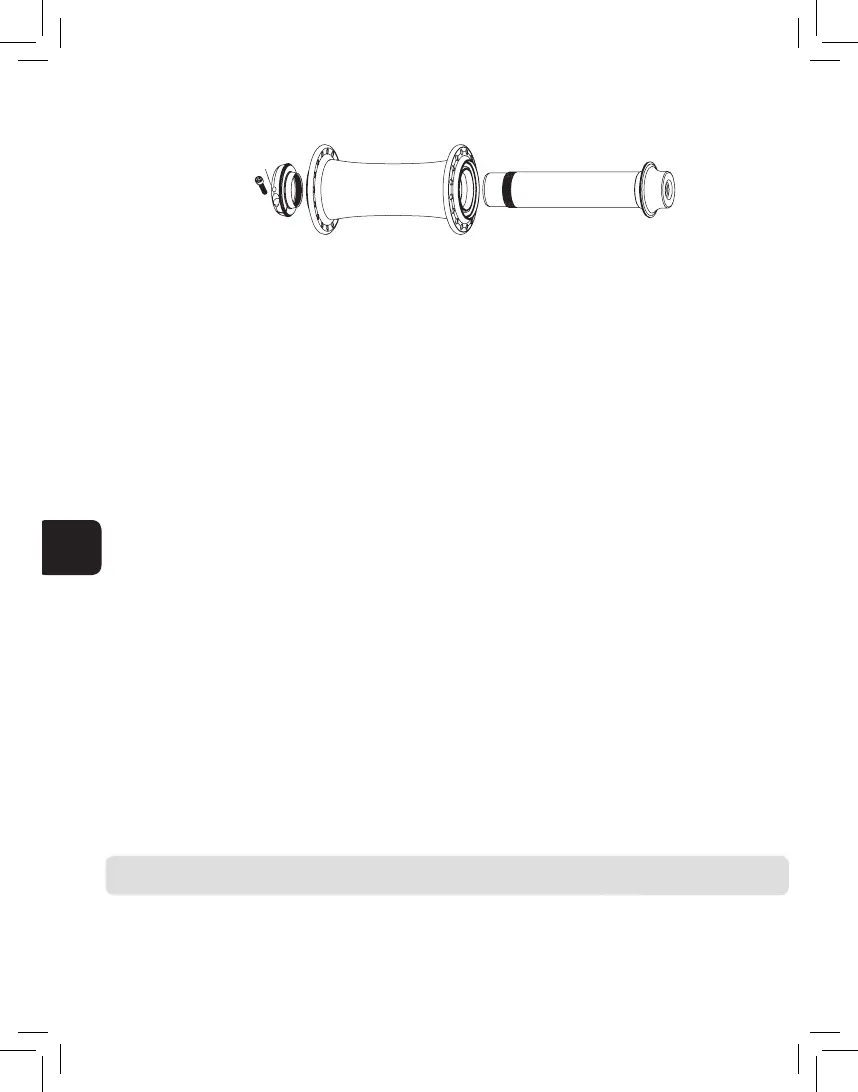
Front Classic
Hubshell Assembly
Front BMX Axle
Assembly
Figure 7
helper
hole
1. Insert a 2.5mm hex wrench into the adjusting clamp hex bolt, and loosen. If adjusting
clamp is diffi cult to remove, insert a 2.5mm hex key into “helper hole” on adjusting clamp
adjacent to 2.5mm hex bolt. Use the hex key as a lever to unscrew adjusting clamp.
2. With adjusting clamp facing towards you, hold opposite end of axle stationary, and rotate
clamp in a counter clockwise direction. After one complete revolution the adjusting clamp
should be free from the axle.
3. Slide out axle.
4. Both hub shell bearing assemblies can now be accessed.
For bearing service information see “Service of the bearings”, page 13.
Reassembly of one piece axle on front BMX hub (see fi gure 7)
1. Lightly grease threads on axle.
2.
Insert driveshell into the hub shell; turn in a clockwise motion while letting it pull itself in.
A distinctive click sound will indicate that the driveshell is fi rmly seated.
3. Insert main axle into hubshell until axle is through the hub.
4. Thread adjusting clamp onto the protruding threads of axle.
5.
Snug the adjusting clamp up to the bearing.
6. Proceed to “Adjustment of one piece axle on front BMX hub”, below.
Adjustment of one piece axle on front BMX hub (see fi gure 7)
The one piece front axle assembly features an adjusting clamp that minimizes over tightening or over pre-
loading of the bearings.
Adjustment may be accomplished while axle is attached to bicycle frame.
1. Loosen the adjusting clamp hex bolt using a 2.5mm hex wrench.
2. Hand tighten the adjusting clamp onto the axle until it stops against the bearing. If adjusting
clamp is diffi cult to move, insert a 2.5mm hex wrench into “helper hole” on adjusting clamp
adjacent to 2.5mm hex bolt. Use the hex key as a lever to turn adjusting clamp.
3. Once the adjusting clamp is in position, use a 2.5mm hex wrench to tighten the adjusting
clamp hex bolt to 10 inch-pounds.
4. Check for play or binding and readjust if needed.
If you have any additional questions, please contact our Technical Service Department at 800-523-
6008, or check out our website for tech info and videos: www.chrisking.com
If you have any additional questions, please contact our Technical Service Department at 800-523-
6008, or check out our website for tech info and videos: www.chrisking.com
Disassembly of one piece axle on rear Classic hub
(
see
Figure 8)
1.
Remove Cog Lock Ring and cog/cassette using a chain whip and HG cogset lock ring
removal tool.
2.
Insert a 2.5mm hex wrench into adjusting clamp hex bolt, and loosen. If adjusting clamp
is diffi cult to remove, insert a 2.5mm hex key into “helper hole” on adjusting clamp
adjacent to 2.5mm hex bolt. Use the hex key as a lever to unscrew adjusting clamp.
3. With adjusting clamp facing towards you, hold opposite end of axle stationary, and
rotate clamp in a counter clockwise direction. After one complete revolution the
adjusting clamp should be free from the axle.
4. Remove axle by pulling on drive side end of axle.
5 Hold hub or wheel in one hand and pull driveshell with other.
6. Hub shell bearings, RingDrive engagement and driveshell bearing assemblies can
now be accessed.
For RingDrive inspection and maintenance information, see “The RingDrive”, pg. 11.
For
bearing service information see “Service of the bearings”, pg. 13
Further disassembly requires specialized tools. These come individually or in the Chris
King Hub Service Tool Kit, which is available at any authorized Chris King dealer, or directly
from Chris King Precision Components.
Reassembly of one piece axle on rear Classic hub
(see Figure 8)
1. Lightly grease threads on axle. Apply two drops of Tri-fl ow
™
or a quality 10w synthetic
oil to axle O-ring. If using QR adaptors or FunBolts, apply anti-seize to threads
before threading them into the axle.
2.
Insert driveshell into the hub shell; turn in a clockwise motion while letting it pull
itself in. A distinctive click sound will indicate that the driveshell is fi rmly seated.
3. Insert main axle, small end fi rst into driveshell. Continue until axle is through the
hub and large end is fi rmly seated in driveshell.
4. Thread adjusting clamp onto the protruding threads of axle.
5.
Snug the adjusting clamp up to the bearing.
6. Proceed to “Adjustment of one piece axle on rear Classic hub”, below.
Note: To improve performance, the axles have been precisely matched with the needle
bearings in the driveshell. Be sure to combine only like numbered parts, (e.g., #3 axle with
#3 needle bearing race).
5.2mm Cog
Spacers (Single
Speed only)
Single Speed/
BMX Cog
Lock Ring
Single Speed/BMX
Axle Assembly
Single Speed/
BMX Driveshell
Assembly
Single Speed/BMX
Rear Hubshell
Assembly
Adjusting
Clamp
Figure 8
2.5mm
hex bolt
O-ring
O-ring (Single
Speed only)
8