EasyManua.ls Logo

CIRCLE FITNESS B6 - User Manual

Default Icon
13 pages
Print Icon
To Next Page IconTo Next Page
Loading...
Question and Answer IconNeed help?

Do you have a question about the CIRCLE FITNESS B6 and is the answer not in the manual?

Summary

Information For Components & System

System wiring diagram

Visual representation of the electrical connections and component layout of the fitness equipment.

Generator Controller

Details of the generator controller board, including pin assignments for various connections.

Console PCB

Information regarding the console printed circuit board, its connectors, and membrane key functions.

Error Signal Check And Solutions

EEPROM ERROR

Troubleshooting guide for EEPROM read or write errors, recommending console PCB replacement.

MOTOR ERROR

Procedure for diagnosing motor abnormalities and failure to reach requested positions.

Other Information

Console no power, no any display

Step-by-step guide to diagnose and resolve issues where the console has no power or display.

Console no power right away after stop exercise

Troubleshooting steps for when the console loses power immediately after the exercise session ends.

Engineering Mode

Engineering mode 1: Factory settings

Instructions for entering and configuring factory settings via the engineering mode.

Engineering mode 2: Used information

Guide to accessing and managing usage data like total distance and time in engineering mode.

Overview

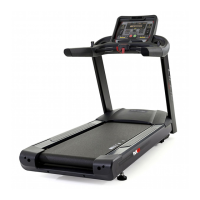
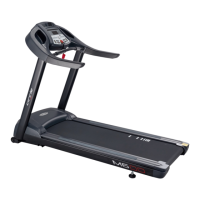
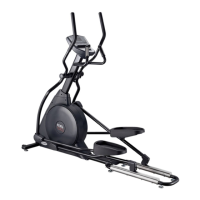
This document serves as a service manual for Circle Fitness E6 Elliptical, B6 Upright Bike, and R6 Recumbent Bike models, all featuring an LED display type. It provides comprehensive information for understanding, operating, and maintaining these fitness machines.

Function Description

The E6 Elliptical, B6 Upright Bike, and R6 Recumbent Bike are fitness machines designed to provide cardiovascular exercise. The E6 Elliptical offers a low-impact, full-body workout, mimicking the motion of walking or running without the associated stress on joints. The B6 Upright Bike provides a traditional cycling experience, engaging leg muscles and offering a comfortable upright riding position. The R6 Recumbent Bike, on the other hand, features a reclined seating position with back support, which can be more comfortable for users with back issues or those seeking a less strenuous workout while still engaging leg muscles. All models are equipped with an LED display that provides real-time feedback on various workout metrics.

The core functionality of these devices relies on a generator controller and a console PCB. The generator controller manages the resistance levels and power generation, while the console PCB processes user input, displays workout data, and communicates with other components. The resistance mechanism, whether for an elliptical or a bike, is controlled by a motor that adjusts the intensity of the workout. Speed sensors monitor the user's activity, providing data for the console display.

Usage Features

The devices are designed for user-friendly operation, with an intuitive LED display and various input options. The console features a main membrane key for general control and a membrane key for display switch functions.

Workout Metrics and Display: The LED display provides essential workout information, including:

  • Watt: Power output during exercise.
  • Time: Duration of the workout.
  • Calories: Estimated calories burned.
  • Level: Resistance level.
  • RPM: Revolutions per minute (for bikes) or strides per minute (for ellipticals).
  • Mets: Metabolic equivalents.
  • Distance: Total distance covered.
  • Heart Rate: Measured via hand pulse grips or a wireless receiver.

Program Selection: Users can select from various workout programs using the main membrane key, which includes options like:

  • TARGET: Goal-oriented workouts.
  • HRC: Heart Rate Control programs.
  • ENTER: To confirm selections.
  • RESET: To clear current workout data and restart.
  • ROLLING: Programs simulating varied terrain.
  • FITNESS TEST: To assess fitness levels.
  • RANDOM: Workouts with unpredictable resistance changes.
  • START: To begin a workout.
  • VALLEY: Programs with undulating resistance.
  • FAT BURN: Programs optimized for fat loss.
  • INTERVAL: Workouts alternating between high and low intensity.

Heart Rate Monitoring: The devices are equipped with hand pulse grips for direct heart rate measurement. Additionally, a wireless receiver (JK2) allows for external heart rate monitors to be connected, providing more accurate and continuous heart rate tracking.

Resistance Adjustment: The resistance level can be adjusted using the "UP" and "DOWN" keys on the lever (JK9), allowing users to customize the intensity of their workout.

Engineering Mode (Factory Settings): The devices feature an "Engineering Mode 1: Factory settings" accessible by pressing and holding "UP" and then "ENTER" in idle mode. This mode allows for:

  • Software Version Check: Displays the software version (e.g., EPBR 6000 VX.XX).
  • Model Selection: Allows selection between different models (e.g., EP-6000 or BR-6000).
  • Unit Selection: Users can choose between "UNITS METRIC" and "UNITS ENGLISH" for display measurements.

Engineering Mode (Used Information): "Engineering Mode 2: Used information" is accessed by pressing and holding "DOWN" and then "ENTER." This mode provides:

  • Total Used Distance (ODO): Displays the total distance accumulated over the device's lifetime.
  • Total Used Time (HRS): Shows the total operational time of the device.
  • Erase ODO and HRS: Allows for clearing the accumulated distance and time by holding "ENTER" for 3 seconds, returning the device to idle mode.

Maintenance Features

The service manual outlines several procedures for troubleshooting and maintaining the fitness equipment, focusing on common issues like error signals and power problems.

Error Signal Check and Solutions:

  • EEPROM ERROR: If an "EEPROM ERROR" occurs, it indicates a read or write error with the EEPROM. The recommended solution is to replace the console PCB.
  • MOTOR ERROR: A "MOTOR ERROR" signifies an abnormal motor function where the motor cannot reach the requested position. The troubleshooting steps include:
    1. Check Controller: Verify if the correct controller is being used for the specific model. If not, replace the controller.
    2. Battery Disconnection: Disconnect the battery.
    3. Resistance Mechanism Check: Disassemble the pull steel rope from the flywheel and allow the pull motor to operate freely. This helps identify if the jam is within the resistance mechanism.
    4. Battery Reconnection: Connect the battery back.
    5. Paddling Test: Start paddling and observe if the "MOTOR ERROR" persists.
    6. Resistance Jam Adjustment: If the error persists, adjust any resistance jams while operating and reassemble the pull steel rope to check for the source of the jam.
    7. Motor Movement Check: Determine if the pull motor moved before the "MOTOR ERROR" appeared. If it did not, the motor might be faulty, requiring replacement. If the error still occurs after motor replacement, the controller might be at fault, requiring replacement.

Console No Power, No Display: If the console has no power or display, follow these steps:

  1. Disassemble Console: Remove the console from the device.
  2. Disconnect Console Wires: Disconnect the wires connecting to the console.
  3. Start Paddling: Begin paddling to generate power.
  4. Measure Console Wire Power: Measure the voltage at the console wire power pins. It should be DC12~13V.
    • If the voltage is correct, replace the console PCB.
    • If the voltage is incorrect, proceed to the next steps.
  5. Access Controller: Reassemble the console, then open the right and left covers to access the controller.
  6. Disconnect Speed Sensor Wire: Disconnect the speed sensor wire from the controller.
  7. Short and Open Sensor Terminal: While paddling, repeatedly short and open the sensor terminal using metal parts.
    • If the console gets power, replace the speed sensor.
    • If the console still does not get power, replace the controller.

Console No Power Right Away After Stop Exercise: This issue suggests a problem with the battery or charging system:

  1. Start Paddling: Begin paddling until the console displays normally.
  2. Stop Paddling: Stop exercising. If the console immediately loses power, proceed.
  3. Check Battery Voltage: Open the right and left covers and measure the battery voltage. It should be over 11V.
    • If the battery voltage is below 11V, replace the battery.
    • If the battery voltage is over 11V, charge the battery using an external adaptor (12V/1A, 2.5mm jack). If the issue persists after charging, replace the controller.

These detailed troubleshooting and maintenance procedures ensure that technicians can effectively diagnose and resolve common issues, extending the lifespan and reliability of the Circle Fitness E6 Elliptical, B6 Upright Bike, and R6 Recumbent Bike.

CIRCLE FITNESS B6 Specifications

General IconGeneral
BrandCIRCLE FITNESS
ModelB6
CategoryTreadmill
LanguageEnglish

Related product manuals