7
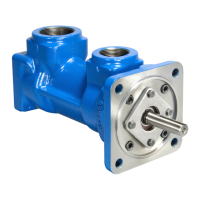
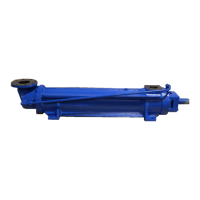
Table 2 – 3E-143, 143J and 162 Pump Models Versus Assembly Figure Numbers
Figure Numbe
Pump Models
3 C3EIC, C3EICX
4 D3EICS, D3EICSX
5 C3EBC, C3EHC, C3EBTC, C3EHTC, C3EXC, C3EBCX
6 C3EBF, C3EHF, C3EBTF, C3EHTF, C3EXF, C3EXTF
7 D3EBCS, D3EHCS, D3EBTCS, D3EHTCS, D3EXCS, D3EBCSX, D3EBCSTX
8 D3EBFS, D3EHFS, D3EBTFS, D3EHTFS, D3EXFS, D3EHFSX, D3EXTFS
9 D3ENC, D3ENCX, D3EJC, D3EJCX
10 D3ENCS, D3EJCS, D3ENCSX, D3EJCSX
11 D3ENFS, D3EJFS, D3ENFSX, D3EJFSX
CAUTION
Fluid leakage from disassembly of pump may make floor slippery and cause personal injury
1. If pump is an iron case seal-less version C3EIC (See figure 3), it is not repairable. Contact Imo for a
replacement pump. If pump is steel case seal-less version D3EICS (See Figure 4), proceed to step
6 below for disassembly. If pump is any other type, proceed with step 2 below.
2. Remove bearing retainer bolts (6) and bearing retainer (12).
3. Grasp power rotor (7) shaft and pull assembled power rotor (7) from pump. Removal of power rotor
will also remove bearing (11), seal (16), seal seat adapter (92) and snap ring(s) (15).
4. Disassemble power rotor as follows:
a. Remove drive side bearing retaining ring (15) from groove of power rotor (7). Put power rotor (7)
on a press with bottom of seal seat adapter (92) on plate of press. Press power rotor (7) through
bearing (11) and seal seat adapter (92). On high inlet pumps, Figure 9, 10 and 11 only, remove
inner retaining ring (15) from power rotor (7).
CAUTION
ATTENTION
Ensure power rotor (7) does not fall to floor when it is pressed off ball bearing (11).
b.
Remove seal seat adapter (92) from shaft (7) and stationary seal seat with O-ring from seal seat
adapter (92) and remove O-ring from stationary seal seat. Remove O-ring (93) from groove in
OD of seal sleeve adapter.
c.
Remove rotating assembly of mechanical seal (16) from power rotor (7) sleeve as outlined
below
:
(1)
If single spring seal. Slide rotating assembly from power rotor (7).
(2)
If multi-spring type seal. Loosen setscrews and slide rotating assembly from power rotor (7).
5. If only seal (16) is being replaced, disassembly is complete. Follow steps 5, 7 and 8 of reassembly
procedure below to assembly new seal (16) on power rotor (7) and assembly power rotor (7) into
pump. If rest of pump is to be disassembled, proceed to step 6 below.
6. Remove hex bolts (27) and cover (4) from case (1). Remove O-ring (26) from either case (1) or
cover (4). If pump is D3EICS, figure 4, remove power rotor (7) from housing (1).