4-3
Cisco Nexus 5000 Series Hardware Installation Guide
Chapter 4 Replacing Components
Replacing an I/O Module for a Cisco Nexus 5548 Switch
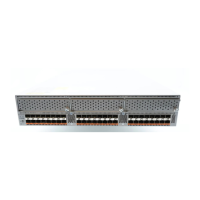
Figure 4-2 Removing a Fan Tray from the I/O Module in the Chassis
Step 3 With a hand on the fan module handle, pull the fan module out of the chassis (see Callout 2 in Figure 4-2)
and place it on an antistatic surface.
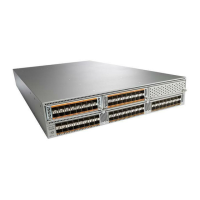
Step 4 Loosen the two captive screws on the I/O module so that they are no longer in contact with the chassis
(see Callout 1 in Figure 4-3).
Figure 4-3 Detaching the I/O Module from the Chassis
Step 5 Holding the handle for the left fan module, pull the I/O module (which houses the fan module) part way
out of the chassis (see Callout 2 in Figure 4-3).
Step 6 Place your other hand under the I/O module to support its weight, and fully remove the module from the
chassis (see Callout 1 in Figure 4-4).
1 Loosen the captive screw on the right most fan
tray so that the screw is free of the I/O module.
2 Pull the fan tray out of the I/O module and
set on an antistatic surface.
2
1
1
239227
1 Loosen captive screws until they are no longer
attached to the chassis.
2 Pull the I/O module part way out of the
chassis.
 Loading...