1/3
U200 Abbreviated instruction
• This watch is solar-powered. Expose the dial to light and use it sufficiently charged.
• To see details of charging time, specifications and operations, refer to the instruction manual:
U200 instruction manual
English
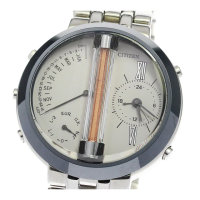
Component identification
Button
M
Button
A
Button
B
Mode indicator
Hour hand
Second hand
Minute hand
Digital display A
Crown
Digital display B
• Actual appearance may differ from the illustration.
Changing the mode
This watch features six different modes (functions): [TME] (time), [CAL]
(calendar), [AL1]/[AL2] (alarm), [CHR] (chronograph) and [TMR] (timer).
1.
Press and release the lower left button
M
repeatedly.
The current mode is indicated at the mode indicator.
Setting the time
Setting the time of the analog section
1.
Pull out the crown when the second hand points 0 second.
The second hand stops.
2.
Rotate the crown to set the time.
• Move the hands 4 or 5 minutes forward and move them back to the right
time to set the time more precisely.
3.
Push in the crown in accordance with a reliable time source to
finish the procedure.
The second hand starts moving.
Setting the time of the digital section
• Press button
M
to cancel setting of the time of the digital section.
• The setting is automatically canceled in about 2 minutes without any operation
during the setting.
1.
Press and release the lower left button
M
repeatedly to
change the mode to [TME].
2.
Press and release the upper right button
A
or upper left button
B
repeatedly to indicate an area name you want on the digital
display B.
• For area names, refer to the table on “Using the world time”.
3.
Press and hold the upper left button
B
until “SMT” starts to
blink on the digital display A.
The time becomes adjustable.
• The blinking part is the target to adjust.
4.
Press and release the upper left button
B
repeatedly to change
the target to be set.
• Each time you press button
B
, the target changes as follows:
Summer time Second Minute Hour 12/24-hour
basis
5.
Press and release the upper right button
A
to adjust the time.
• Press button
A
in accordance with a reliable time source when setting the
second.
• Pressing and holding button
A
changes indication continuously when
setting the minute and the hour.
• “A” or “P” is displayed to indicate AM or PM in 12-hour basis indication.
6.
Press and release the upper left button
B
to finish the
procedure.