3.
Remove the floor carpet and decide on the place
to install. Adjust the installation bracket with bolts
to suit the place of installation.
/
7. Align the unit with the bolts and secure it with the
wing nuts.
4.
Remove the separator
of
the cushion rubber that
is attached to the installation bracket with bolt and
install accordingly.
5.
Unfasten the wing nut and remove the unit.
6. Return the floor carpet to its original place. Use a
knife to cut into the carpet where the bolt can be
felt, and allow the bolt to protrude from the carpet.
"II
"II
"II
<Suspending Position>
<Horizontal Position>
"
<Vertical Position>
9 TROUBLESHOOTING
If
the same phenomenon still occurs after checking the above, or it
is
impossible to remove the magazine, please
consult your local dealer.
Installation Procedure
1.
Use
the double seamed hexagonal bolts to fix
installation bracket to the unit (on both sides) in
the desired direction
of
installation.
2. Use the wing nut to hold in place the installation
bracket with bolt to the installation bracket, which
is attached to the unit.Then affix the cushion rub-
ber.
Symptom Cause
Remedy
Loss
of
power
Bad
connection.
Check connections. Connect the cable again.
Connection
with
the source unit
is
The
length
of
the
CeNET
Rewire the connection
so
that the length of cable
is
less than 65.62 It
not recognized.
cable
wiring
is
more
than
(20m).
65.62
It
(20m).
Address switch num-
When the 2
CD
changers are connected, set the address switch
so
bers are the same.
that they do not have the same address number. Refer to the "Exam-
ple of address switch setting"
in
the section titled "IDENTIFICATION
OF
PARTS".
Magazine cannot
Magazine
inserted
Insert correctly.
be
loaded.
wrongly.
A magazine
is
already Eject the magazine and insert the other.
in
the player.
Distorted magazine. Buy New Magazine CAA-397.
"No Disc" sign Disc inserted upside- Read the section
on
"Inserting The CD" carefully
and
reinsert the
CD
appears when down.
correctly.
searching for
discs. Moisture or dirt
on
disc. Wipe disc free of moisture and dirt.
Noise, skipping
The installation selec- Set the installation selector levers to the same position
on
both sides.
tor levers are set to dif-
ferent positions
on
both
sides.
The unit installation di-
Set the unit installation direction and the installation selector lever
rection
and
the instal- positions to match each other. When installed at
an
angle, change the
lation selector lever po-
installation selector leverto a position
(H,
45",
V)
not prone
to
noise or
sitions
do
not match. sound loss.
Disc
bent
or
badly
Compare with another disc. If bad, discard the damaged disc.
damaged.
Disc
is
very dirty.
Clean the disc.
Mechanism does Mechanical error.
1.
Referring to section "INSTALLATION", check the three angle
of
in-
not function. stallation selector levers are properly set. If not, set them
at
the
proper position for the angle of installation.
2.
Check whether The
CD
magazine can
be
ejected
by
pressing the
CD
magazine eject button, then insert a new
CD
magazine.
Magazine
is
Disc holder
is
not cor-
Read
the section
on
"Inserting the CD" carefully and reinsert the disc
ejected
evenwhen
rectly inserted into the
holder correctly.
inserted into the magazine.
unit.
'\
Digital optical fiber cable
(Sold separately)
" Digital optical fiber cable
(Sold separately)
Ferrite clamp
I
(Included the
MD
changer)
MD changer
G~
-[
I J
V-adapter
(CCA-519: Sold separately)
OCZ6Z5
/
OCZ6Z5
~
~/
=:::::::J===l
• Dust and
other
objects may cause malfunc-
tions
if
they
get
into
the unit.
Always be sure
to
shut
the
flip
down
door
once
finished
with
loading
or
unloading the maga-
zine.
- Before shipment from the factory, the levers are nor-
mally placed
in
the horizontal position.
2.
Decide on the installation place and direction.
3.
Insert an item such as a screwdriver with a fine
point
or
the tip
of
a ballpoint pen into the round
hole of the installation selector lever to switch to
the position you need.
CeNETcable
(Included the DCZ625)
I
'\
CeNETcable
(Included the DCZ625)
CD deck or MD deck
I
Souce
.....
,.....,,.....,,.....,,.....,...,+,.....,
...
j CeNET cable
(Included the Clarion expanded digital
sound processor / equalizer DSP/EQ)
I
• FULL SYSTEM
• STANDARD SYSTEM
Eject button
Note:
• Reinstallthese lockpins when shipping the unitback
for repair.
Note:
Only the providedscrews
and
brackets should
be
used during installation. Us-
ing screws
other
than those specified will cause damage.
• When connecting the CeNET cable, fully insert it. Alter connection, fix
~
the connector with a c1amper as shown in the figure.
• When removing the digital optical fiber cable, rotate it to loosen it and
pull it gentlywhile holding the slide cap (a gray color part on the source
unit).
• Do not coil up the digital optical fiber cable with a radius
of
less than 1"
(3 cm). With a radius
of
less than 1", the performance
of
the cable will
be greatly impaired.
• When installed in a glove box
or
console box, make surethat the source
unit cables
or
cords do not interfere with the opening
or
closing of the
flip down door.
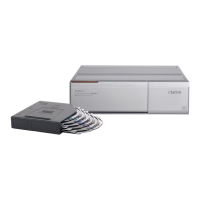
Extracting the Magazine
1.
Open
the
flip down door.
2.
Press the eject button and take out the magazine.
7 INSTALLATION OF CONNECTORS
6
SYSTEM
EXAMPLE
This unit is available
for
upgrade
in
various ways.
When
you
want
to upgrade the system, make sure that the upgrade unit fits and wire it correctly.
Prior to Installation
1.
Before attempting to use this unit you must first
remove the packing safety lock pins (3 posi-
tions). Store these lock pins carefully so they
can be used again if needed.
8 INSTALLATION
10
SPECIFICATIONS
H:
Horizontal 45": Slope
V:
Vertical
u:
~
~
~
~
"
~
~
y
45°
~
~
@y
...-
Align the installation selector le-
Align the installation selector le-
Align the installation selector le-
vers on both sides
of
the unit with
vers on both sides
of
the unit with
vers on both sides
of
the unit with
the "H" position.
the "45°" position.
the "V" position.
Frequency
Response
Signal-to-Noise
Ratio
Wow
and
Flutter
Power
Supply
Current
Consumption
Unit
Weight
Dimensions
:
5Hz-20kHz(±ldB)
: 105dB(1
kHz)IHF'A
: Below measurement limits
: DC14.4V
(1
O.8-15.6V) negative ground
: Less than 1A
: 3.6Ib. (1.65kg)
: 8-7/8"(Width) x 2-1/2" (Height) x 6-9/16"(Depth)
[225mm(W) x 63mm(H) x 167mm(D)]
• Set the installation selector lever
to
the same
position
on
both
sides.
• When
the
unit
is
installed below the horizontal
position
(up
to
15 degrees) the ejected magazine,
when
left
in
that
position,
will
drop
due
to
vibrations
from the car.
•
Adjust
the installation selector levers
into
the correct locations. Setting the locations incorrectly
or
in varied
positions
will
cause skipping.
• Do
not
move the installation selector levers while the
unit
is
in use. This
will
cause damage
to
the
mechanism and the disc.
-Due
to improvements, the design and these specifications
may
be modified without prior notice.
Clarion
Co.,ltd.
All
right Reserved. Copyright ©
2001
:Clarion
Co.,
Ltd.
Printed
in
China 2001/6
(T.C)
PE-24338 280-7715-00
 Loading...