EasyManua.ls Logo

Cochlear Mini Microphone 2+ User Manual

Cochlear Mini Microphone 2+
5 pages
To Next Page IconTo Next Page
Page #1 background imageLoading...
Page #1 background image
www.cochlear.com/us
Follow us on
FUN4932 ISS1 JAN23
*Battery life may vary by individual.
Please seek advice from your health professional about treatments for hearing loss. Outcomes may vary, and your health professional will advise you about the factors which could
a ect your outcome. Always read the instructions for use. Not all products are available in all countries. Please contact your local Cochlear representative for product information.
©Cochlear Limited 2023. All rights reserved. ACE, Advance O -Stylet, AOS, Ardium, AutoNRT, Autosensitivity, Baha, Baha SoftWear, BCDrive, Beam, Bring Back the Beat,
Button, Carina, Cochlear, 利耳, レア, 코클리어, Cochlear SoftWear, Contour, ントゥア, Contour Advance, Custom Sound, DermaLock, Freedom, Hear now. And
always, Hug t, Human Design, Hybrid, Invisible Hearing, Kanso, LowPro, MET, MP3000, myCochlear, mySmartSound, NRT, Nucleus, Osia, Outcome Focused Fitting,
O -Stylet, Piezo Power, Pro le, Slimline, SmartSound, Softip, SoundArc, True Wireless, the elliptical logo, Vista x, Whisper, WindShield and Xidium
are either trademarks or registered trademarks of the Cochlear group of companies.
Using the Cochlear Mini Microphone 2+
with CR310 Remote
Turn the microphone
on by holding the
gray button on top
for 2 seconds.
You will see a
green  ashing light.
1
Turn the remote on by
sliding the gray bar on
the side up.
2
Hold the silver button on
the remote for 2 seconds
to start streaming.
You will see an extra icon
appear on the screen.
If the microphone is
paired in slot 2, hold the
silver button on the remote
for 2 more seconds.
You can start using the
microphone now!
3
Turn the microphone
o by holding the
gray button on top
for 2 seconds.
You will see a red light.
5
Turn the remote o
by sliding the gray bar
on the side down.
Note: Charge the
Mini Microphone 2+
every night.
Note: The battery in your
CR310 Remote could last
up to 3 months.
*
6
To stop streaming, quick
press the silver button on
the remote one time.
The extra icon
will disappear.
4
For help, call Device Support at 800 483 3123 then select option 2.
Question and Answer IconNeed help?

Do you have a question about the Cochlear Mini Microphone 2+ and is the answer not in the manual?

Cochlear Mini Microphone 2+ Specifications

General IconGeneral
TypeMini Microphone
Battery LifeUp to 10 hours
Microphone TypeOmnidirectional
CompatibilityCochlear Nucleus 6, Kanso, Kanso 2, Baha 5, Baha 6
Wireless Technology2.4 GHz
Charging Time3 hours
ConnectivityBluetooth

Summary

Cochlear Mini Microphone 2+ with CR310 Remote Operation

Powering On the Mini Microphone 2+

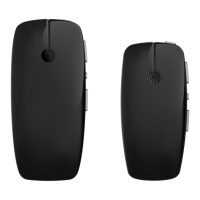
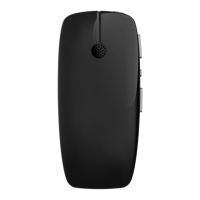
Instructions to turn on the Mini Microphone 2+ using the gray button for 2 seconds, indicated by a green flashing light.

Powering On the CR310 Remote

Steps to activate the CR310 remote by sliding the gray bar on its side upwards.

Initiating Audio Streaming

Start streaming by holding the remote's silver button for 2 seconds, showing an icon on screen.

Stopping Audio Streaming

End streaming by quickly pressing the remote's silver button once; the icon will disappear.

Powering Off the Mini Microphone 2+

Turn off the Mini Microphone 2+ by holding the gray button for 2 seconds, indicated by a red light.

Powering Off the CR310 Remote

Deactivate the CR310 remote by sliding the gray bar on its side downwards.

Using the TV Streamer with CR310 Remote

Connect and Power On TV Streamer

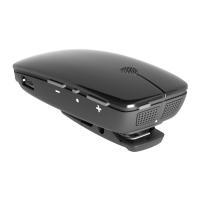
Ensure the TV Streamer is plugged into the wall and TV, observing solid orange and green lights.

Power On the CR310 Remote

Activate the CR310 remote by sliding the gray bar on the side up.

Start TV Streamer Streaming

Initiate streaming by holding the remote's silver button for 2 seconds, showing an icon on screen.

Adjust TV Streamer Volume

Control audio volume by pressing the + or - buttons on top of the TV Streamer.

Stop TV Streamer Streaming

End streaming by quickly pressing the remote's silver button once; the icon will disappear.

Power Off the CR310 Remote

Deactivate the CR310 remote by sliding the gray bar on the side down.

CR310 Remote Control Functions

Power On the CR310 Remote

Turn the CR310 remote on by sliding the gray bar on the side up.

Adjust Program Selection

Use the arrow buttons on the left side to adjust hearing programs.

Adjust Volume or Sensitivity

Control volume or sensitivity using the buttons on the right side.

Power Off the CR310 Remote

Turn the CR310 remote off by sliding the gray bar on the side down.

Kanso 2 Sound Processor Charging

Remove Sound Processor for Charging

Take the Kanso 2 sound processor off your head before placing it in the charger.

Connect to Home Charger

Plug the Home Charger into the wall outlet and place the sound processor inside the open lid.

Start Charging Process

Close the lid; the sound processor light will flash green during charging.

Remove Fully Charged Processor

Open the lid and remove the processor when its light is a steady green.

Nucleus 8 Sound Processor Charging

Remove Sound Processor and Battery

Detach the Nucleus 8 sound processor from your head and remove the battery.

Connect Battery to Y Battery Charger

Ensure charger is plugged in, then twist the battery clockwise onto the charger.

Monitor Charging Status

The charger light will flash green while the battery is charging.

Confirm Fully Charged Battery

A steady green light on the charger indicates the battery is fully charged and ready.

Related product manuals