420706-UU M-A-1 008
7. NEVER ... Store flammable materials of any kind near your fur-
nace. Gasoline, solvents, and other volatile liquids should be
stored only in approved containers outside your home. These
materials vaporize easily and are extremely dangerous.
8. NEVER ... Store cleaning materials near your furnace. Materials
such as bleaches, detergents, powdered cleansers, etc., can
cause corrosion of the heat exchangers.
9. NEVER ... Use the area around your furnace as a storage area
for items which could block the normal flow of air. This flow of air is
required for ventilation of the various furnace components.
~WARNIN~
FIRE OR EXPLOSION HAZARD
This furnace is designed and approved for use with Nat-
ural Gas and (LP) Propane Gas ONLY. DO NOT BURN
ANY LIQUID FUEL OR SOLID FUEL IN THIS FURNACE.
Burning any unapproved fuel will result in damage to the
furnace heat exchanger, which could result in Fire, Per-
sonallnjury, and/or Property Damage.
SECTION II: INSTRUCTIONS FOR
EXAMINING THE FURNACE
INSTALLATION
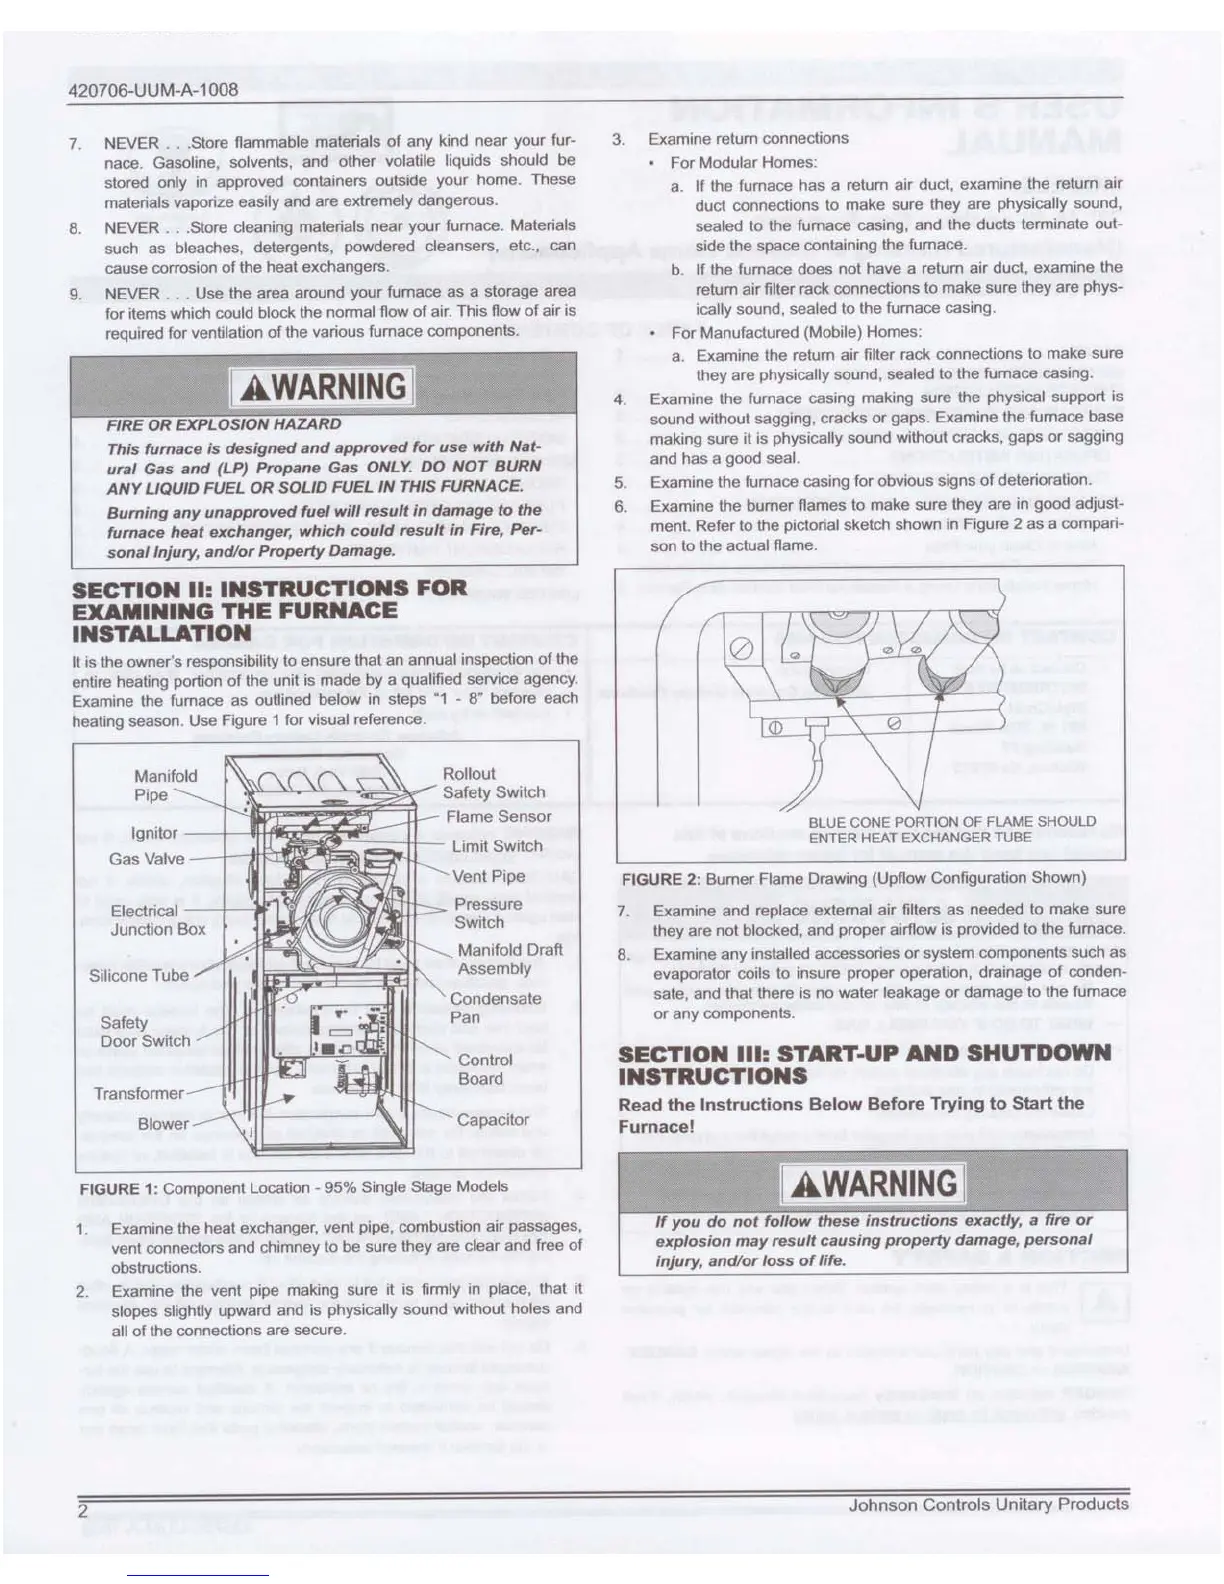
It is the owner's responsibility to ensure that an annual inspection of the
entire heating portion of the unit is made by a qualified service agency.
Examine the furnace as outlined below in steps "1 - 8" before each
heating season. Use Figure 1 for visual reference.
Manifold
Rollout
Pipe
Safety Switch
Flame Sensor
Ignitor
Gas Valve
Limit Switch
Vent Pipe
Electrical
Pressure
Junction Box
Switch
Manifold Draft
Silicone Tube
Assembly
Condensate
Safety
Pan
Door Switch
Control
Board
Transformer
Blower
Capacitor
FIGURE 1: Component Location - 95% Single Stage Models
1. Examine the heat exchanger, vent pipe, combustion air passages,
vent connectors and chimney to be sure they are clear and free of
obstructions.
2. Examine the vent pipe making sure it is firmly in place, that it
slopes slightly upward and is physically sound without holes and
all of the connections are secure.
3. Examine return connections
For Modular Homes:
a. If the fumace has a return air duct, examine the return air
duct connections to make sure they are physically sound,
sealed to the furnace casing, and the ducts terminate out-
side the space containing the furnace.
b. If the furnace does not have a return air duct, examine the
return air filter rack connections to make sure they are phys-
ically sound, sealed to the furnace casing.
For Manufactured (Mobile) Homes:
a. Examine the return air filter rack connections to make sure
they are physically sound, sealed to the furnace casing.
4. Examine the furnace casing making sure the physical support is
sound without sagging, cracks or gaps. Examine the furnace base
making sure it is physically sound without cracks, gaps or sagging
and has a good seal.
5. Examine the furnace casing for obvious signs of deterioration.
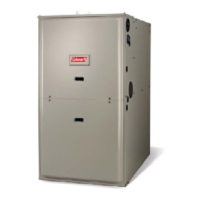
6. Examine the burner flames to make sure they are in good adjust-
ment. Refer to the pictorial sketch shown in Figure 2 as a compari-
son to the actual flame.
BLUE CONE PORTION OF FLAME SHOULD
ENTER HEAT EXCHANGER TUBE
FIGURE 2: Burner Flame Drawing (Upflow Configuration Shown)
7. Examine and replace external air filters as needed to make sure
they are not blocked, and proper airflow is provided to the furnace.
8. Examine any installed accessories or system components such as
evaporator coils to insure proper operation, drainage of conden-
sate, and that there is no water leakage or damage to the furnace
or any components.
SECTION III: START-UP AND SHUTDOWN
INSTRUCTIONS
Read the Instructions Below Before Trying to Start the
Furnace!
~VVARNIN
If you do not follow these instructions exactly,
a
fire or
explosion may result causing property damage, personal
injury, and/or loss
of
life.
2
Johnson Controls Unitary Products