EasyManua.ls Logo

Coleman BEACH SHADE 2000002120 User Manual

Coleman BEACH SHADE 2000002120
2 pages
To Next Page IconTo Next Page
Page #1 background imageLoading...
Page #1 background image
STITCH LINE
BEACH SHADE MODEL 2000002120
Fig. 1
Fig. 2
To Set Up Beach Shade
1. Unfold Beach Shade and spread out on a clean, level surface
with the door facing the desired direction. Unzip door.
(Fig. 1)
6. Insert one end of the grey Crossover Pole into the grommet
on the web strap on either side of front door. (Fig. 4)
Fig. 6
Fig. 4
8. Go to the back of the
Beach Shade and
insert black Main Pole
tip into the grommet
on the web strap.
(Fig. 6)
To Set Up Beach Shelter (continued)
Fig. 5
(continued on other side)
Main Poles (2)
Crossover Pole (1)
2. Stake down shade corners,
using the outside grommets on
the web straps. Keep the floor
taut. (Fig. 2)
Option: Use sand bags to weight
shelter down, see Fig. 14 & 15.
7. Go to opposite end of the grey pole and gradually apply
pressure to the pole, forming an arch, until you are able to
insert the pole tip into the grommet on the web strap. (Fig. 5)
9. From the front of the Beach Shade, gently pull the black Main
Pole down until you
can insert the end into
the grommet on
the web strap located
above the door open
ing. (Fig. 7)
10. Repeat for the
second black
Main Pole.
(Fig. 8)
Fig. 7
Fig. 8
Before you begin
Read all instructions before set up.
• Select a level site clear of rocks, branches, and other hard or
sharp objects, to install your Beach Shade.
WARNING: Keep clear of overhead power lines.
Do not set up your Beach Shade under trees because of potential
lightning strikes or falling tree limbs in inclement weather.
• Secure with all stakes and guylines provided to prevent
property damage or personal injury.
For best results in windy conditions, position narrow end of
Beach Shade into the wind.
Enlist the help of at least one other person to assist you when
it is time to assemble the Beach Shade.
Pole Descriptions
Pole Pole Pole
Description Qty. Dia. Repair Kit Replacement Kit
Main Poles, black 2 8.5mm 5010000541 5010000547
Crossover Pole, grey 1 9.5mm 5010000540 5010000548
3. Assemble both Main (black) Poles and the Crossover (grey)
Pole by interlocking shock-corded sections.
4. Insert the black Main Poles through the pole sleeve running
from the front to the back. (Fig. 3)
5. Insert the grey Crossover Pole through the pole sleeve
running side to side. (Fig. 3)
Fig. 3
Black Poles
Grey Pole
Front of the Beach Shade
Question and Answer IconNeed help?

Do you have a question about the Coleman BEACH SHADE 2000002120 and is the answer not in the manual?

Coleman BEACH SHADE 2000002120 Specifications

General IconGeneral
BrandColeman
ModelBEACH SHADE 2000002120
CategoryTent
LanguageEnglish

Summary

Setting Up the Beach Shade

Unfold and Prepare Shade

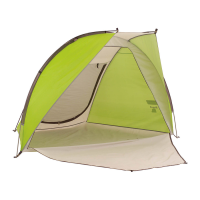
Unfold the Beach Shade on a clean surface with the door facing the desired direction and unzip the door.

Stake Down Corners

Stake down the shade corners using the outside grommets on the web straps to keep the floor taut.

Assemble Poles

Assemble main black poles and grey crossover pole by interlocking shock-corded sections.

Insert Main Poles

Insert the black Main Poles through the pole sleeve running from the front to the back of the shade.

Insert Crossover Pole

Insert the grey Crossover Pole through the pole sleeve running side to side across the shade.

Setting Up Beach Shelter

Attach Crossover Pole to Front

Insert one end of the grey Crossover Pole into the grommet on the web strap on either side of the front door.

Form Arch with Crossover Pole

Apply pressure to the grey pole to form an arch, inserting the tip into the grommet on the web strap.

Insert Main Pole into Back Grommet

Insert the black Main Pole tip into the grommet on the web strap located at the back of the Beach Shade.

Attach Main Pole to Front Grommet

From the front, pull the black Main Pole down to insert its end into the grommet above the door opening.

Attach Second Main Pole

Repeat the previous step for the second black Main Pole to secure it.

Attach Guy Lines to Front

Attach guy lines to the front of the Beach Shade by inserting them through the webbing between the grommet and shade material.

Extend and Secure Guy Lines

Extend guy lines out until taut, then secure them with stakes for stability.

Rear Vent Flap Operation

Operate Rear Vent for Ventilation

Unzip the inside flap to expose the mesh screen for ventilation, then roll the flap up and secure.

Open Rear Vent for Access

Undo the outer zipper on the rear vent flap, roll it up, and secure for ventilation or additional access.

Securing Beach Shade in Sand

Prepare Sand Bags

Fill the six sand bags with sand or small rocks for anchoring the shelter.

Anchor Shade with Sand Bags

Insert sand bag toggles into stake loops, bury the bags, and tie guy lines to them for secure anchoring.

Storing the Beach Shade

Prepare for Storage

Place all poles and stakes in the storage bag. Ensure the shade is clean and dry before storage.

Pack for Storage

Fold the Beach Shade to the width of the pole bag, place bag on shade, roll tightly, and place in carry case.

Important Usage Information

Condensation Management

Condensation inside the shelter is normal; minimize it by ensuring good ventilation and removing wet items.

Shelter Fabric Care

Avoid tree sap, bird droppings, or moisture drips, as they can damage fabric coating and cause leaks.

Storage and Pole Care

Always dry and clean the shelter before storing. Do not telescope poles together for storage.

Sunlight Exposure Warning

Avoid prolonged setup as UV rays can damage material and cause discoloration.

Flame Resistance

This tent meets flammability requirements; fabric may burn if in continuous contact with flame sources.

Related product manuals